Here is your weekly update from GreeNaval Yachts in the Antalya Free Zone on the building of our new all aluminium 24m eXtreme Passage Maker or XPM78 Möbius. June is here and the heat is on not only with regard to progress on Möbius but with the weather as well and we are now seeing temps in the low to mid 30’s most days. Usually a nice breeze and they filled and opened the pool at our apartment last week so it is all working out very well.
Similar to watching a new home or building going up there are times when the progress is very visually obvious and other time when you have to look harder to see what’s new and this week has been the later to some extent. As you’ll see in the photos to follow and the video at the end, the focus this week has been on putting in the frames, stringers and other components of the overall framework for the hull. In the mid section of the hull this involved putting in the additional baffles, stringers and margin plates around the tanks which you saw going in last week and then assembling the frames at the aft end for the Engine Room ER and Workshop.
I hope the style I’ve been using of letting the photos do most of the talking along with a bit of text is working well for you and I’d be MOST appreciative if you’d let me know how well this is working or NOT working for you by adding your comments at the bottom. I can’t promise I can accommodate all requests but I do promise to do my best to bring you along for the ride on this latest adventure of ours and what you can do to help is give me good honest feedback as to what works, what doesn’t, what to add, what to leave out, etc. Any and all suggestions welcome and I’ll so my best to follow up on as many as possible.
We’ll start wtih one quick shot of where the bow is at progress wise. The bow didn’t see much action this week but you can see it has taken shape nicely and that Frame #1 is now awaiting installation. This Frame is solid and will be fully welded al around to the hull and deck to form a fully self contained “crash bulkhead”, a term I always hesitate typing, in the extremely unlikely but always possible scenario of hitting something with the bow that was big enough and hard enough to puncture the super thick plating up there. Yet another item on the SWAN list of things which help us Sleep Well At Night.
Between Frame #1 and 4 is the very voluminous Forepeak area which will contain things like the big anchor chain bin, grey and black water tanks, VacuFlush holding tank/pump for the Main Cabin head, miscellaneous other pumps and most of our lines, fenders, inflatable kayak and other items we will store up here.
I’ve mentioned previously how we have utilised an “empty ends” design to make the boat long on the WL or water line for maximum hull speed and efficiency and yet just right sized inside for eXtremely comfortable and spacious accommodations for Christine and I and our infrequent guests. The 4m/13ft at the bow (1m crash bulkhead + 3m Forepeak) is the forward “empty end” and then moving aft as you can see here, the 5.5m/18ft long workshop and engine room plus the 1.2m/4ft swim platform creates a 6.7m/22ft aft “empty end”. Together, these two “empty ends” take up 10.7m/35ft of the overall hull length and give us 13.3m/43.6ft for living space. This empty end design gives us the perfect the Goldilocks combination of an eXtremely efficient long hull as well as the “just right for us” amount of living space.
Uğur and Umit welded up this new head for the big hydraulic press and spent most of the first few days this week very careful bending the 12mm plate for what are technically known as “margin plates” which in our case are where the tank top level joins up with the hull plates.
I’ve flipped the 3D model upside down and taken this screen snip so you can see where these margin plates are and why they are bent. Click to enlarge and you will see that these margin plates need to be bent in order to intersect and be welded to the hull plates perpendicularly. Because almost every part of the hull below the WL is tankage we essentially have no bilge on Möbius and so these margin plates have the added benefit of becoming nice little “gutters” running down both sides of the hull to make it easy to quickly vacuum up any water or bits of debris that might find their way down to tank top level (purple in the snip). A clean ship is a safe ship and with aluminium in particular we want to make sure to keep everything is ship shape in this regard so these margin strip gutters make this much easier.
Here are some of the margin plates all bent to just the right angle and waiting to be tacked into place and then fully welded up as the hull assembly proceeds.
Many of the margin plates form part of the tank tops and have additional stiffeners and baffles welded onto them and you can see one such margin plate all cleaned up where these will soon be welded on.
as Umit and Enver are doing here.
and now Sezgin can fully weld this margin plate up.
Once welded up they move over to Muammer’s clean up table where he uses various size wire wheels and rotary burr grinders to clean up all the welds.
This cleanup is perhaps one of the most thankless yet important jobs in the build of an aluminium hull and you can begin to imagine how many kilometers of weld poor Muammer has to clean. However he is meticulous about his work and always has one of the most sincere smiles and gentle demeanor of the entire team.
Next up, the margin plates are carefully fitted in place, tacked and then welded to the frames on each end.
O Framing in the aft end of the hull is where the most visible progress was made this week and these are some of the tops/bottoms of the aft frames being prepped for the 12mm flat bar stiffeners you can see here being bent to shape.
The large radius you see on these Frames #21 & 22 are where the prop tunnel plates will be welded.
Frame #20 was the first to receive its bottom portion which has now been tacked in place. The hole at the top is where the prop shaft log tube will slide through and be welded in place later.
And now those parts we saw earlier have been tacked in place for the aft two Frames #21 & 22.
This quick screen snip will hopefully help your AI Augmented Imagination visualise where how the prop tunnel fits into the hull. This area of the hull will be eXtremely strong when all that robust framework is covered with all that green 12mm and purple 10mm hull plating is welded in.
You can also see why we sometimes refer to this as a “sailor’s motorboat” hull with the way the stern tucks in so much as it moves aft on the waterline and create this eXtremely efficient very slender hull which helps the wake release easily and create minimal wake as we cruise around the world.
The all important Engine Room or ER is also located in this aft are of the boat making this not quite such an “empty” end and we need an even more eXtreme bit of plating to create the beds where the monstrous Mr. G, our Gardner 6LXB engine and the Nogva CPP servo gearbox will mount. For that we are using 25mm/1” thick plate and this is one half of the lengthwise running engine beds.
My trusty thumb provides some relative reference.
And I must add, how can you not LOVE the look of unpainted aluminium??!! Moving over to the other half of each engine bed we find this slab of 25mm AL which has its forward end tapered down where it will butt up against and be welded to the vertical bulkhead forming the front wall of the ER and Workshop More on why in a moment.
Each bed is fabricated from two lengths of 25mm plate welded perpendicular to each other to create both an eXtremely strong solid bed for the Gardner and CPP gearbox mounts as well as to provide as much mass as possible so as to reduce vibration and noise transfer into the hull. By tapering the transition where the massive beds attach to the bulkhead the transfer of the absorbed vibrations is reduced even further. Yet another example of the level of detail which Dennis has built into the design of our hull. As you are seeing our choice of calling this the eXtreme eXploration Passage Maker XPM style is quite literally true not Wayne’s hyperbole!
Here are the fabricated beds lifted in place and being lined up with the respective frames. You can see how the aft end is also thinned down where it attaches to the frame to further reduce the transfer of any vibration and noise from the Gardner and the CPP gearbox when we are underway.
Adding yet more strength and stiffness to this area of the hull, the sides of these engine beds are further reinforced with the inner walls of the two big 1500L water tanks which you see Enver and Umit fitting into place here.
Soon looking like this when viewed from the other side.
Moving forward to about midships, you can see how the equally beefy framing for the future active stabilisers has been tacked in place. We don’t think we will ever install these as we are going with passive paravane stabilisers instead we think it is smart to “future proof” the boat wherever we can and so building this in now is much smarter, faster and cheaper than trying to retrofit years from now for us or a future owner several decades from now.
Evidence of Sezgin’s non stop welding keep showing up everywhere. Here he has completed the welds in these top mitred corners and flat bars of the frames.
More evidence of Sezgin’s craftsmanship when you notice all these kilometers of weld he has added to all the baffles and stringer joints. .
It’s no wonder Sezgin is such a masterful welder when you start to imagine what his lifetime length of welds would add up to! He has many many years of welding up ships and we could not be more delighted to have him applying all that mastery to Möbius.
Stepping back to give you a shot from the stern at the end of this week so you can see how the hull continues to come into view and makes the transition from the virtual 3D model to an eXtremely real hull.
and here is your reward for making it through another week with us, a sped up video compilation of the week.
Hope you enjoy and we’d love to hear your reactions, comments, questions and suggestions so don’t be shy about going to the VERY bottom of this post and type in the “Join the Discussion!” box.
Lest you should think from my previous posts that the only thing being built here in the Antalya Free Zone (AFZ) are Mega Yachts and Super Yachts, thought you would enjoy seeing a recent visitor here.
This little fella was anchored outside the entrance to the AFZ for a few days earlier this week and we had a bird’s eye view out the windows of our 9th story apartment a few blocks away.
She was particularly striking at night when she was lit up like a Xmas tree. My zoomed in blurry shot from several miles away doesn’t do her visual light show justice so you’ll have to use your own AI (Augmented Imagination) to get the full effect.
She soon moved into the AFZ harbour and with the vehicle and people in the foreground you can see that she really is Super Sized!
One of many such drilling rig ships in the Turkish Petroleum company’s fleet.
While I was at the harbour taking these photos I thought you would also enjoy seeing the way they move the Super Yachts in and out of the water. You’ll recall seeing mv Lady Jade from the previous post “Another Day at the Office” when she went by riding on the big yellow transport trailer and here she is in the water. Look closer (click to enlarge) and you will see that white trailer you see on the right is on rails to slide down the ramp into and out of the water.
Here is a bit closer full view of the rail mounted trailer. It is all hydraulic and each of those pads you see along the trailer are big independent hydraulic rams to fit up under any hull and support these super sized yachts.
If you click to enlarge this photo you can check out some of the other boats in the background which have been built here in the AFZ and get a sense of the diversity of boat building that goes on here. Walking further up the launching rail ramp you can now see what I wasn’t able to show you in the previous posting about how they transfer ships from the yellow road based trailer to the rail one. Yellow is the road version as you can see by its many tires and then the white rail based trailer behind it.
Can’t wait to be showing you Möbius coming out of the GreeNaval shipyard and going into the water for the first time and that could be as soon as late next year.
Now you can understand a bit better why we are building Möbius here and why we say everything is “SUPER” in the Antalya Free Zone.
For the second week in a row it was all about tanks this week as Team Möbius continues to make fabulous progress building the hull for mv Möbius. Last week saw most of the tanks being built as sub assemblies and this week these were all lifted into position atop the hull frames in the jig and then connected up with the side legs of each frame being tacked into position. There is a LOT to show you and this will be a long post so get comfy with the beverage of your choice and let’s get to it.
I will let the pictures I took throughout the week do most of the talking and then have a sped up video at the end with a compilation of the video clips I shot to give you a bit more perspective on this week’s progress.
Picking up where we left off last week, the tanks are being built as sub assemblies and here Uğur and Enver are turning one of the last ones over.
Like this to finish welding the next set of baffles onto this tank. You can see other tank assemblies in the background ready to be lifted in place onto to the framework that has been assembled on the jig.
Here is one of the tanks ready to be lifted in place and slid into the space between two of the bulkheads that have been erected on the jig. These two bulkheads will form the ends of this tank. Each of these sub assemblies are actually two independent tanks as they are divided the Keel bar and baffle running down the centerline of the hull.
This overhead shot shows the close baffling of each tank and you can also see how these line up with the slots cut into each transverse frame for the longitudinal stringers and the large 25mm thick keel bar. Once the tanks are lifted in place on top of the hull (remember being built upside down) all the long length stringers and keel bar will be slid in place to line everything up just right.
This is a shot of what will become the tops of the tanks or the floor inside the boat. An aluminium plate will be welded on top to form the tops of the tanks and the 8mm flat bars you see running vertically and the one middle horizontal bar are to allow the tank top to be welded on. If I told you that the tank tops are welded on last, after the hull plates have been welded to all these baffles, frames and stringers, you might wonder how they can weld the tank tops to these bars? That is dong using a method called “plug welding” where the tank top plate will have a series of slots which line up along the centerline of these flat bars so they put the tank tops on top and then weld through the slots and then grind the welds off flush to finish off the floor.
Tanks all tacked up and waiting to be lifted in place. Meanwhile, Uğur has started to tack some of the side frames in place which will form the framework for the superstructure above the decks. This is part of Frame #12 which is where the side decks run alongside the row of large glass windows down the sides of the SuperSalon. Uğur’s hand is where the side deck will run.
Moving to the opposite side and looking a bit further forward, more frames being assembled and tacked in place.
Here you can see a whole row of them as we look aft from Bulkhead/Frame #9. The plate you can see in the top of the photo is what will be the floor of the SuperSalon and the basement/storage area that is in the space now above this.
Peeking in we can watch Uğur put the framing in place for the side deck plates up near the front of the pilot house or Super Salon
You can see how the stringers we’ve been talking about so much slot into place and interlock with the frames so everything lines up just right. and now one piece of the side decking is tacked in place
Stepping back this shot looking forward shows that same deck plate and how it will soon have a mate aft of it. With all the plates for the tanks and baffles out of the way the bottom of the pile of AL plate reveals the two 25mm plates which is mostly used for the keel bar running the length of the hull as well as parts like the engine beds where we want these eXtremely thick plates for their sound deadening mass and strength.
You can see how they have cut the first length of the keel bar out and have cleaned off areas where it will be welded to frames that slot around it
This will give you a sense of the thickness of these keel bars.
Here are two keel bars stacked on top of each other wtih their ends ground off at 45 degrees on bot sides to create the deep groove needed for full penetration of the welds that will join them once they are positioned just right atop the hull.
Meanwhile, our Master Welder Sezgin is kept VERY busy welding up the miles of stringers and frames that have now been put into their final positions on the deck plates.
Here is a before ……………….. … and now an after shot of some of his handiwork all these staggered welds along each stringer where it joins the deck plate.
Can you guess what it means when these guys show up??
That’s right, time for the praying Mantis crane truck to show up!
Be sure to watch him in action in the video and I’ll show a series of shots now with the tanks being lifted and dropped in place on the hull
Doesn’t take long to lower the first one in place and the second one is lifted up …..
and dropped into place.
The ever watchful eye of Enver (center) making sure everything is just right while Uğur lines up the laser level and Umit is up on top directing the crane operator. This section of tank was too long to be tacked up as one assembly so they dropped the first half in place and welded in some vertical supports to hold it while the second have is lifted in place.
Like this.
One more for today, our eXtreme crane has the forward half of the water tanks lifted in place
Umit, one of our other welders helps to pull it down onto the flatbar you can see behind him which was previously welded to the bulkhead as per the lines etched on it for the just right position.
This forward tank section under our Main Cabin is suspended in place temporarily with some vertical supports they are tacking on here.
The crane retracts it’s eXtreme arm for one last job while he is here today …… ……. lifting those big 6 meter / 20 ft lengths of 25mm keel bars into place atop the bottom so to speak.
Now you can see what those big slots in the frame bottoms are for.
Right now these planks of aluminium are just being set atop the frames and once all the frames are up it will be used to precisely locate each frame in just the right spot.
What do you think? Strong enough to keep us safe and help us SWAN (Sleep Well At Night)?
Our previous boat Learnativity was all steel and she taught us the value of having a rock solid bottom. For Möbius we wanted this hull to be another 2X stronger.
This plating is many many times greater than required for even the most stringent CE-A or MCA O certification but this eXtreme plating and construction is a big part of providing the mandatory confidence we think you have to have in your boat when you are going to be crossing oceans in all kinds of conditions and for the inevitable run ins with hard bits such as ice and rock from time to time. Dennis has carefully calculated all this mass of these much overbuilt frames and plating into the design characteristics to give us weight in the right places and plays its role in making Möbius a self righting boat which makes us feel VERY good.
With the the tanks and bulkheads all temporarily tacked in position, the frames can now be completed by adding in their side pieces. Here you can see that the aft frames have their sides tacked in place and the one in the foreground will have its side tacked in next.
Uğur holds the side frame component in position while Umit tacks it in place.
Enver tacks one more in place The joints between frame pieces are positioned in the best location for strength and have their surfaces extended as you can see in the closeup here to create a weld that is stronger than the adjacent aluminium.
The pieces for all the frames for the aft deck area are laid out in preparation for their turn in the assembly process.
and in not time at all these are all soon stood up and tacked in place.
You can see how the flat bar overlaps each joint for added strength.
These overhead shots provide a sense of how the hull is really taking on her shape now.
and Sezgin keeps welding and welding and welding……….
Here you can see how the baffles connect up to the stringers and you can get an appreciation that it is not an exaggeration to say that there are miles of welding required to complete the hull.
Now you get a good sense of how the massive keel bar creates a literal backbone to the hull and when the frames and baffles are all welded in place it creates an extremely rigid grid for the hull plates to be welded to and makes for one of the toughest hulls of any ship you will ever see.
Just imagine how strong this hull will be when the 12 and 15mm plate is welded to this grid of tanks!
Whew! What a week! What a crew! What a boat!
Just another week for Team Möbius here at GreeNaval Yachts in Antalya.
Here is your weekly summary video synopsis that distills the whole week down to a few minutes. Fun for you to watch and you’ll get a good sense of the progression of this construction technique.
Thanks for coming aboard this adventure with us, wouldn’t be the same without you. And don’t be shy about adding your questions and ideas in the comments section below.
One of the many great things about my office at GreeNaval Yachts is that I spend every day sitting in the middle of the Antalya Free Zone which is a collection of some of the world’s largest and most renown shipyards for super yachts. Every day driving to and from my office I see the most interesting things happening within the various shipyards depending on when they have their doors open to see inside or when jobs/ships are moving in and out. There is also a huge launching facility for taking these ships in and out of the water which adds to the fun.
I have my head down most of the day but try to look up as often as I can as I’ve learned that you never know what you will see going by outside. Thought you might enjoy what I saw when I looked up yesterday ………….
That is Lady Jade, originally built in Brazil and then brought up here for a major renovation which included being cut in half and lengthened 10 meters. The work is mostly finished and so she is leaving the shipyard and heading for the launch ramp where they will complete the work in the water and take her out for some sea trials before turning her over to her owner.
Just another day at the office here at Naval Yachts in the Antalya Free Zone!

 We’ll start wtih one quick shot of where the bow is at progress wise. The bow didn’t see much action this week but you can see it has taken shape nicely and that Frame #1 is now awaiting installation. This Frame is solid and will be fully welded al around to the hull and deck to form a fully self contained “crash bulkhead”, a term I always hesitate typing, in the extremely unlikely but always possible scenario of hitting something with the bow that was big enough and hard enough to puncture the super thick plating up there. Yet another item on the SWAN list of things which help us Sleep Well At Night.
 I’ve mentioned previously how we have utilised an “empty ends” design to make the boat long on the WL or water line for maximum hull speed and efficiency and yet just right sized inside for eXtremely comfortable and spacious accommodations for Christine and I and our infrequent guests. The 4m/13ft at the bow (1m crash bulkhead + 3m Forepeak) is the forward “empty end” and then moving aft as you can see here, the 5.5m/18ft long workshop and engine room plus the 1.2m/4ft swim platform creates a 6.7m/22ft aft “empty end”.
  Uğur and Umit welded up this new head for the big hydraulic press and spent most of the first few days this week very careful bending the 12mm plate for what are technically known as “margin plates” which in our case are where the tank top level joins up with the hull plates.
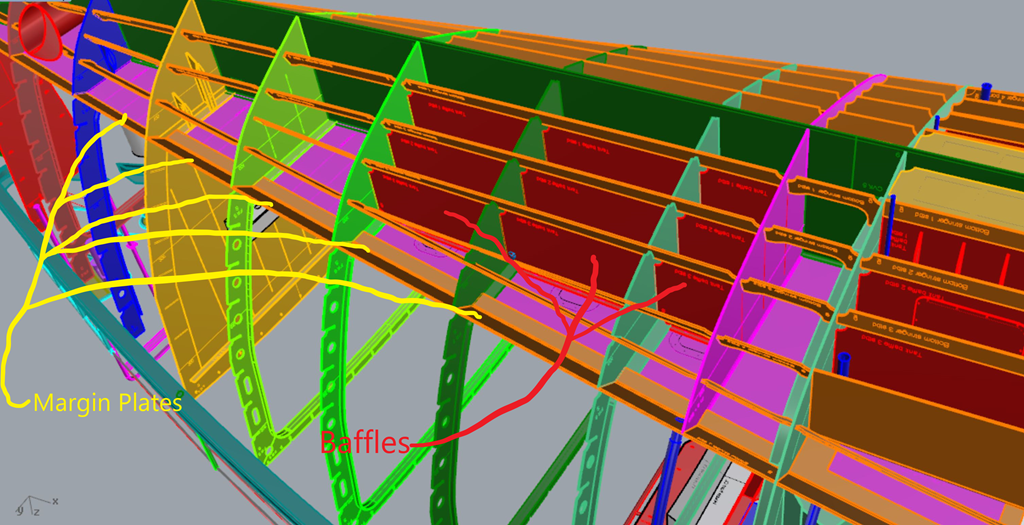 I’ve flipped the 3D model upside down and taken this screen snip so you can see where these margin plates are and why they are bent. Click to enlarge and you will see that these margin plates need to be bent in order to intersect and be welded to the hull plates perpendicularly. Because almost every part of the hull below the WL is tankage we essentially have no bilge on Möbius and so these margin plates have the added benefit of becoming nice little “gutters” running down both sides of the hull to make it easy to quickly vacuum up any water or bits of debris that might find their way down to tank top level (purple in the snip). A clean ship is a safe ship and with aluminium in particular we want to make sure to keep everything is ship shape in this regard so these margin strip gutters make this much easier.
 Here are some of the margin plates all bent to just the right angle and waiting to be tacked into place and then fully welded up as the hull assembly proceeds.
 Many of the margin plates form part of the tank tops and have additional stiffeners and baffles welded onto them and you can see one such margin plate all cleaned up where these will soon be welded on.
 as Umit and Enver are doing here.
 and now Sezgin can fully weld this margin plate up.
 Once welded up they move over to Muammer’s clean up table where he uses various size wire wheels and rotary burr grinders to clean up all the welds.
  Next up, the margin plates are carefully fitted in place, tacked and then welded to the frames on each end.
 Framing in the aft end of the hull is where the most visible progress was made this week and these are some of the tops/bottoms of the aft frames being prepped for the 12mm flat bar stiffeners you can see here being bent to shape.
  Frame #20 was the first to receive its bottom portion which has now been tacked in place. The hole at the top is where the prop shaft log tube will slide through and be welded in place later.
 And now those parts we saw earlier have been tacked in place for the aft two Frames #21 & 22.
  This quick screen snip will hopefully help your AI Augmented Imagination visualise where how the prop tunnel fits into the hull. This area of the hull will be eXtremely strong when all that robust framework is covered with all that green 12mm and purple 10mm hull plating is welded in.
 The all important Engine Room or ER is also located in this aft are of the boat making this not quite such an “empty” end and we need an even more eXtreme bit of plating to create the beds where the monstrous Mr. G, our Gardner 6LXB engine and the Nogva CPP servo gearbox will mount. For that we are using 25mm/1” thick plate and this is one half of the lengthwise running engine beds.
 Moving over to the other half of each engine bed we find this slab of 25mm AL which has its forward end tapered down where it will butt up against and be welded to the vertical bulkhead forming the front wall of the ER and Workshop More on why in a moment.
 Each bed is fabricated from two lengths of 25mm plate welded perpendicular to each other to create both an eXtremely strong solid bed for the Gardner and CPP gearbox mounts as well as to provide as much mass as possible so as to reduce vibration and noise transfer into the hull. By tapering the transition where the massive beds attach to the bulkhead the transfer of the absorbed vibrations is reduced even further.
  Here are the fabricated beds lifted in place and being lined up with the respective frames. You can see how the aft end is also thinned down where it attaches to the frame to further reduce the transfer of any vibration and noise from the Gardner and the CPP gearbox when we are underway.
 Adding yet more strength and stiffness to this area of the hull, the sides of these engine beds are further reinforced with the inner walls of the two big 1500L water tanks which you see Enver and Umit fitting into place here.
  Soon looking like this when viewed from the other side.
 Moving forward to about midships, you can see how the equally beefy framing for the future active stabilisers has been tacked in place. We don’t think we will ever install these as we are going with passive paravane stabilisers instead we think it is smart to “future proof” the boat wherever we can and so building this in now is much smarter, faster and cheaper than trying to retrofit years from now for us or a future owner several decades from now.
 Evidence of Sezgin’s non stop welding keep showing up everywhere. Here he has completed the welds in these top mitred corners and flat bars of the frames.
 It’s no wonder Sezgin is such a masterful welder when you start to imagine what his lifetime length of welds would add up to! He has many many years of welding up ships and we could not be more delighted to have him applying all that mastery to Möbius.
 Stepping back to give you a shot from the stern at the end of this week so you can see how the hull continues to come into view and makes the transition from the virtual 3D model to an eXtremely real hull.


Recent Comments