Thanks for your patience in waiting two weeks since the last post “Aluminium Surgery with Dr. Wayne” and do my best to get back to weekly updates now.
But I do have a pretty good excuse for taking last Sunday off to celebrate of our tenth anniversary.
Our anniversary is actually on August 4th but had to be postponed when Christine was back in Florida getting in some long awaited Gramma time with our grandson Liam and her friends and family in the Fort Lauderdale area.
We prefer experiences rather than “things” for gifts so we took the opportunity to explore this beautiful area of southeastern Oregon and drove over to Crater Lake National Park for a picnic lunch. It is about 75 very scenic miles away and truly a natural wonder that we can now recommend highly.
Crater Lake! Crater Lake was originally formed when Mount Mazama erupted about 7,700 years ago creating a 1.2km/.7mile deep caldera, After several hundred years of rain and snow it is now filled with water to create the deepest lake in the US and one of the ten deepest lakes in the world. Due to the depth and clarity of the water it is also a spectacular blue colour that these photos really don’t do justice to. So we HIGHLY recommend you go see it for yourself.
I left off the last update having cut down and welded in customized externally accessible storage compartments and so the interior of Lance’s “Happytat” (my play on words for habitat which is what the box or module of an ambulance is called) was completely empty and down to just the bare 50mm/2 inch square aluminium frames and 3.5mm / 0.138” thick outer skin.
Now it was time to for the next modification; putting in the new aluminium framing for the three windows we are going to be installing. The only windows in the original ambo habitat were the relatively small ones in the three doors; the two rear and one Passenger Side entry doors. In order to transform this into a Happytat we are going to be adding three more much larger windows in the sides. One large window on the DS Drivers Side that will be above the large Galley/Kitchen countertop. And then on the PS Passenger side, one smaller one above the opposite Galley countertop where the induction cooktop will be and then a larger window aft of that above the side Settee seat. Removing the outer AL skin from the DS this is what the original 50mm AL framing (Green) looked like. I need to cut out some of that and add in new AL framing (Black) for the window. Similarly on the PS Passenger side, this original framing (Green) …… ….. needs to be cut away and new (Black) framing added in to surround and support both windows here. I started on the DS Drivers Side and used my laser level to help layout the position of the new window framing that needs to go in here. After checking and rechecking these measurements with the 3D model it was relatively easy to use the green laser lines to mark out where the existing frames would need to be cut.
I set the aluminium cutting blade in my circular saw to be just a hair more than 50mm/2” and then carefully cut along each line to sever the AL frame. The thick outer AL skin is attached to these frames using VHB Very High Bond tape which definitely lived up to its name and so even after they were fully cut through it still took a good bit of force to peel the frames away from the skin.
I found that a pipe wrench and lots of elbow grease worked well to get them out. This also provided yet another example of the tremendous high quality of the build that Horton Emergency Vehicles provides; even these AL frames are all filled with closed cell spray in foam insulation. With the frames removed I was then able to sharpen up the scraper blade on my trusty Fein Multitool and remove the very recalcitrant VHB tape.
I was able to reuse most of the 2” AL framing I cut out but for the longer sections of the new window frames I had ordered new 2” square AL tubing cut them all to length using my cut off saw, also now fitted with a AL cutting carbide saw blade. One of the many reasons why aluminium is one of my all time favorite materials is just how easy it is to work with. Here is the new framing all in place for the large DS window.
Repeating the same process to cut the existing frames for the new PS Passenger Side window frames. remove the old and …..
…. fit in the new framing.
Up on the front wall there is a small window pass through into the Kenworth Cab and we want to change this to a much larger walk through so it also needed new framing. Cut out the full height vertical frame on the Left side and moved it over to be wide enough for the new walk through and then added a new horizonal frame for the top of what will be the walkthrough door.
To install the new framing, I followed Horton’s lead and applied 3M VHB tape to the inside faces of each new frame member, rolled them on with lots of pressure using the greenish roller you can see in the background, peeled away the red plastic on the exposed side and then pressed this into place on the freshly cleaned AL skin surfaces. I did not want to weld the fame joints as the heat would have warped the outer skin so at each corner joint I used pieces of thick AL L-bar and tapped and threaded them to the frames after buttering these surfaces with JB Weld metal epoxy which have nothing but great experiences with in permanently joining metal components. Here is the end result of the framing for the two windows on the Passenger Side.
New Double Paned GLASS windows!
We tend to have a bit of a “thing” for having lots of natural light and great views from wherever we are living
Such as as you can see here in this stretched panoramic shot of the Super Salon on our last building project and home, the good ship Mobiüs. And the great room in our cabin on Saturna Island.
These past experiences also taught us the value of investing in top quality glass double paned windows and so we went shopping for the Goldilocks just right, just for us windows for our newest home; Lance. This turned out to be quite challenging as all the ones we could find were either single paned glass or double paned acrylic. Single paned glass would have been a very big heat loss and acrylic will scratch and craze over time and we knew either would just not work for us.
The key features for us are that the frames are molded GRP (fiberglass) so there is minimal thermal transfer from outside to inside and have no mechanical fasteners to the walls, they are mounted using industrial adhesive. The glass is double paned tempered certified safety glass with stainless steel hinging hardware that allows the windows to open a full 90 degrees for maximum open views. Each window also has fully retracting bug screens and black out shades that roll up/down into rollers on the top and bottom of the interior frames. And the fit and finish is top notch, so after talking with the manufacturer, we were sold.
They aren’t cheap and are made in the UK so it would take over two months to ship them here but with no other viable choices we could find we went ahead and placed the fully paid for order and waited. The Monsoon model windows have a lip or peak along the top edge which helps deflect water away from the glass. Our US based contact, Dave Anderson at Globe Trekker was outstanding to work with and was able to get the windows built and delivered to us in about six weeks. They arrived very securely packed in a wood crate with custom foam packing on all corners and in between each unit. It worked out just perfect for us to have them shipped to Globe Trekker in Portland and we stopped by on our last trip down from Saturna Island and brought them to our workshop here in Klamath Falls. You may recall seeing this photo at the end of the previous blog post as a teaser and clue as to what was about to happen. YIKES!!!!!
It was certainly a bit scary and I did a lot of measure ten times, cut once, before drilling this first hole through the skin to locate the bottom Left corner of the big window cutout on the Drivers Side. Too late to turn back now and so continuing with the scary theme, I picked up my circular saw and started the first cut through that thick AL skin. Fortunately it all worked out very well. Cutting from the inside made it much easier to ensure I was cutting parallel to the new AL framing and I soon had this big piece of the AL skin hanging by the top right corner ready to remove.
I still marvel at the thickness of the AL skin on this ambo Happytat! Repeating the same process to cut out the AL skin for the two PS windows. I filed the edges all straight and smooth to remove any sharp edges and all three window openings were ready and waiting or their new lease on life. As with many such jobs it all depends on the prep work which also takes most of the time but it paid off,
… as all the windows all fit in snug to their respective cut outs. The inner GRP frames extend about 100mm / 4” from the outer wall surfaces and will be cut to size to fit the inner frames after I have the interior walls fully insulated. I used lengths of stiff thick aluminium extrusions to clamp the window frames into the walls and ensure that the mounting surfaces were all tight. With each window dry fitted, plumb and secured I carefully masked around the outer perimeter of each frame to create a sharp straight edge where the white adhesive would soon be. Wherever possible we are using marine grade products and hence my choice to go with 3M 4000 UV Fast Cure adhesive sealant to bond the GRP window frames to the exterior AL walls. The inner surfaces of the GRP frames were quite rough which helps ensure very good adhesion so also required a good amount of the 4000 adhesive. Proof is always in the amount of squeeze out which turned out just right with enough to create a nice concave bead I formed with a plastic squeegee and my finger. The lengths of AL extrusions and clamps provided plenty of pressure to pull the GRP frames snug against the outer walls. Just right amount of squeeze out on the inside as well. These windows are definitely not going to leak and also NOT ever coming out! Very happy with the end result and well worth all the $$ and time.
After curing overnight, the last step was to trim the inner GRP frames where the AL frame of the blinds/screens will fit. My new favorite Milwaukee tool is this 12V mini saw. I have been using this throughout the build to cut both aluminium with a carbide tipped 3” saw blade or in this case with a 3” abrasive wheel. Used a piece of extruded aluminium for a straight edge and cut each frame to finished depth. All three new windows are now fully installed!
As you might notice, I have also been busy installing all the PolyIso insulation and I’ll focus on that in next week’s post.
Till then, my sincere thanks for coming along on this latest adventure in Wayne’s World and please add your comments and questions in the “Join the Discussion” box below. They add much value to these blog posts and are MUCH appreciated by yours truly.
When we left off in last week’s “Constructive Deconstruction” update the interior of Lance’s box or what is often referred to as the Habitat, had been stripped pretty much naked after I had removed all the cabinetry, equipment and wiring of the original Horton ambulance. It was now down to quite literally just the “skin and bones” of the original box.
Time to switch from deconstruction to surgery!
It was quite amazing for me to discover that there was literally not a toothpick worth of wood in the entire Horton build. As you saw in the previous post, all the cabinetry was made from extruded aluminium framing and sheets of 13mm / 1/2” thick ACM (Aluminium Composite Material).
And all of the box itself was built entirely from 50 mm / 2” square tubing.
Which is “skinned” or covered with sheets of Xtremely thick 3.5mm / 0.138” thick AL plate. (think very thick HD cardboard box or car window glass)
I also discovered that there are no seams other than at the four outer corners of the box. All the side walls and roof are made from a single continuous sheet of thick aluminium which makes for a very beautiful box and NO leaks! Another intriguing discovery I made was that this thick outer skin is not welded or riveted anywhere! Instead the skin is glued onto the frames using thick VHB (Very High Bond) adhesive tape. This way there is no direct contact between the aluminium skin and the frames which eliminates any chance of corrosion and provides a bit of a thermal break between the skin and the frames. For example, if you look closely (click to expand any photo) you’ll see that there are no welds between the wall sheets and the frames. Note that the smaller pieces of aluminium L bar are welded to the frame but not to the outer skin.
This was also done to eliminate any warping of the huge continuous sheets of AL if they had been welded.
Redistributing External vs Internal Storage:
One of the great features that makes an ambulance such a great basis for building an eXtreme RV are all the externally accessible storage compartments located on both sides of the box.
There is one on each corner and on the drivers side there is a third one in the middle.
You can see these compartments a bit better perhaps here in this screen shot of the 3D model (facing drivers side) I created to accurately document the original.
However, as we designed the new interior living space, we realized that we needed to have a better balance between the volume of this externally accessible storage space and that on the inside.
If you compare these two renders you can see the external storage compartments have been re-sized. Clearly some reduX surgery is needed on all four corners.
Switching to Surgery
To get warmed up, I started with some minor surgery such as removing these ventilation fan covers. There were two of these on the drivers side and in our new layout these will both be covered by interior cabinetry and the lift bed and we’ll be putting in new ventilation and air conditioning.
If you refer to the 3D model shots above you can see that the passenger rear corner compartment is going to be cut down the most as this is where the corner of the L-shaped settee will be.
My circular saw with a carbide tipped aluminium cutting blade quickly cut out the upper portion.
And it was soon on its way to the growing collection of diamond plate aluminium that will be reused to build new compartments.
The compartment on the opposite rear corner needed to be cut down in height and depth to allow the Queen bed to fit as it is raised and lowered.
Here is a look from the outside with some of my weapons of mass deconstruction in the bottom.
Moving on the drivers side front compartment, the section from the interior floor up to the ceiling will become the Head (toilet) so it needs to be cut down.
The remaining portion of this exterior compartment will closed in and house all the electrical system components.
Now for some Reconstructive Surgery
With the external compartments cut out I now started cutting the pieces needed to weld back in to close each compartment.
Here is the new top for the PS Rear compartment after being carefully cut, filed and clamped to fit precisely inside the remaining vertical walls creating a tight fit along each edge to be welded.
Then I could put in some tack welds to hold the new piece exactly square.
And then weld each edge. I’m teaching myself to TIG weld so my skills still have a LONG ways to go and the welds are not pretty but I think they will be plenty strong enough. I’ve done some destructive testing of many practice welds to see if the welds would break and am able to produce welds that don’t.
The new section on the DS Rear took a bit more time to fit and get just right.
Followed by the new horizontal plate and that new compartment was all welded.
Completing the Rear compartments.
The new vertical wall of the future Electric Cabinet on the DS Front corner was a bit more challenging as I needed to extend the height of the old part I cut out.
Worked out well in the end.
and it was ready to be fitted in place. Worked out very well as I was able to reuse those two vertical slot bars to mount the bit Victron MultiPlus inverter charger.
Along with the new floor plate and both were welded then fully welded in to finish off this new compartment.
The mid compartment on the DS does not have any exterior doors and so I just cut out the top and side and left the rest of this lovely diamond plate in place that will form the bottom of a large interior cupboard.
As you saw above I had welded in the new bottom section of the PS Rear compartment but I now needed to close in that large open upper section as will be a fully insulated interior wall in the new layout.
Another contribution from the diamond plate collection and I had this new piece fitted for its new lease on life.
Here is a look at the new version from the outside. This wall is a bit different than the other compartments as it had to be bolted in place rather than welded as it is right up against the painted aluminium frame and skin
With all these external compartments now all resized that should mark the end of the deconstruction phase and will be a wrap for this week folks.
I’m getting closer to catching you up to real time in the build and next week I’ll show you the process of fully insulating the walls and ceiling with PolyIso foam board. This will bring them up to about R-20 insulated value in the finished habitat or “Happytat” as one of my typos prompted me. Out work on renovating, building and living in our previous boats has taught us the multiple values of great insulation so we’re applying those lessons in this latest build.
Oh NO!!! What is he thinking???
As a teaser to keep you coming back for more, does this photo help you guess what I’ve been doing in the past few days?
It’s a new and exciting phase of the build that I can’t wait to show you in the next few weeks and something exciting to show Gramma Christine when she gets back home from Florida on Thursday night.
Till then I hope this is proving to be fun and interesting to read and I really appreciate your doing so.
It would be especially helpful to get any of your suggestions for changes and improvements. As you may have noticed I’ve been playing around with sizing of the photos and text so let me know what you find best in terms of spacing, layout, etc. Text on the sides or text below the photos? Level of detail; too much/too little and so on.
Thanks and hope to see you back here again next Sunday.
Sorry for the two week lag in getting this post published as Christine and I have been up at our little sanctuary on Saturna Island.
We were up there getting in some much needed and long anticipated Gramma and Grampa time with our Grand Daughters Brynn and Blair and their parents Lia and Brian who drove up from their place in the Los Angeles area.
A truly GRAND time was had by all, including Cotton their “blonde” Golden retriever and our ten days together zipped by in a blink as we explored most of Saturna and spent a day on neighboring Mayne Island.
Ending many nights with S’mores on the deck with our propane fire pit certainly helped!
Christine and I drove back down to our place here in Klamath Falls just in time for me to take Christine over to the Medford airport on Thursday to catch her flights over to the Fort Lauderdale area to now get even more Gramma time with our Grandson Liam and his parents Ashley and Tim.
Meanwhile, I am back at work on Lance, currently modifying the externally accessed aluminium cabinets to convert some of their volumes into internally accessible storage. Lots of cutting, grinding and welding as I teach myself how to TIG weld aluminium but I’ll leave all of that for another post and go back to catching up on all the work that had to happen first to fully remove all the existing ambulance cabinetry, equipment and electrical.
After a bit of deliberation and reviewing other ambulance to RV conversions in blogs, discussion forums and YouTube, we decided that it was going to be best for us to completely gut the ambulance “module” or box that was made by Horton Emergency Vehicles and take it down to its bare all aluminium (AL) frame. I covered part of this in the previous two posts HERE and HERE which shows most of the deconstruction and removal of the extensive interior cabinetry.
In this week’s post I’ll do my best to take you through the removal of the eXtremely extensive electrical system and wiring that Lance has/had. I will be reusing many of the electrical components and wires to power and control the new electrical systems I’ll be installing for things like heating, cooking, water, showers, pumps, etc. but for now it all needs to come out before the new construction can begin.
Here is a“Before” shot of what the interior looked like when we purchased Lance.
a few months later with almost all the cabinets and equipment removed it looked like this.
and a few weeks ago after even more hours of removing literally miles of wires it looked like this with the interior down to nothing but all aluminium framing and exterior “skin”. For those wondering, Horton sprayed the interior with sound insulation which is why it is all Black rather than the shiny silver of aluminium.
You can skip to the end if that’s enough of a summary for you but for those interested in a bit more of the process or removing all the wiring, here are a few of the steps along the way.
Modern ambulances are very complex units being close to a hospital on wheels and so they have a full compliment of equipment from oxygen supply, defibrillators, vacuum pumps, heated and refrigerated compartments for medications, communications via radio, audio and video with the land based hospital, dispatch and the driver in the cab to name but a few. This cabinet was the last to come out as it held the “brains” controlling all the electrical equipment.
Most of the medical systems are fully digitally controlled via LCD touch screens like this one of three that are located in the box and one in the cab.
The touch screens connect to five of these digital/analog switching boards to turn pumps, lights, sirens, inverters and such on and off.
As well as boards such as this one for used for switching some of the higher amperage circuits.
Several of which have high amp circuit breakers such as these and I removed a total of 16 of them.
I will likely reuse several of these control boards (they are all identical units) for controlling some of the lights and systems in the new build so these are now all safely stored away.
These are some of the wires that were feeding into that master cabinet with just the control boards to be removed now before the cabinet can be taken out.
As you might notice I was taking copious notes both in my notebooks and Excel spread sheets as well as hundreds of photos so I can refer back to these during the build.
Fortunately, Horton provided a HUGE help in keeping track of all this as every single wire has text labeling about every 6 inches and they supplied me with their spreadsheet of what each number corresponds to.
Which is a VERY good thing when these are only about a third of the wires that were inside the front half of the Horton box.
A few more in the back.
Oh, and did I mention that all these wires need to make their way up into the cab of the truck?
Some of these like you see here are for truck related items such as lights for brakes, turn signals, air suspension and brakes as well as power from the alternator and batteries.
But the majority of the wires and circuits went up into the Black center console that had the master control touch LCD screen, siren controls, VHF and cell radios, etc.
So I removed the drivers seat and the center console to get at all of these wires
and control boards like this one so I could sort through and remove most of them.
I now have many crates filled with the wires, looms, switches, control panels, LCD screens, connectors and more.
In all my spare time I am going through the piles of wires and coiling each one and sorting by colour and purpose to make it a bit easier when it comes time to start reusing these for the new wiring I’ll be installing in the coming months.
So far I have 786 lines in the spreadsheet I’ve been keeping for each wire and circuit I’ve removed which has been a job all in itself to provide wire colour, purpose, from/to, plug type, etc. The labels printed on each wire will continue to be very useful in the new build and will just have different purposes now so the spreadsheet will allow me to type in the name of the circuit in the new electrical system and be my cross reference to know that what used to be Horton #539 Intravenous Warmer Tray is now Lance #539 Heated Floor thermostat. So all this work up front will pay me back many times over as I start wiring all the new systems as well as reconnecting all the vehicle systems such as brake and turn signals, marker and back up lights, ground lights, engine gauges, diagnostics and more.
Hasn’t this been an electrifying experience for you going through all this?!! The good news though is that this brings me close to the end of the “constructive deconstruction” phase and next week I will start to show you the beginning of the transition into building the all new Lance. Yesterday I finished the last of the modifications to the externally accessed aluminium cabinets and I’ll pick up there in the next blog post.
Thanks again for joining us on this latest adventure and be sure to leave any and all comments and questions in the “Join the Discussion” box below.
Oh! Just one more thing before I wrap this up and publish.
Ten years ago today (Aug 4th, 2014) I somehow managed to catch Christine in a rare moment of poor judgement and got her to say “I Do” at the little courthouse in Deland Florida. Lucky ME!!!
So even though we’re on opposite coasts today, Happy Anniversary to my best friend and partner in all the truly awemazing adventures we’ve had in the past ten years!
Can’t wait for our next chance to kiss and celebrate when you get back from Florida my Love.


 But I do have a pretty good excuse for taking last Sunday off to celebrate of our tenth anniversary.
 Crater Lake was originally formed when Mount Mazama erupted about 7,700 years ago creating a 1.2km/.7mile deep caldera,
 I left off the last update having cut down and welded in customized externally accessible storage compartments and so the interior of Lance’s “Happytat” (my play on words for habitat which is what the box or module of an ambulance is called) was completely empty and down to just the bare 50mm/2 inch square aluminium frames and 3.5mm / 0.138” thick outer skin.
  The only windows in the original ambo habitat were the relatively small ones in the three doors; the two rear and one Passenger Side entry doors. In order to transform this into a Happytat we are going to be adding three more much larger windows in the sides.
  One large window on the DS Drivers Side that will be above the large Galley/Kitchen countertop.
  And then on the PS Passenger side, one smaller one above the opposite Galley countertop where the induction cooktop will be and then a larger window aft of that above the side Settee seat.
  Removing the outer AL skin from the DS this is what the original 50mm AL framing (Green) looked like.
  I need to cut out some of that and add in new AL framing (Black) for the window.
  Similarly on the PS Passenger side, this original framing (Green) ……
  ….. needs to be cut away and new (Black) framing added in to surround and support both windows here.
  I started on the DS Drivers Side and used my laser level to help layout the position of the new window framing that needs to go in here.
  After checking and rechecking these measurements with the 3D model it was relatively easy to use the green laser lines to mark out where the existing frames would need to be cut.
 The thick outer AL skin is attached to these frames using VHB Very High Bond tape which definitely lived up to its name and so even after they were fully cut through it still took a good bit of force to peel the frames away from the skin.
  I found that a pipe wrench and lots of elbow grease worked well to get them out.
  This also provided yet another example of the tremendous high quality of the build that Horton Emergency Vehicles provides; even these AL frames are all filled with closed cell spray in foam insulation.
  With the frames removed I was then able to sharpen up the scraper blade on my trusty Fein Multitool and remove the very recalcitrant VHB tape.
 I was able to reuse most of the 2” AL framing I cut out but for the longer sections of the new window frames I had ordered new 2” square AL tubing cut them all to length using my cut off saw, also now fitted with a AL cutting carbide saw blade.
  Here is the new framing all in place for the large DS window.
  Repeating the same process to cut the existing frames for the new PS Passenger Side window frames.
  remove the old and …..
 …. fit in the new framing.
 Cut out the full height vertical frame on the Left side and moved it over to be wide enough for the new walk through and then added a new horizonal frame for the top of what will be the walkthrough door.
 I did not want to weld the fame joints as the heat would have warped the outer skin so at each corner joint I used pieces of thick AL L-bar and tapped and threaded them to the frames after buttering these surfaces with JB Weld metal epoxy which have nothing but great experiences with in permanently joining metal components.
  Here is the end result of the framing for the two windows on the Passenger Side.
 And the great room in our cabin on Saturna Island.
 The Monsoon model windows have a lip or peak along the top edge which helps deflect water away from the glass.
  Our US based contact, Dave Anderson at Globe Trekker was outstanding to work with and was able to get the windows built and delivered to us in about six weeks. They arrived very securely packed in a wood crate with custom foam packing on all corners and in between each unit.
  It worked out just perfect for us to have them shipped to Globe Trekker in Portland and we stopped by on our last trip down from Saturna Island and brought them to our workshop here in Klamath Falls.
  You may recall seeing this photo at the end of the previous blog post as a teaser and clue as to what was about to happen. YIKES!!!!!
 Too late to turn back now and so continuing with the scary theme, I picked up my circular saw and started the first cut through that thick AL skin.
  Fortunately it all worked out very well. Cutting from the inside made it much easier to ensure I was cutting parallel to the new AL framing and I soon had this big piece of the AL skin hanging by the top right corner ready to remove.
 I still marvel at the thickness of the AL skin on this ambo Happytat!
  Repeating the same process to cut out the AL skin for the two PS windows.
  I filed the edges all straight and smooth to remove any sharp edges and all three window openings were ready and waiting or their new lease on life.
  As with many such jobs it all depends on the prep work which also takes most of the time but it paid off,
 The inner GRP frames extend about 100mm / 4” from the outer wall surfaces and will be cut to size to fit the inner frames after I have the interior walls fully insulated. I used lengths of stiff thick aluminium extrusions to clamp the window frames into the walls and ensure that the mounting surfaces were all tight.
  With each window dry fitted, plumb and secured I carefully masked around the outer perimeter of each frame to create a sharp straight edge where the white adhesive would soon be.
  Wherever possible we are using marine grade products and hence my choice to go with 3M 4000 UV Fast Cure adhesive sealant to bond the GRP window frames to the exterior AL walls.
  The inner surfaces of the GRP frames were quite rough which helps ensure very good adhesion so also required a good amount of the 4000 adhesive.
  Proof is always in the amount of squeeze out which turned out just right with enough to create a nice concave bead I formed with a plastic squeegee and my finger.
  The lengths of AL extrusions and clamps provided plenty of pressure to pull the GRP frames snug against the outer walls.
  Just right amount of squeeze out on the inside as well. These windows are definitely not going to leak and also NOT ever coming out!
  Very happy with the end result and well worth all the $$ and time.
 All three new windows are now fully installed!


 You can see these compartments a bit better perhaps here in this screen shot of the 3D model (facing drivers side) I created to accurately document the original.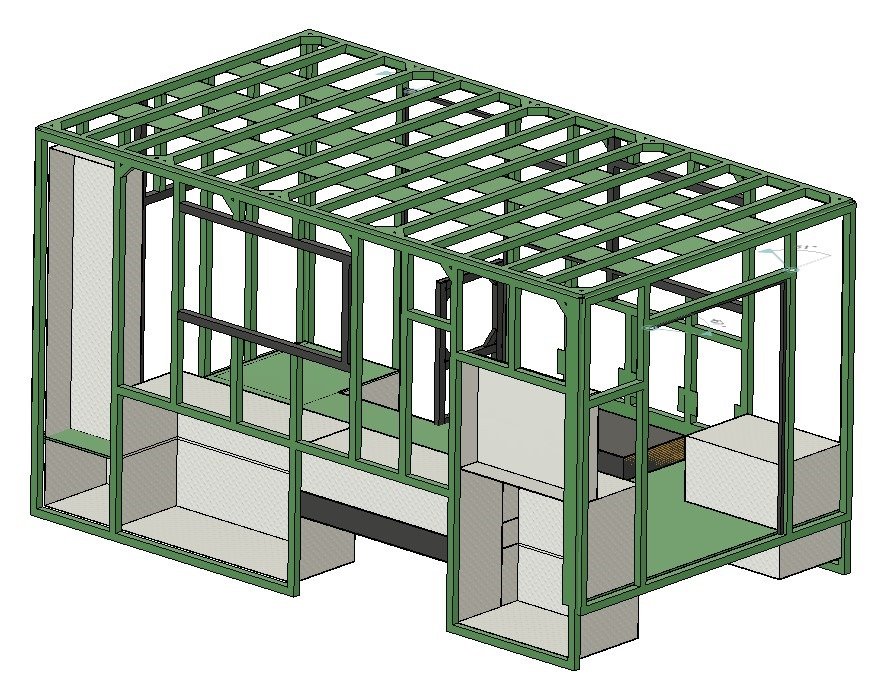
 To get warmed up, I started with some minor surgery such as removing these ventilation fan covers. There were two of these on the drivers side and in our new layout these will both be covered by interior cabinetry and the lift bed and we’ll be putting in new ventilation and air conditioning.
 If you refer to the 3D model shots above you can see that the passenger rear corner compartment is going to be cut down the most as this is where the corner of the L-shaped settee will be.
  My circular saw with a carbide tipped aluminium cutting blade quickly cut out the upper portion.
 The compartment on the opposite rear corner needed to be cut down in height and depth to allow the Queen bed to fit as it is raised and lowered.
 Moving on the drivers side front compartment, the section from the interior floor up to the ceiling will become the Head (toilet) so it needs to be cut down.
 With the external compartments cut out I now started cutting the pieces needed to weld back in to close each compartment.
  Here is the new top for the PS Rear compartment after being carefully cut, filed and clamped to fit precisely inside the remaining vertical walls creating a tight fit along each edge to be welded.
  Then
Then And then weld each edge. I’m teaching myself to TIG weld so my skills still have a LONG ways to go and the welds are not pretty but I think they will be plenty strong enough. I’ve done some destructive testing of many practice welds to see if the welds would break and am able to produce welds that don’t.
  The
The But
But Followed by the new horizontal plate and that new compartment was all welded.
  Completing the Rear compartments.
  The
The Worked out well in the end.
  and it was ready to be fitted in place. Worked out very well as I was able to reuse those two vertical slot bars to mount the bit Victron MultiPlus inverter charger.
  Along with the new floor plate and both were welded then fully welded in to finish off this new compartment.
 As
As Another
 Here is a look at the new version from the outside. This wall is a bit different than the other compartments as it had to be bolted in place rather than welded as it is right up against the painted aluminium frame and skin


 Here is a“Before” shot of what the interior looked like when we purchased Lance.


 As well as boards such as this one for used for switching some of the higher amperage circuits.


 Fortunately, Horton provided a HUGE help in keeping track of all this as every single wire has text labeling about every 6 inches and they supplied me with their spreadsheet of what each number corresponds to.
  Which
Which A few more in the back.

 But the majority of the wires and circuits went up into the Black center console that had the master control touch LCD screen, siren controls, VHF and cell radios, etc.


 In all my spare time I am going through the piles of wires and coiling each one and sorting by colour and purpose to make it a bit easier when it comes time to start reusing these for the new wiring I’ll be installing in the coming months.
Recent Comments