Lance is headed for the finish line in terms of completing the transformation from his origin as a 2016 Kenworth T270 Horton Ambulance to our awemazing eXpedition Recreation Vehicle XRV aka “Lance”. He and I are now back up at our place on Saturna Island where I have a great woodworking workshop that I am thoroughly enjoying as I complete the last phase of the internal buildout of the original Horton 14 x 8 ft ambulance box. This is the only wood I’ve used so far as everything else is either extruded aluminium or XAL, Aluminium Composite Material ACM for the surfaces of the walls and ceiling and then LVT solid vinyl planks for the floor and solid surface acrylic for the countertops.
No surprise to those of you who have been following my adventures for any time, the lead up to this post is a great story and the wood itself has its own which I’ll outline first.
Mother Nature + Friends Converge
I have some dear friends, Rick & Sherry and we lived and worked together when Rick & I were teachers on the Canadian Armed Forces jet fighter base in Baden Baden Germany in the early 80’s. Hard to believe that is now more than 45 years ago! Rick and Sherry live in Vancouver and have had a lovely property I’ve been to many times over the years on Gambier Island off the coast of North Vancouver as you’re driving up to Whistler mountain. Their son Colin was just a young boy when we were all together in Baden and has grown a wee bit since then. On our way back from our “sea trials” with Lance last summer when we drove across the US to attend the wedding of my niece in Portland Maine and then back across Canada, we stopped in to see Rick, Sherry and Colin while they were at their place on Gambier Island. We stayed overnight swapping stories and catching up. In the course of our conversations they told me about a very large old Cherry tree, over 200 years old they think, that had come down in a big wind storm a few years ago. Colin lives on Gambier full time which is saying something as it is totally off grid and only accessible by private boat, so he grows all his own food and is very talented and self sufficient young man. Over the years, he and I have developed a growing friendship discussing some of our respective DIY projects and he has been following my progress in transforming Lance into an XRV. In telling the stories about the stories about this big old tree coming own, Colin told how he had salvaged as much as he could using a chain saw milling machine he had assembled and he was anxious to show me the planks from his handiwork. As we looked over these massive planks he had hewn that were about 75mm / 3” thick and 4m/12ft long I asked him what he planned to do with them and he said he didn’t have anything in mind just yet. Well, you know where this is going and so yes, Colin ever so generously insisted that it would make him very happy if I would take some and use them for the interior of Lance! Unfortunately I didn’t get any photos of the whole stack of Cherry planks but these are the ones we pulled out and loaded onto a cart to move down to the boat dock. Why the cart you ask? Well, as you may recall Gambier can only be accessed by private boat so we now needed to figure out a way to get these planks off the island and back over to the mainland where Lance was parked. After all his years on Gambier, Rick is used to this so he helped load up the planks and drive them from up on the property down to the boat dock, which as you can see is a looooooong way down. Rick and I carried them down the last way on the ramp and had them all ready to now load onto his boat. Easy peasy as we Canadians say and Rick put his boat into gear and we were off on the 10 minute ride over to the dock and then carried them up and loaded into Lance! Christine and I bid them all adieu and headed off on the final leg of our cross North America trip to get Lance back to our place on Saturna Island where I carried the planks on their next voyage into my workshop. You can see some of the planks now standing up on edge to the Left of the yellow table saw. A few weeks later my awemazing son Skyler came over for a few days to help me out and after a bit more wood wrestling and we had the first slab horizontally on the sawhorses ready for to be cut down to size. What we needed to do is cut some of these into strips about 20mm/ 3/4” square that would be glued to the edges of 13mm/ 1/2” Baltic Birch plywood and then to cut others into very thin sheets that would be glued on top of the edged plywood to create all the drawer fronts and cabinet doors patiently awaiting inside Lance’s Galley. Skyler is a very talented cabinetmaker and woodworker and he had brought over his Fein Track Saw with him which was just the right tool to cut the rough sawn slabs down to more usable size. Cherry is a lovely wood to work with and over the years I’ve used it to built quite a lot of furniture and cabinets with. These thick planks were a bit of a challenge but Skyler and his saw were up for it and along with the table saw we soon had these planks cut into about 150mm/6”wide boards for our next step. Which was to move them over to the bandsaw which had a sharp new 1” carbide toothed blade I had just bought and fitted. We made up the wooden fence you see here to guide the planks that were now up on their edge ready to be run through that blade a bit like a meat cutter blade shaves thin slices of ham. After a few test cuts we had the fence set just right to give us consistently thick slices. This yellow feather jig clamps to the slots in the bandsaw table and keeps the plank pressed tightly against the side of the fence. Each slice is about 3-4mm / 1/8” thick and will be the “veneer” that I glue onto all that edge banded plywood drawer fronts and doors. Net result was four of these stacks of the 6” wide Cherry veneer. For the solid Cherry edging we needed for the perimeter edges of each Baltic Birch plywood blank we ripped them to rough size using the table saw and then fed them through our thickness planer to take them down to be just a wee bit thicker than the 1/2” plywood so I can trim them down to be perfectly flush with the faces of the plywood. There are a LOT of drawers and doors each of which needs four solid Cherry edges so we set up a bit of a production run between the two of us using the table saw and the thickness planer and started putting them all into this plastic waste can. The past few weeks I’ve been busy cutting all the BB plywood pieces to size and then gluing these lengths of Cherry edging and getting them ready to laminate with my vacuum bagging press to create what I’m calling my “Cherry Burritos “ But I’m going to going to leave that whole process for the next update here which I will do my best to put together in the next week or two before we take off on our next adventure over to Europe for a few months!
Hope you will stay tuned for that and join us here again.
My sincere thanks again to Rick, Colin and Sherry for their kind generosity in donating this gorgeous Cherry to the cause here.
And thanks in advance for all your questions and comments that you can put in the “Join the Discussion” box below and thank you SO much for taking them time to follow along on these adventures in Wayne’s World.
Well, as the saying goes, it has “been a minute” since my last post and update, Dec 14th 2025 to be precise, so I’ll try to catch up with some of the key things that have happened since then in the next few posts here.
I’ll start with this post that will provide you with a quick summary of the phenomenal time we had eXploring the Baja peninsula of Mexico from end of December to beginning of March. Sure helped us get 2026 off to a GREAT start.
and yes, I can see those eyes rolling when those who know me hear Wayne saying “a quick summary” BUT in this case it is actually true because my awemazing wife, travel partner and best selling author (pen name Christine Kling) wrote it! Christine regularly writes an article on her Substack called “SailingWriter” and she did her typically awemazing job of summarized our two months in Baja in an article there she titled “Curiouser and Curiouser in Baja” Click on this link to read the whole article and see all her phots. And trust me, you will want to be sure to stay to the end to see the abfab video she took while we were out on the whale watching tour that she had gifted me with for Xmas this year.
While I will plead guilty as charged to being “narratively generous” and Captain of the Good Ship sv LongWinded, when you read Christine’s article you will learn that I am not being my typical grandiloquent self when I tell you that she is an awemazing woman, writer and person and has been from a VERY early age. For example, the last time she was traveling the Baja highway was just after it opened in 1974 when she rode her bicycle from Tijuana to La Paz to at the age of 19. As you’ll read she not only pedaled her way to La Paz, she “… had this crazy idea that you had to do something extraordinary and write about it in order to get published. It was crazy, but it worked and my very first publication was in Bicycling Magazine in July, 1975.”
NOW go ahead and tell me that I’m hyperbolic embellisher!
Hope you enjoy this all too brief detour to well written articles and that you’ll still bravely continue to read mine such as the next update on my latest progress this year converting “Lance” our 2016 Kenworth T270 ex Medium Duty ambulance, into an eXtreme RV. I’m writing that newest update now and should have it published later today. (10 May, 2026)
Thanks so much for joining Christine and me on our adventures and be sure to add any comments and questions you have in the “Join the Discussion” box below.
You might say that my world has gone to the dogs as Christine is back in Florida getting in some much needed Gramma time with our Grandson Liam, who somehow just turned TEN last week. Yikes! How did THAT happen?!?!?!? So here on Road Runner Ranch it is down to us Three Pupsketeers, Razz, Zoe and me, but we’re doing well and enjoying being surrounded by the beauty here in Southern Nevada.
Some of you may remember that the last post I did with updates on the work on Lance’s transformation was called “Mini-Split = Major Step Up: XRV Lance Update 4 May, 2025” May was a Looooooong time ago now so you may want to click on that link if you’d like a refresher.
Quite a lot of progress has happened with Lance’s transformation during the six months since that last post and I’ll do my best to cover as much as I can here in the coming weeks. To get started I’ll pick up where that update left off and catch you up on what happened between then and June 10 when we took left our place here in Nevada in Lance bound for Portland Maine for the June 21st wedding of my niece Julia to her beau Ben.
In the weeks to follow I will try to post once a week, usually on Sundays, providing updates on the work I’ve done on the different systems such as cabinetry, all the dovetail drawers, the Electrical Cabinet, rooftop solar panels and so on.
So grab a tasty beverage and a comfy seat and let’s get back to where we left off with that air conditioner/heater Mini-Split system you last saw in May.
Mini-Split is Fully Functional!
As per the title of that May 4th post, I had just finished quite literally shoehorning the exterior half of the Mini-Split unit up into the barely big enough space between Lance’s ambo box and the Kenworth frame.
And I’m very happy that I can start this week’s update with the news that I have since finished installing the Mini-Split and it is working even better than we had hoped. For those interested in the details, this is the make and model Mini-Split we decided on. It is a 9k BTU capacity “Pioneer Diamante Ultra” that is one of the most efficient models they make rated at 23.5 SEER for those who know that system. These type of two part aircon/heating systems are referred to as Mini-Splits because they consist of two parts; the outside condenser/compressor and the inside air handler evaporator. If you check out the basic features here this model provides both cooling in up to 131F/55C outside temps as well as heating when it gets down to from –13F/-25C. 9000 BTU is more than we need but the smallest model I could find so just means it won’t take much run time to keep the inside of the “Hab” as we have come to call the Habitat or Box or living quarters in Lance, just the right temperature in both hot and cold climates.
I will cover this in a later blog post but just FYI, in addition to the Mini-Split we will also have a diesel fired boiler that will heats the Glycol solution that flows through a network of PEX tubing in the floor as well as heat for two floor mounted air/glycol heat exchangers (mini radiators) so that when we head up to the Arctic, possibly this summer, we’ll stay nice and toasty. And this boiler also provides all our domestic hot water DHW for sinks and showers so stay tuned for that update in a few weeks. Back to the Mini-Split install, this is the wall mounted interior evaporator half of the system and I mounted this Air Handler above the entry door on the front passenger side of the Hab. Works out well as you can see being almost the same width as the door. There are moving louvers with one large one running across the bottom that you can see partially open here that distributes the cold/hot air up/down vertically and then inside are a set of other smaller louvers that move back and forth sideways and help move the air left and right. So this location works out very well for the heating/cooling of the interior air and yet keeps it from blowing directly on us when we are at the Settee or in bed. As you might have noticed in the earlier photos, I had to cut away part of the upper stair in the entry to fit this top right corner of the exterior half or condenser/compressor. Once I had this all solidly bolted in place to the frame of the Hab underneath (see that May post for details if you’re curious) I finished it off by building a little “cage” using extruded aluminium and some aluminium diamond plate that I had left over from cutting out some of the original ambulance cabinetry. Also added some insulation to keep the other heat/cold from getting into the Hab. The 6mm diamond plate slid nicely into the T-slot grooves of the extruded Aluminium or XAL as you can see here. All these interlocked plates and XAL turned this into somewhat of an Origami project as I needed to be able to slide some of those plates out to get inside to connect the wiring and refrigerant lines but I was quite pleased with the way it turned out in the end and still functioned well as our entry stairs. I chose the 240V model as it is a wee bit more efficient than the 120V versions and I designed our AC system that I’ll cover in more detail in a future post, to be a Split Phase system so it provides both 120 and 240 Volt power. I’m going to break the time sequence a bit here as I actually finished off this l the install of the Mini-Split when we got back from our summer marathon in Lance and was working on him at our place on Saturna Island. Next part of the install was to make up some custom copper line sets that connect the two parts and transfer the refrigerant between the exterior condenser and the interior evaporator. These copper tubes are well insulated to help with efficiency and that’s the white covering you see here.
I could do this because Lance’s ambulance box is 8 feet wide and allowed me to design both really deep drawers and countertops and still have lots of room for working in the Galley between the two countertops. I’m mentioning this because designing this space behind the drawers gives me the perfect place to run electrical cables, PEX water lines and now Mini-Split copper line sets all out of the way and hidden from view and yet easy to access for installing and maintenance. Looking inside the entry door, the drawers on both sides of the Galley are 24” deep but the countertops are 32” so there is a nice space behind the drawers when they are closed. I could do this because Lance’s ambulance box is 8 feet/243cm wide on the outside and the finished inside width is about 7 1/2 ft/2.3m which allowed me to design both really deep drawers and countertops and still have lots of room for working in the Galley between the two countertops. I’m mentioning this because designing this space behind the drawers gives me the perfect place to run electrical cables, PEX water lines and now Mini-Split copper line sets all out of the way and hidden from view and yet easy to access for installing and maintenance. This is the space behind the bottom drawer on the Left side of the stairs as you enter and I drilled a 2” hole through the vinyl flooring, insulation and aluminium floor of the box. The Pioneer unit came with the white PVC insert to protect the copper line set and the white cable is the 240VAC power and the black is the communication cable between the two halves of the Mini-Split. Up above I drilled two overlapping holes in the solid Acrylic countertop, which is fabulous stuff to work with BTW, and ran the electric cables and copper line sets through this. The copper lines in the interior evaporator unit come permanently fitted and they ended up just above the countertop height so I cut the new copper lines and installed new flare nuts that allowed me to connect them here and then run down into the compressor/condenser unit under the floor. The upper parts of the line sets gets covered with this black EPDM insulation and the corrugated clear hose is where the condensation produced by the evaporator drains out and down through the floor onto the road below. To protect and hide all these lines and cords I built a small vertical connector between the countertop and the overhead cabinet you can just see at the very top of this photo. The sides will soon be fitted with Cherry panels same as all the fronts of the doors and drawers that will be the topic of several other future posts. I will maybe guild some small shelves into this space to make it otherwise useful but for now it plays its primary role of protecting all these electrical cords and copper lines. Most importantly, Razz and Zoe use this new little upper step for their water bowl and so they give this new addition two paws up!
It’s been a bit cold the past few days with highs in the day around 10C/50F and brrrrrrrr as low as 4C/40F at night so we Three Pupsketeers have been really appreciating how well the heating function of the Mini-Split has kept us keeping us nice and comfy.
Well, that’s going to do it for this week but at least I’ve started to catch up with all those months of no updates on the progress with Lance and hope you enjoyed it.
Thanks for joining the journey here and don’t hesitate to leave your comments and questions in the Join the Discussion box below.
See you next week which will be Thanksgiving weekend for all my American friends and family.
Hope you’ve enjoyed the long break from your brevity challenged reporter here but your time is up and I’m back!
Hard for me to get my head around but it was almost exactly one year ago today, July 11, 2023 to be precise, I posted THIS and thought it would be the last article here on the Möbius World blog. However, as is often the case with me, I was wrong. Turns out that it was just a case of one door closing while another one opens. My sincere thanks to all of you who sent all the supportive messages and emails, including the more troubled of you asking when I was going to get back to blogging because you were missing these regular updates. I’ll leave the need for you getting help with that problem to professionals but I’m glad to be back at the keyboard here and will be doing my best to provide weekly updates again in the all new version 2.0 of Wayne’s World and the joint adventures of Christine and I as we make the transition into this newest version of Möbius World V2.0.
To say that the past year has been a bit of a whirlwind might well qualify for one of the greatest understatements of all time and fortunately for you I am not going to resist the temptation to summarize it all as it would be excessively long even by my verbose standards.
Instead I happen to know someone who is a “proper” writer as my British friends might say and unlike me, she knows how to write clearly, concisely and can synthesize large topics into succinct text and photos. So for those of you interested enough in the back story of the wild roller coaster ride that has been our life for the past year, I’m going to let my Beautiful Bride Christine provide you with the updates for you to read at your leisure. You can do that by simply clicking on the links below that will take you to several of the posts Christine has put up on her Sailing Writer substack newsletter.
Here are the relevant links that will provide those interested with a relatively quick summary to fill in the gap between my post last July and this new one today.
FYI: if you like what you see and read you can subscribe to Sailing Writer to get automatic updates whenever Christine posts a new article which is typically every month or so.
For my part my goal with this first new posting is to bring you to date and closer to real time with Möbius version 2.0. Buckle in and here we go ………………
From Möbius to MöbiLance
No surprise to most of you I’m sure, while it came as quite a shock for us to have to “swallow the anchor” after decades living at sea and move on to life ashore, it did NOT diminish our adventuresome spirit and passion for exploring this awemazing world of ours. Indeed if anything it has reminded us both of how much we love living an exploratory and adventuresome lifestyle. We very much remain the “Nomadic Grandparents” you’ve come to know and have simply pivoted to adjust to our new situations and are now in the process of creating what Christine so aptly calls “Möbius on Wheels” or Möbius V2.0 as per the title of this post.
Come on now, you didn’t really think that we’d just settle into a retirement community in Florida now did you???!!!
Several months of introspection, reflection, research and intense discussions between us rekindled the spirit that drove us to create eXtreme eXploration Passage Maker or XPM Version 1.0 aka XPM 78-01 Möbius. We hit upon the idea of converting a medium duty ambulance into an eXtreme eXploration Vehicle which I will now refer to as either the portmanteau of MöbiLance ( Möbius Ambulance) or just “Lance” as we have come to call him.
For those wondering, there is no particularly good reason though it seemed in keeping with the severity of the transition for us, to also switch genders from all our boats being female to our new big boy Lance being male. He’s a beauty but he’s a brute!
Serendipity and synchronicity continue to be my guides in life and so in December I stumbled over an online post that mentioned a 2016 Kenworth medium duty ambulance being retired from its first life and looking for a new home. I tracked it down and reached out to what turned out to be the original coach builder that created this ambulance and they had just taken this vehicle back from the fire department after delivering an all new one to them. They were anxious to get this vehicle off their books by the end of the year and short on time but willing to be flexible with the price.
That triggered a flurry of emails and phone calls to answer my endless questions but Shawn at Foster Coach had been the one who created the original specifications for both the Kenworth chassis and the Horton ambulance module so he knew every detail and was able to expertly answer my every question. Shawn could not have been more helpful and generous with his time. He also worked with the fire department and their service center and was able to send me every invoice with detailed descriptions for every bit of work ever done over the almost eight years it had been in service. The more we learned the more this seemed to be the Goldilocks, just right, just for us base upon which to create our Möbius on wheels.
And yes I am going to continue to use and overuse and abuse this metaphor. Shocking I know!
Perhaps it was the Christmas spirit that was in the air at the time (third week of December) but I submitted what I thought was a rather low all cash offer to buy this beauty without ever seeing it in person and to my delight and surprise when I woke up the next morning, there was an Email from Shawn saying “offer accepted, when would you like to pick it up?” I turned to Christine and said Holy flaming fire trucks Batwoman, I think we just bought ourselves an ambulance!!!!
It was now the week between Xmas and New Years and we had just moved into our little sanctuary on Saturna Island in the Gulf Islands of BC Canada (see Christine’s post above for those details and photos) so it took several weeks to make all the arrangements for a trip out to Illinois where Lance was waiting for us at Foster Coach as we not only had book flights and hotels, we also needed to make all the arrangements for transferring title, plates, insurance, renting a truck to pick up all our belongings we had left in Portsmouth Virginia after selling Möbius. But we are well seasoned travelers and we soon had flights booked for mid January to Jacksonville Florida as we needed to be at the DMV in person to do the out of state transfer and have Lance registered as an RV. That was a whole adventure in itself but I’ll leave that for another time. With papers and plates in hand we then flew up to Norfolk the next day to pick up the rental truck and move all our belongings we had moved off of Möbius in October that were in a storage locker in Portsmouth and start our cross country drive.
We made the drive from Portsmouth to about 100 miles West of Chicago just as what turned out to be one of the coldest winter storms in history was building but we soon had our hearts warmed by meeting Shawn and finding Lance sparkling inside the warehouse at Foster Coach as you can see in the photos above.
We spent a few hours with Shawn going over just a few of the unique features of this very unique vehicle, transferred all our belongings (and Barney) from the rental truck and we were off on our first adventure in Lance.
It was bitter cold but we managed to find mostly all clear dry roads all the way across the US and up and up to Vancouver where Lance took his first ferry rides to get him over to his new part time home on Saturna Island.
Total miles for drive from Illinois to Saturna was 2469 and we were pleasantly surprised to have averaged 11MPG for the trip.
Meet Lance:
I will write a separate blog post to go over the details of why we chose a medium duty ambulance as the base for building “Möbius on Wheels” and try provide answers to the many questions some of you may have but for those curious, here are the quick details of our new rig:
Make & Model: 2016 Kenworth T270 with a Horton Emergency Vehicles ambulance module
Interior dimensions of bare ambo box: 4.3m / 14’ 2” Long x 2.4m / 7’ 10” Wide x 1.91m / 6’ 3” High
Let the Demo(lition) Phase Begin!
That brings you up to date to the end of January 2024 with Lance safely parked in his wooded home on Saturna and I spent the next few months doing a combination of building a full 3D model in Fusion 360 of the existing structure of the “Happitat” which is our name for the ambo box on Lance which is technically called either the ambo module or the habitat and then starting the major job of carefully removing all the cupboards, seats and interior cabinetry of the ambulance. We qualtiy of construction of these Horton ambo boxes is incredible and we considered leaving it largely as as we designed the layout transforming this into a full time XRV, it quickly became clear that the best approach was to remove EVYERYTHING and strip it down to the bare aluminium framework and starting the new build from there. I will have MUCH more details on all that in future posts but here is a quick run through of the lengthy process of removing everything.
Difficult to capture it all but this photo shot from the rear looking forward will give you an idea of what the inside of the ambo looked like to begin with. Side entrance door on the very far Right, pass through window into the cab you can see behind the jump seat, refrigerator (black rectangle) top Right, Oxygen controls above what they call the “bar” on the Left of the seat and then lots of extremely well built cabinets, drawers and doors throughout.
There is a LOT of electronics in these modern ambulances and this is a small sample of one of the 5 LCD touch screens on the top Left, controls for the Oxygen and vacuum pumps below it, pass through door into the drivers side DS external compartment on the lower Right and then 120VAC and 12VDC plugs on the Right side of the wall.
Looking back here out through the rear double doors as the demo begins.
To be certified for emergency use these ambulances must be able to go through a complete 360 degree roll over without any damage to the interior or its occupants, more on that in future posts, so they are built like a proverbial tank, just all out of aluminium with a bit of stainless steel and in the case of the countertop here a Corian like composite.
If you check out the exterior photos up at the beginning you will see that there are compartments on all four corners of the module/box and a double door one in the middle of the drivers side. These are all accessed through eXtremely robust aluminium doors on the exterior and on the inside they are all built out of aluminium diamond plate. As per this example on the passenger side front compartment, they also have equally robust adjustable shelves also built out of 3mm / 1/8” diamond plate. Compartments also have 120V and 12V outlets throughout.
There was literally not a toothpick worth of wood in the entire build, EVERYTHING is built from either aluminium plate or ACM (Aluminium Composite Material) and so I carefully unbolted all the fasteners holding the modules together and moved them into my storage building for future use in either the new build or for future home projects.
As you can see by peering into that tall cupboard on the mid left, there is also a LOT of wiring and electronics involved which added to the puzzle.
The builders at Horton also went to great lengths (pun intended) to build the cabinetry out of very large single sheets of AL and ACM (Aluminium and Aluminium Composite Material) This piece that I finally wrestled off the driver side wall was over 4 meters or almost 14 feet long!
Starting to empty out.
Getting down to bare AL framework in walls. You can see the stairs leading out the passenger side (PS) door in the bottom Left corner here and then the bench that runs down the PS side. The AL track embedded in the middle of the floor is for the Stryker stretcher to slide into and lock in place but that will need to wait for another day.
This is a very small amount of the material that I removed from the interior. Some covered with contact cement or padding as you can see but all very high quality material and very valuable for using in future projects so it all gets stored away.
Another one of the LCD screens, this one while I was running the engine every few weeks to keep battery levels and systems all working.
It was cccccccold in Saturna this past winter but not quite as cold as the disconnected “interior temp” gauge says but the exterior temp is accurate at 35F/ 1.6C!
You can control most everything in the Happitat or ambo module from these screens and all the option buttons on the sides. May try to repurpose these for use in Lance as we build but for now they all go in the rapidly growing electronics pile.
Oregon Here We Come!
As part of our pivot to new landlubber status we are going to establish a type of “mobile snowbirds” lifestyle where we will spend the warm summer months on our lovely island getaway we refer to as “RavensRidge” on our 4 acres on Saturna Island which I’ve circled in Red here. Click to expand any photo and Click on the link to Christine’s article “From the Canary Islands to Saturna” above for details and photos.
Saturna Island is is nestled amongst the Canadian Southern Gulf Islands and the US San Juan Islands as you can see by the very zig zag border line. We live on The No Plan Plan but our intent is that when the weather turns cooler on Saturna in October or so will move into Lance full time and head to warmer climes in the southern US, Mexico and Central America. As those areas start to get too warm we‘ll head North back for more warm and sunny weather at RavensRidge.
Right now though because we ended up buying both Lance and RavensRidge quite unexpectedly this past January we are out of synch with this snowbird like schedule and officially we are both residents of the US and so we need to keep our total time in Canada to be less than half the year. Factoring everything into the equation, we decided to find a place to rent in the US for the rest of this year where I work on transforming Lance and Christine write her next books. It took quite a bit of online searching but we found the ideal spot in southern Oregon and drove Lance down to Klamath Falls mid April and set up our latest home base here.
You didn’t really think we would stay in the same place for very long now did you???
It is a rather unique property that matches our equally unique needs as it is a commercially zoned location with a two bedroom home adjoining a huge workshop/garage. We even have our very own parking lot that you can see in front of Lance here so not much grass for me to have to mow!
Lance feels right at home here as his brothers and sisters all live in the big Fire Department across the street.
Klamath Falls is the Goldilocks not too big, not too small, size for us where we have all the shops and services we need, great Amazon, FedEx, UPS, USPS deliveries for all the equipment and supplies we need to build out Lance AND no sales tax! Both of which are a huge benefit for this latest project.
This is one half of the garage after I set up some workbenches and unloaded some of my tools and equipment I brought down in Lance. Provides a great place for me to work and Christine has her latest office all set up in the 2nd bedroom so it suits us very well.
On the other side of the workshop, this is about a quarte of the materials that came out of the ambo.
Demo Part II
As you saw in the photos above I had removed most of the interior in Lance’s original ambo box while in Saturna and so I was down to the bare AL frame & skin on the walls as you see here. So once in Klamath Falls mid April I continued with the demo and removed the ceiling and the floor. You will also note that I have yet to remove the miles and miles of wiring and electronics inside but like eating an elephant it is one bite at a time right?!
The ceiling was a double layer of ACM (Aluminium Composite Material) with a foil faced backing sandwiched between it and the AL ceiling ribs.
All of which came out relatively easily.
Leaving just these battons of insulation to remove that were also simple to remove and left me with the bare ceiling to work from. The entire box is framed with 2” x 2” or 50mm square aluminum tubing with 3.2mm or 1/8” thick walls. The frames are all welded gogether and you’ll notice that many have additional 45 degree gussets for additional strength and rigidity. For those wondering why it is all Black, all the surfaces have been sprayed with black sound deadening.
I tackled the floors next. First by peeling off the diamond pattern rubber sheet floor surface.
Under the diamond pattern flooring was a layer of AL faced 13mm / 1/2” thick ACM board and then under this ACM floor was a 5mm / .2” thick rubber sound deadening matt. The ACM board was bolted through the 10 gauge AL floor pan that is welded to the 2” x 3” AL floor joists. Stainless bolts in aluminium tend to corrode over time so it was quite a chore to remove each of these floor bolts with my manual torque screwdriver but I was able to finally find and remove all of them.
With all the bolts removed I was then able to carefully pry up the ACM board ………
……… and flip it and the underlying thick rubber sheet up and finally reveal the actual AL floor panels.
They had cut the ACM floor out of what must have been a huge single sheetso to make my life a bit easier I used my track saw to cut it lengthwise into two halves to make it a bit easier to get out of Lance. I will reuse this ACM and be able to butt the new straight edges up to each other to avoid any seam.
I was very familiar with ACM or Aluminium Composite Material as we used it extensively in building Möbius V1.0 and it is an incredibly useful building material that many are not aware of. It comes in large sheets in thicknesses from 2mm to at least 55mm or 1/8” to 1” and each sheet has three layers, a 1mm thick layer of aluminium on both sides of the center polyethylene foam core. ACM is eXtremely rigid, flat and easy to cut with regular carbide saw blades, routers, etc. You will see me working with ACM in future posts as it is a key material I will be using in the new build of Lance.
There were a few of he SS bolts that had sheared the heads off during removal so I went through and removed all of them. The black surfaces you see are thin rubber non skid sheets which are very solidly glued to the AL floor panels. I’m debating whether or not to peel them off and take the floors down to bare AL or leave as is. For now I am leaving them alone as it makes for a good surface for me to stand on and work from.
OK enough already Wayne!!!
Whew!! That was a bit of a marathon to bring you up to about mid July and my congratulations and condolences to any of you who persevered to reach this point.
I’ll try to get back to posting about every Sunday and bring you up to about real time with this build process in the next few postings. Next week I will show you the significant task of carefully removing literally miles of wires and then starting to add in the new framework for the three big windows are will be installing. I’ll also add some posts about the extensive amount of 3D modeling I’ve been doing to create both the existing box as well as then designing the layout and virtually building all the interior cabinetry, bed, galley, etc.
So if you are still interested in following along with our adventures as we make this transition from sea to land please do subscribe and stay tuned for more and join us on our latest adventures into Möbius World V2.0.


 Unfortunately I didn’t get any photos of the whole stack of Cherry planks but these are the ones we pulled out and loaded onto a cart to move down to the boat dock. Why the cart you ask?
 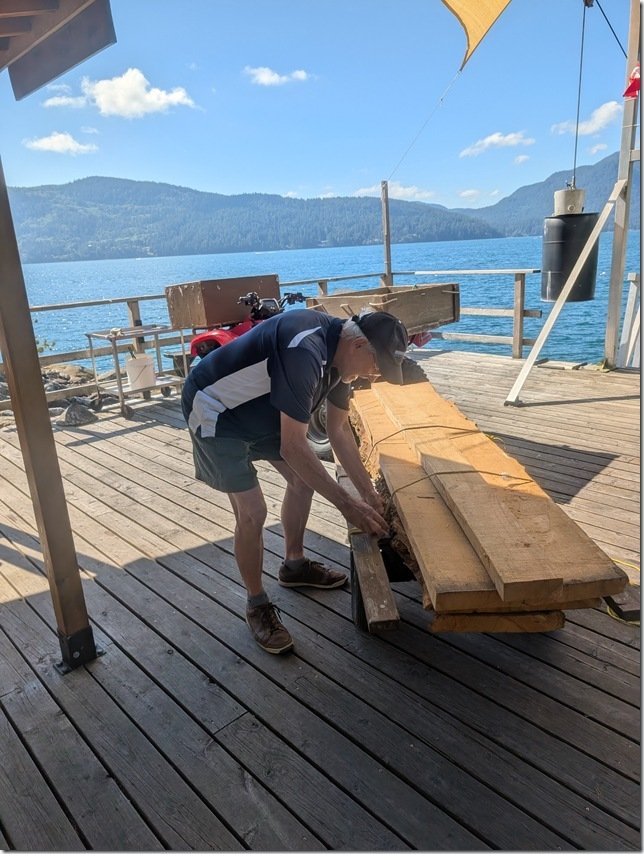 Well, as you may recall Gambier can only be accessed by private boat so we now needed to figure out a way to get these planks off the island and back over to the mainland where Lance was parked.
  After all his years on Gambier, Rick is used to this so he helped load up the planks and drive them from up on the property down to the boat dock, which as you can see is a looooooong way down.
 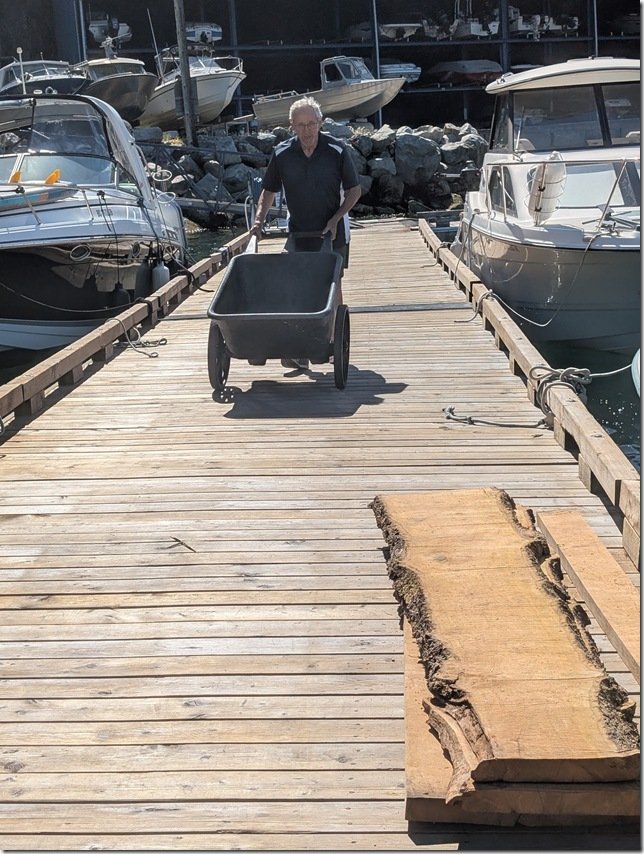 Rick and I carried them down the last way on the ramp and had them all ready to now load onto his boat.
 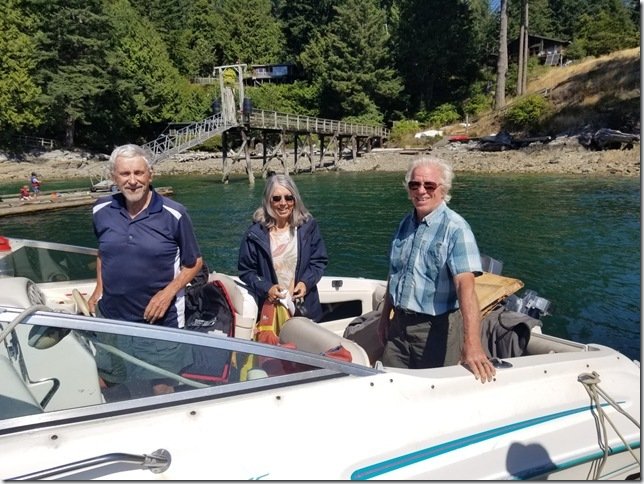 Easy peasy as we Canadians say and Rick put his boat into gear and we were off on the 10 minute ride over to the dock and then carried them up and loaded into Lance!
 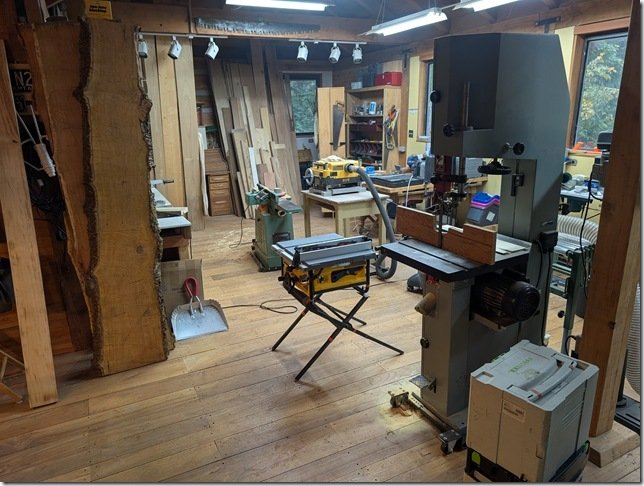 Christine and I bid them all adieu and headed off on the final leg of our cross North America trip to get Lance back to our place on Saturna Island where I carried the planks on their next voyage into my workshop. You can see some of the planks now standing up on edge to the Left of the yellow table saw.
  A few weeks later my awemazing son Skyler came over for a few days to help me out and after a bit more wood wrestling and we had the first slab horizontally on the sawhorses ready for to be cut down to size. What we needed to do is cut some of these into strips about 20mm/ 3/4” square that would be glued to the edges of 13mm/ 1/2” Baltic Birch plywood and then to cut others into very thin sheets that would be glued on top of the edged plywood to create all the drawer fronts and cabinet doors patiently awaiting inside Lance’s Galley.
 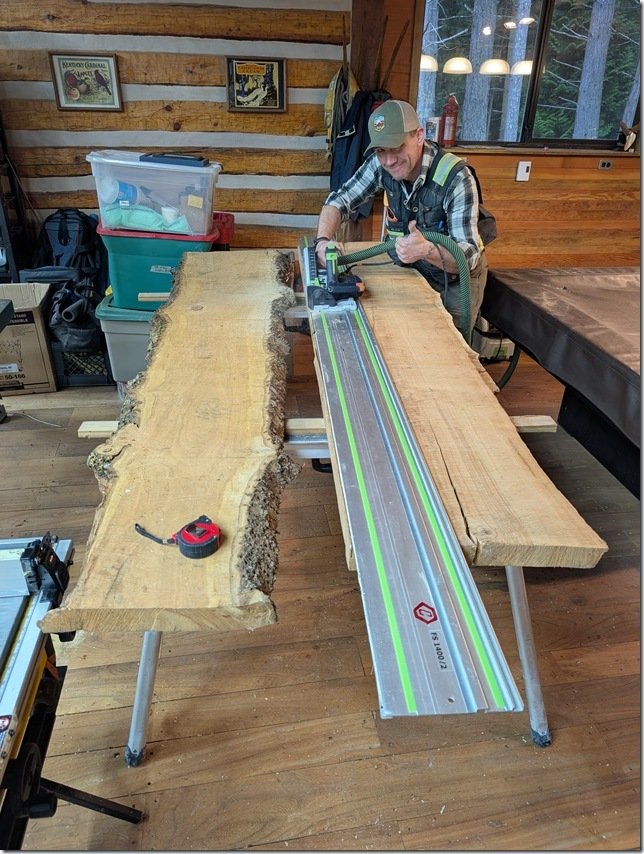 Skyler is a very talented cabinetmaker and woodworker and he had brought over his Fein Track Saw with him which was just the right tool to cut the rough sawn slabs down to more usable size.
 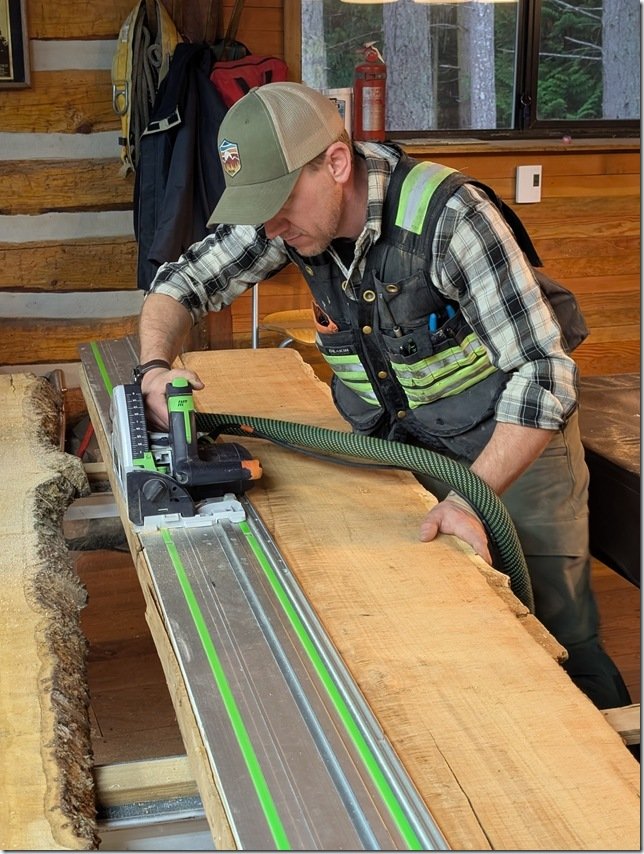 Cherry is a lovely wood to work with and over the years I’ve used it to built quite a lot of furniture and cabinets with.
  These thick planks were a bit of a challenge but Skyler and his saw were up for it
  and along with the table saw we soon had these planks cut into about 150mm/6”wide boards for our next step.
 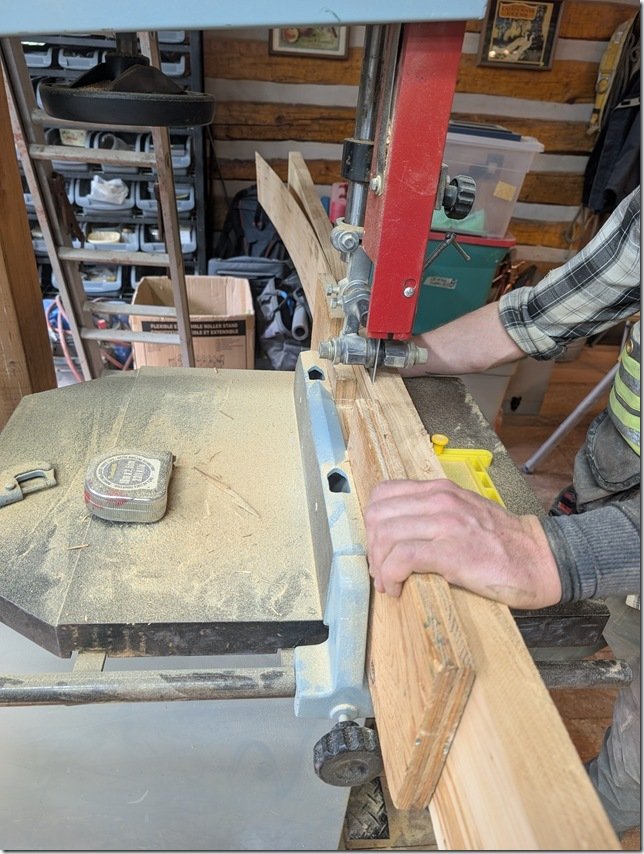 Which was to move them over to the bandsaw which had a sharp new 1” carbide toothed blade I had just bought and fitted. We made up the wooden fence you see here to guide the planks that were now up on their edge ready to be run through that blade a bit like a meat cutter blade shaves thin slices of ham.
 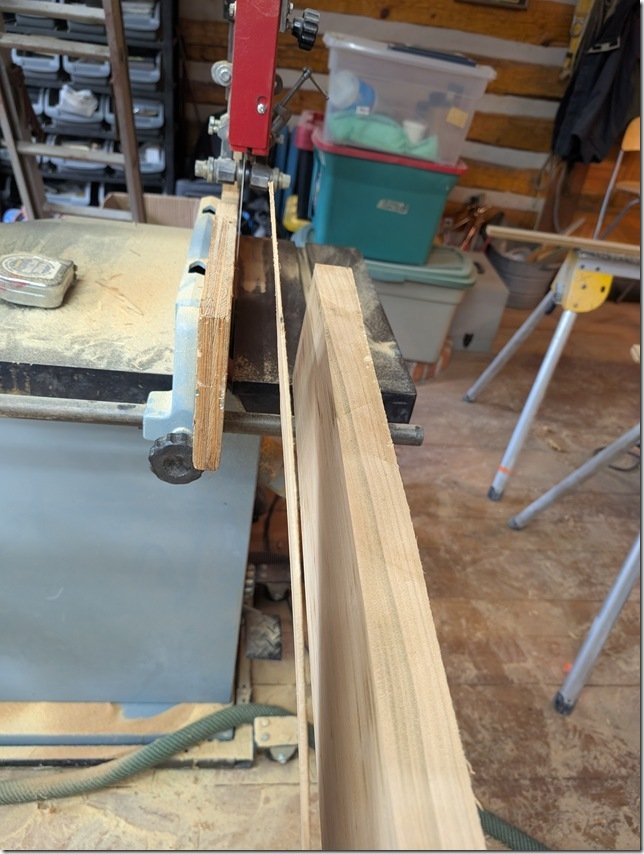 After a few test cuts we had the fence set just right to give us consistently thick slices.
 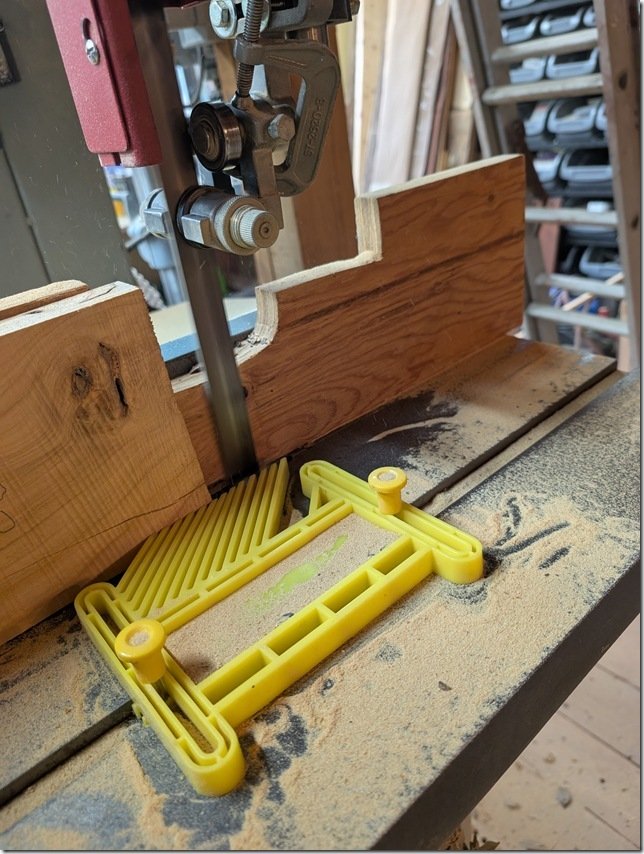 This yellow feather jig clamps to the slots in the bandsaw table and keeps the plank pressed tightly against the side of the fence.
 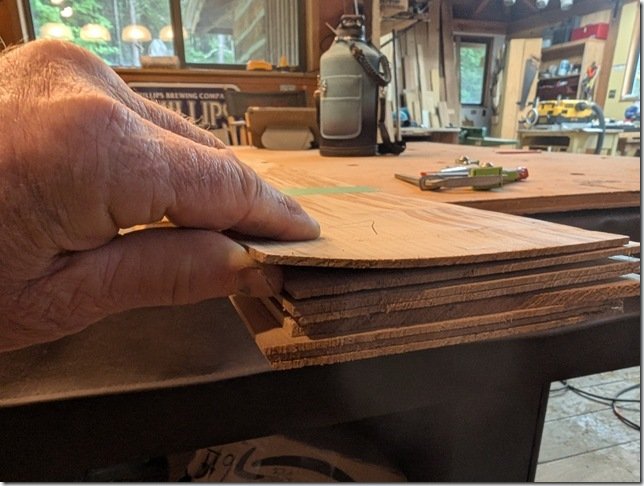 Each slice is about 3-4mm / 1/8” thick and will be the “veneer” that I glue onto all that edge banded plywood drawer fronts and doors.
 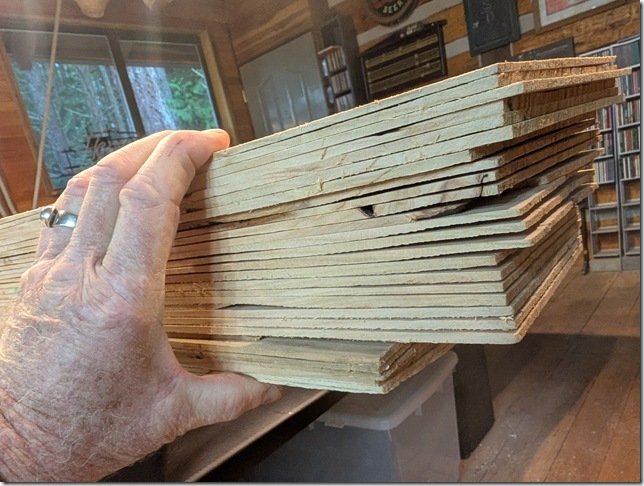 Net result was four of these stacks of the 6” wide Cherry veneer.
  For the solid Cherry edging we needed for the perimeter edges of each Baltic Birch plywood blank we ripped them to rough size using the table saw and then fed them through our thickness planer to take them down to be just a wee bit thicker than the 1/2” plywood so I can trim them down to be perfectly flush with the faces of the plywood.
 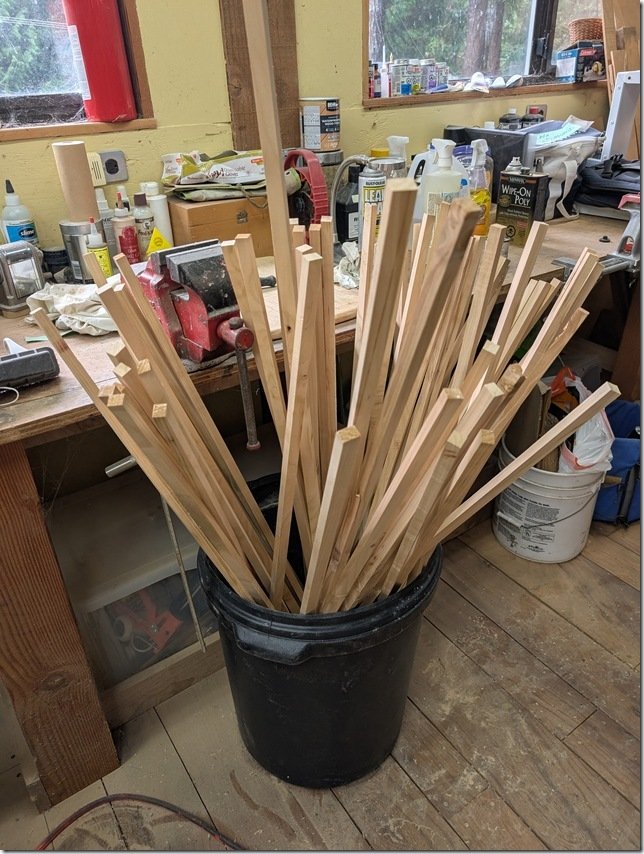 There are a LOT of drawers and doors each of which needs four solid Cherry edges so we set up a bit of a production run between the two of us using the table saw and the thickness planer and started putting them all into this plastic waste can.


 For those interested in the details, this is the make and model Mini-Split we decided on. It is a 9k BTU capacity “Pioneer Diamante Ultra” that is one of the most efficient models they make rated at 23.5 SEER for those who know that system. These type of two part aircon/heating systems are referred to as Mini-Splits because they consist of two parts; the outside condenser/compressor and the inside air handler evaporator.

 Back to the Mini-Split install, this is the wall mounted interior evaporator half of the system and I mounted this Air Handler above the entry door on the front passenger side of the Hab. Works out well as you can see being almost the same width as the door. There are moving louvers with one large one running across the bottom that you can see partially open here that distributes the cold/hot air up/down vertically and then inside are a set of other smaller louvers that move back and forth sideways and help move the air left and right. So this location works out very well for the heating/cooling of the interior air and yet keeps it from blowing directly on us when we are at the Settee or in bed.
  As you might have noticed in the earlier photos, I had to cut away part of the upper stair in the entry to fit this top right corner of the exterior half or condenser/compressor. Once I had this all solidly bolted in place to the frame of the Hab underneath (see that May post for details if you’re curious) I finished it off by building a little “cage” using extruded aluminium and some aluminium diamond plate that I had left over from cutting out some of the original ambulance cabinetry. Also added some insulation to keep the other heat/cold from getting into the Hab.
  The 6mm diamond plate slid nicely into the T-slot grooves of the extruded Aluminium or XAL as you can see here.
  All these interlocked plates and XAL turned this into somewhat of an Origami project as I needed to be able to slide some of those plates out to get inside to connect the wiring and refrigerant lines but I was quite pleased with the way it turned out in the end and still functioned well as our entry stairs.
  I chose the 240V model as it is a wee bit more efficient than the 120V versions and I designed our AC system that I’ll cover in more detail in a future post, to be a Split Phase system so it provides both 120 and 240 Volt power.
 Looking inside the entry door, the drawers on both sides of the Galley are 24” deep but the countertops are 32” so there is a nice space behind the drawers when they are closed.
  This is the space behind the bottom drawer on the Left side of the stairs as you enter and I drilled a 2” hole through the vinyl flooring, insulation and aluminium floor of the box. The Pioneer unit came with the white PVC insert to protect the copper line set and the white cable is the 240VAC power and the black is the communication cable between the two halves of the Mini-Split.
  Up above I drilled two overlapping holes in the solid Acrylic countertop, which is fabulous stuff to work with BTW, and ran the electric cables and copper line sets through this. The copper lines in the interior evaporator unit come permanently fitted and they ended up just above the countertop height so I cut the new copper lines and installed new flare nuts that allowed me to connect them here and then run down into the compressor/condenser unit under the floor.
  The upper parts of the line sets gets covered with this black EPDM insulation and the corrugated clear hose is where the condensation produced by the evaporator drains out and down through the floor onto the road below.
  To protect and hide all these lines and cords I built a small vertical connector between the countertop and the overhead cabinet you can just see at the very top of this photo. The sides will soon be fitted with Cherry panels same as all the fronts of the doors and drawers that will be the topic of several other future posts.
  I
I Most importantly, Razz and Zoe use this new little upper step for their water bowl and so they give this new addition two paws up!


 There is a LOT of electronics in these modern ambulances and this is a small sample of one of the 5 LCD touch screens on the top Left, controls for the Oxygen and vacuum pumps below it, pass through door into the drivers side DS external compartment on the lower Right and then 120VAC and 12VDC plugs on the Right side of the wall.

 If you check out the exterior photos up at the beginning you will see that there are compartments on all four corners of the module/box and a double door one in the middle of the drivers side. These are all accessed through eXtremely robust aluminium doors on the exterior and on the inside they are all built out of aluminium diamond plate.
 The builders at Horton also went to great lengths (pun intended) to build the cabinetry out of very large single sheets of AL and ACM (Aluminium and Aluminium Composite Material) This piece that I finally wrestled off the driver side wall was over 4 meters or almost 14 feet long!
  Starting to empty out.
  Getting down to bare AL framework in walls. You can see the stairs leading out the passenger side (PS) door in the bottom Left corner here and then the bench that runs down the PS side. The AL track embedded in the middle of the floor is for the Stryker stretcher to slide into and lock in place but that will need to wait for another day.
  This is a very small amount of the material that I removed from the interior. Some covered with contact cement or padding as you can see but all very high quality material and very valuable for using in future projects so it all gets stored away.


 On the other side of the workshop, this is about a quarte of the materials that came out of the ambo.
 The ceiling was a double layer of ACM (Aluminium Composite Material) with a foil faced backing sandwiched between it and the AL ceiling ribs.
  All of which came out relatively easily.
  Leaving just these battons of insulation to remove that were also simple to remove and left me with the bare ceiling to work from. The entire box is framed with 2” x 2” or 50mm square aluminum tubing with 3.2mm or 1/8” thick walls. The frames are all welded gogether and you’ll notice that many have additional 45 degree gussets for additional strength and rigidity.
  I tackled the floors next. First by peeling off the diamond pattern rubber sheet floor surface.
  Under the diamond pattern flooring was a layer of AL faced 13mm / 1/2” thick ACM board and then under this ACM floor was a 5mm / .2” thick rubber sound deadening matt. The ACM board was bolted through the 10 gauge AL floor pan that is welded to the 2” x 3” AL floor joists. Stainless bolts in aluminium tend to corrode over time so it was quite a chore to remove each of these floor bolts with my manual torque screwdriver but I was able to finally find and remove all of them.
  With all the bolts removed I was then able to carefully pry up the ACM board ………
  ……… and flip it and the underlying thick rubber sheet up and finally reveal the actual AL floor panels.
  They
They I was very familiar with ACM or Aluminium Composite Material as we used it extensively in building Möbius V1.0 and it is an incredibly useful building material that many are not aware of. It comes in large sheets in thicknesses from 2mm to at least 55mm or 1/8” to 1” and each sheet has three layers, a 1mm thick layer of aluminium on both sides of the center polyethylene foam core.
  There
There
Recent Comments