


In the very first post here in a year “We’re back! Transition to Möbius v2.0 begins” about Project Goldilocks Version 2.0 aka Möbius on Wheels aka Lance, I introduced you to Lance, our 2016 Kenworth T270 medium duty Horton ambulance that we are now transforming into our newest adventures eXploring this awemazing world by land. 
If you missed it, that post will provide you with a good overall sense of the vehicle itself, our January trip to bring him from his birthplace in Sterling Illinois to our new place on Saturna Island in BC and then our relocation to our rental place that is appropriately across the street from the Klamath Falls Fire Department in Oregon.
 Where I’ve continued the long process of removing most of the original ambulance interior equipment, walls, ceiling and floor.
I will get back to that in a later post but I thought it might be more helpful to go back to what is both the beginning and the end so to speak; the design we have evolved so far of what we hope the end result will look like. So that’s what I’ll be covering here in this week’s posting.
As I did with Möbius V1.0 (the boat), I continue to use Autodesk Fusion 360 to create 3D models of almost everything I build, and so I will use screen shots and some animations from Fusion 360 to walk you through the evolution of the design we have so far.

I started by creating a 3D model of the Horton ambulance box/module itself which is an extremely robust all aluminium framed box. I spent time measuring all these frames to an accuracy of about +/- 1mm (0.04”) as I want to be able to use this model to plan out the whole interior and know exactly where every part of the frame is located. This will become especially valuable to me after I have put in all the interior insulation and walls and this AL framing is completely covered up.  The aluminium frames are all 2 inch (50mm) square AL tubing that is 1/8” (3.2mm) thick and then this is “skinned” with continuous sheets (no seams or joints) of 10 Gauge (3mm/0.10”) thick aluminium.
  This shot of the upper rear DS (Driver Side) corner will give you a bit of an idea of just how well reinforced and strong this box is.
One interesting detail I discovered along the way is that the outer AL skin does not come in any direct contact with the AL frame members as the skin is all fastened using 3M VHB (Very High Bond) tape that is about 2mm thick and keeps the outer AL skin isolated from the 2” square AL tubing and reduces the heat bridging transfer.
One of the big benefits of using an ambulance as the base for our XRV is all the compartments that are built into the AL framing with external doors accessing each one, so I added these to the 3D model next.
 On the DS (Drivers Side) there are three of these compartments; two tall ones on the front and rear corners and then a very wide one midway along the DS with double doors.
 All of these externally accessible cabinets are made from 3mm / 1/8” thick diamond plate Aluminium which makes them very strong and fully sealed off from the interior.
As you can see in the photo above they are all in like new condition.
The Black rectangular shapes are the AL plate covers over the wheel wells  On the Passenger Side (PS) there are two compartments, one on the front and rear corners as well as the side entrance door into the interior.
  The compartment on the Front PS corner is in orange here because it was built as an independent AL framed cabinet framed which will be removed and replaced by AL cabinetry I will be building to house the full size fridge/freezer as well as additional storage via the external door (not yet in this model)
 Looking from the PS front corner here I’ve added in the original flooring to help show how all of these diamond plate compartments extend about 50cm/20” below which adds significantly to their total volume. I have now also started to create the new framing (in Black) that I will be adding in for two windows on the PS and one large one on the DS as well as framing in the walk through into the cab you can see on the Right here.
  Looking from the DS front corner here, if you compare these last two views of the model to the previous ones you will see that the diamond plate external compartments have now been cut down to accommodate the internal floor plan we’ve come up with and provide more internal volume.
  Here for example is the DS Front compartment with about 3/4 of its depth cut off leaving about a 24cm / 9.5” deep full height cabinet which will be the new home of the entire electrical system for the habitat which I will cover in detail in future posts.
 We will be insulating all surfaces very heavily with 2 inches of PolyIsocyanurate rigid foam board with double AL foil both sides for maximum R value. This works out perfectly to completely fill the 2 inch deep voids between each of the 2” AL square tubing as you can see here in the ceiling.
On top of this we will add another 1 inch thick layer of double foil faced PolyIso which will give us an total R-value of about R-20 which we think is pretty amazing and is in addition to the black coating of sound suppression on all the interior AL surfaces.
We’ve learned from living in our VERY well insulated boats over the past decades how much overall efficiency we get from having lots of insulation. Keeps the heat out in summer and the heat in during winter so our HVAC (Heating Ventilation Air Conditioning) systems have to work much less and it also dramatically reduces the ingress of any external noises and creates an eXtremely cozy habitat.
Even with all this added insulation our overall finished interior space works out to be 421cm / 13’ 10” Long x 228cm / 7’ 5” Wide x 184cm / 6’ 1/2” Headroom. Might not sound like very much to most of you but by our tiny living standards, and certainly compared to any camper van, is HUGE!
But I digress with all these background details ……………
OK, let’s get back to the interior design!
Once we had the original faming of the ambo box all modeled in Fusion it was time to start figuring out how to organize everything for optimal and maximum living.
This is what I call the “box modeling” stage as using basic box shapes for the major interior components makes it very fast and easy for us to try out every idea we had, and between the two of us and all our times living in boats, we had a LOT of ideas!
Doing all this within our 3D model ensured that we were working within the actual interior dimensions we had and allowed us to work out realistic dimensions for things like countertop and drawer depths, headroom, walking and seating spaces.
* Note; you can click on any image to enlarge if you’d like to see more details.
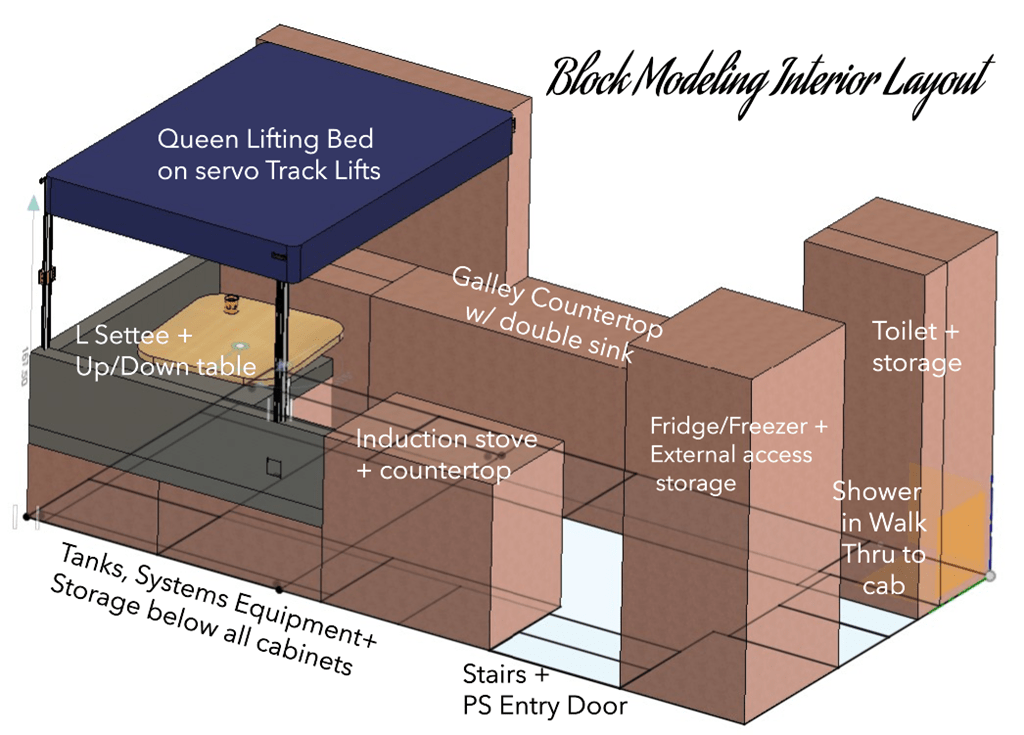 I have annotated this example of one of our box modeling sessions which is about where we ended up.
We started with the placement of the bed as it is the largest single item and because knew we wanted to make this a lifting bed rather than fold out/up/down style so it could be a full Queen sized mattress that was always ready to use at a push of a button and not one that needed to be put together and taken apart every night/morning.
As we used to say about our boats, this is our full time home, we are NOT camping! Hence all our focus on designing the interior for maximum efficiency of the available space.
 Putting the bed on a platform that raises and lowers electronically using Track Actuators allows us to put the bed all the way up into the ceiling every morning and have the entire space below available for our equally large L-shaped settee. At night we lower the large table in the settee and lower the bed in seconds and climb right in.
This layout naturally divides the length of the habitat into three areas; the lifting Queen bed and work/eating settee in the rear, Galley/Kitchen in the middle and then Fridge/Freezer + Head + Shower in the front.
Fast forwarding through MANY iterations and discussions the final design gradually emerged as I added in the specific equipment we have decided on (for now) with models of actual components and equipment such as the double sink, induction cooktop, smart oven, fridge/freezer, toilet, windows, house batteries and so on. I’ll do my best to use screen grabs from our Fusion 360 model to show you the layout we will be building.
 It is still very crude but I’ve added in some textures, colours and materials to help show the basic interior design that we’ve settled on.
  Seen from the PS Rear corner in bed time mode.
  Bed removed this top view might provide a bit more perspective.
And that’s a wrap for this week folks! Hope this has been helpful in visualizing the layout in your own mind.
Any and all comments, ideas, and critiques most welcome and appreciated and I look forward to reading them all as they come in. Having you along for this adventure is MUCH appreciated and thanks to you all for putting up with my long winded reporting.
One note is that we are going to be up in Saturna till about the end of July with our two awemazing Granddaughters for a LONG awaited visit. And yes their pesky parents are coming too! Christine is actually up there already looking after Cotton their lovable white Golden Lab and I’ll be traveling up there on Tuesday. So my time will be a bit short for responding the rest of this month but I’ll do my best to answer and create weekly posts and appreciate your patience.
-Wayne
Yet another exciting Wayne’s World adventure! Love hearing the details.
Ahoy Kathleen and Steve! You are always our biggest fans and we SO appreciate you for it and all you do for us. I’ll do my best to keep you entertained with Mobius V2.0 so stay tuned. Just one word of warning in that once we get Lance on the road it will mean you are in ever greater danger of more frequent visits!!
Very interesting and right down amazing build. I will be following along and thank you for sharing your build. Vern from Boise, Id.