As we all head to the exit of 2025 I will continue to summarize the progress in various key systems and areas on Lance over the past few months.
This week I’ll bring you up to date on where the Galley is at so far.
Easily one of the most used and most important areas for our day to day live in Lance and our 10,000 + mile “maiden voyage” this past summer proved that our design worked well as we used it during that two month test drive. We prioritized large areas of open countertop, dual deep sink, induction cooktop and large fridge and freezer and you can see the basic layout from the 3D model screengrab here.
GALLEY COUNTERTOPS:
Here is what it looked like as of the beginning of June, just before we hit the road to the East Coast of the US. This is looking forward so Drivers Side DS on the Left and Passenger Side PS on the Right. Entry door into the Hab (Habitat/box) is on the upper Right with the large vertical door 10 cubic foot Fridge/Freezer on your Right as you enter.
Deep double sink being undermounted to the 25mm/1” solid surface acrylic countertop.
Lots of options for water at the sink; hot/cold adjustment at the base of the faucet with both a large flexible rinsing hose with its own nozzle & lever and then an independently controlled rotating spigot. To the Right of the main faucet is an ultra purified drinking water nozzle that has water that has been put through a full Acuva UV treatment to remove any possible remaining particles after ……….
……… it comes out of the main filtration which is handled by this triple set of progressive main filtration that all our potable water goes through.
We have eXcellent water pressure running about 65PSI thanks to this Kohree 7GPM pump. All the water system equipment is located in the externally accessed compartment that is midway along the DS.
On the PS of the Galley there is more countertop and our 2 burner induction cooktop that is eXtremely efficient and a joy to cook on. This cooktop fits snugly in the countertop cutout so it can be easily lifted out and plugged in outside when we want to cook out there.
The vertical extruded aluminium XAL on the Right here is the linear actuator for the PS Front corner of the Queen Bed lift system. Underneath both countertops it is all drawers as we find these much more efficient to use than cupboards and overall we have more than 20 drawers inside of Lance.
GALLEY DRAWERS:
I have always preferred dovetail joints for all drawers given their superior strength that stands up for decades of use and I think they look great too and so that’s what we went with for Lance. I was going to do this all myself but with almost a hundred dovetailed corners to do and SO many other jobs demanding my time and attention I decided to job this out. I found a fabulous company to work with called Barker Doors who offer a service using CNC (Computer Numeric Control) machines to custom cut all your drawers. I had all the drawers fully modeled in Fusion 360 so it was easy for me to send them these files with all the exact measurements I needed and they cut all the 5/8” Baltic Birch plywood to size for all the sides and the bottoms and then CNC cut all the dovetails. In the end this all worked out to cost less than I would have paid for just the Baltic Birch plywood and drawer slides so I was super happy with how this all worked out and I can recommend Barker Doors to anyone VERY strongly. They shipped all the pre-cut drawers to me as flatpacks like this so the whole shipment of all the drawers was not too large and they were all very well shrink wrapped and carefully boxed up so they arrived with no damage at all. They also offered a great prices on the the top quality Blum undermount ball bearing drawer slides I wanted so it all came as a single order which made my life easier.
Mounting more than 40 drawer slides to the XAL framework was very straightforward but time consuming to get them all exactly parallel and lined up. and some required a bit of Houdini moves to hold in place and tighten up. Next, I set up a little workbench on top of the PS Galley counter to assemble each drawer. Each set of dovetails only required a few drops of wood glue and they went together very well with two bar clamps and some taps with my little hammer to get the joints to fit together all the way. The dovetails were so precise that every drawer went together perfectly square and were solid as a rock. The Blum drawer slides required two slots in the bottom of each rear drawer side so I cut those out next and then I mounted to the Orange locking hardware to the bottom of the front corners. These are where the drawer slides clip into the drawer and make it very easy to lift out a drawer at any time. It’s a great system! Installing each drawer was now a simple process of pulling out each drawer slide………. ………… setting the pins in the rear of each drawer slide into the corresponding holes I had previously drilled and pushing them closed till they clicked in place. Et Voila! We’ve got drawers! Sad to say that I wasn’t able to get this done before we left on our big summer adventure so we REALLY appreciate having these now! I wanted all surfaces of these drawers to have a tough durable finish and decided to go with this two part Rubi Monocoat finish that you put on by hand with cloths rather than brush or spray. Hand rubbed finishes have always been my favorite and while this was a new one for me I was eXtremely pleased with the end result and the whole process of applying it. It was a bit laborious and a good workout but a very satisfying process for me. Difficult to see in photos but the Baltic Birch plywood came out with a glowing warm colour and a very tough finish that is also very easy to reapply in the future. To reduce the loss of usable space under the sinks I used these low profile P-traps which have turned out to work very well. and only required a small cut out on the rear of the two under sink drawers to clear nicely.
GALLEY CEILING & COB LED LIGHTING
Onwards and upwards I turned my attention to the ceiling of the Galley. It took a LOT of research to find the Goldilocks material for the ceiling but I finally found this White wood textured PVC trim molding material that checked all the boxes of light, easy to clean and attractive. It comes in 6” wide 8ft long planks and was very easy to work with. For lighting, I decided to use COB (Circuit on Board) LED strip lights which I set inside lengths of 20mm wide black aluminium U channel which I ran in between each of the White PVC ceiling planks. I like these newer COB strips for two reasons; they provide an uninterrupted line of light rather than individual points of light in the regular LED strips and they can be adjusted from about 2200K (very warm amber) up to 6500K (daylight white). In the past, SMD LED strips you have to chose a specific colour temp and they often have 60–120 LEDs per meter (≈1.5–3 LEDs per inch) whereas these COB lights have hundreds of micro‑LEDs tightly together, giving continuous light with no visible dots of light. Once I had the layout done and the strips of PVC and AL channel cut to length, the process went quite quickly. I could apply the construction adhesive to each plank and AL channel and press them up into place and then use my super handy cargo jacks and some scrap lengths of XAL to press these all up against the ceiling so they ended up flat and aligned. You can buy the COB LED lights in 20 meter rolls which you then cut to the lengths you want and solder three wires to the copper strips underlying the Yellow COB light strips. Takes a bit of practice to get these tight solder joints without any cross connections but all went pretty well after a few practice solders. Then I twist the wires to help reduce any electrical interference and slide a clear tube of heat shrink tubing over the joints and shrink them in place for a nice clean and protected connection.
Each of the LED strips have self adhesive on the back so you just peel off the protective wax layer and press these into the AL channel. I purchased the Black AL channel with frosted clip in covers so once I had the COB LED light strips glued in place and wired up ………… ……………. I could now press these clear covers in place. Here’s the result at about 6000k. These LED light strips are also fully dimmable so you can adjust both the colour temp from warm to cold white and from off to full almost daylight brightness.
We are very pleased with the end result.
Yet to come is the making of all the fronts to these drawers where I will get to use the fabulous 125 year old Cherry that my dear friends Colin, Rick and Sherry gifted us with but that probably won’t be until we get back here next year from our trip down to Baja so due stay tuned for all of THAT!
My sincere thanks for taking your valuable time to read these updates and join us on our adventures. Please leave your questions and comments in the Join the Discussion box below and hope to see you here again next week.
You might say that my world has gone to the dogs as Christine is back in Florida getting in some much needed Gramma time with our Grandson Liam, who somehow just turned TEN last week. Yikes! How did THAT happen?!?!?!? So here on Road Runner Ranch it is down to us Three Pupsketeers, Razz, Zoe and me, but we’re doing well and enjoying being surrounded by the beauty here in Southern Nevada.
Some of you may remember that the last post I did with updates on the work on Lance’s transformation was called “Mini-Split = Major Step Up: XRV Lance Update 4 May, 2025” May was a Looooooong time ago now so you may want to click on that link if you’d like a refresher.
Quite a lot of progress has happened with Lance’s transformation during the six months since that last post and I’ll do my best to cover as much as I can here in the coming weeks. To get started I’ll pick up where that update left off and catch you up on what happened between then and June 10 when we took left our place here in Nevada in Lance bound for Portland Maine for the June 21st wedding of my niece Julia to her beau Ben.
In the weeks to follow I will try to post once a week, usually on Sundays, providing updates on the work I’ve done on the different systems such as cabinetry, all the dovetail drawers, the Electrical Cabinet, rooftop solar panels and so on.
So grab a tasty beverage and a comfy seat and let’s get back to where we left off with that air conditioner/heater Mini-Split system you last saw in May.
Mini-Split is Fully Functional!
As per the title of that May 4th post, I had just finished quite literally shoehorning the exterior half of the Mini-Split unit up into the barely big enough space between Lance’s ambo box and the Kenworth frame.
And I’m very happy that I can start this week’s update with the news that I have since finished installing the Mini-Split and it is working even better than we had hoped. For those interested in the details, this is the make and model Mini-Split we decided on. It is a 9k BTU capacity “Pioneer Diamante Ultra” that is one of the most efficient models they make rated at 23.5 SEER for those who know that system. These type of two part aircon/heating systems are referred to as Mini-Splits because they consist of two parts; the outside condenser/compressor and the inside air handler evaporator. If you check out the basic features here this model provides both cooling in up to 131F/55C outside temps as well as heating when it gets down to from –13F/-25C. 9000 BTU is more than we need but the smallest model I could find so just means it won’t take much run time to keep the inside of the “Hab” as we have come to call the Habitat or Box or living quarters in Lance, just the right temperature in both hot and cold climates.
I will cover this in a later blog post but just FYI, in addition to the Mini-Split we will also have a diesel fired boiler that will heats the Glycol solution that flows through a network of PEX tubing in the floor as well as heat for two floor mounted air/glycol heat exchangers (mini radiators) so that when we head up to the Arctic, possibly this summer, we’ll stay nice and toasty. And this boiler also provides all our domestic hot water DHW for sinks and showers so stay tuned for that update in a few weeks. Back to the Mini-Split install, this is the wall mounted interior evaporator half of the system and I mounted this Air Handler above the entry door on the front passenger side of the Hab. Works out well as you can see being almost the same width as the door. There are moving louvers with one large one running across the bottom that you can see partially open here that distributes the cold/hot air up/down vertically and then inside are a set of other smaller louvers that move back and forth sideways and help move the air left and right. So this location works out very well for the heating/cooling of the interior air and yet keeps it from blowing directly on us when we are at the Settee or in bed. As you might have noticed in the earlier photos, I had to cut away part of the upper stair in the entry to fit this top right corner of the exterior half or condenser/compressor. Once I had this all solidly bolted in place to the frame of the Hab underneath (see that May post for details if you’re curious) I finished it off by building a little “cage” using extruded aluminium and some aluminium diamond plate that I had left over from cutting out some of the original ambulance cabinetry. Also added some insulation to keep the other heat/cold from getting into the Hab. The 6mm diamond plate slid nicely into the T-slot grooves of the extruded Aluminium or XAL as you can see here. All these interlocked plates and XAL turned this into somewhat of an Origami project as I needed to be able to slide some of those plates out to get inside to connect the wiring and refrigerant lines but I was quite pleased with the way it turned out in the end and still functioned well as our entry stairs. I chose the 240V model as it is a wee bit more efficient than the 120V versions and I designed our AC system that I’ll cover in more detail in a future post, to be a Split Phase system so it provides both 120 and 240 Volt power. I’m going to break the time sequence a bit here as I actually finished off this l the install of the Mini-Split when we got back from our summer marathon in Lance and was working on him at our place on Saturna Island. Next part of the install was to make up some custom copper line sets that connect the two parts and transfer the refrigerant between the exterior condenser and the interior evaporator. These copper tubes are well insulated to help with efficiency and that’s the white covering you see here.
I could do this because Lance’s ambulance box is 8 feet wide and allowed me to design both really deep drawers and countertops and still have lots of room for working in the Galley between the two countertops. I’m mentioning this because designing this space behind the drawers gives me the perfect place to run electrical cables, PEX water lines and now Mini-Split copper line sets all out of the way and hidden from view and yet easy to access for installing and maintenance. Looking inside the entry door, the drawers on both sides of the Galley are 24” deep but the countertops are 32” so there is a nice space behind the drawers when they are closed. I could do this because Lance’s ambulance box is 8 feet/243cm wide on the outside and the finished inside width is about 7 1/2 ft/2.3m which allowed me to design both really deep drawers and countertops and still have lots of room for working in the Galley between the two countertops. I’m mentioning this because designing this space behind the drawers gives me the perfect place to run electrical cables, PEX water lines and now Mini-Split copper line sets all out of the way and hidden from view and yet easy to access for installing and maintenance. This is the space behind the bottom drawer on the Left side of the stairs as you enter and I drilled a 2” hole through the vinyl flooring, insulation and aluminium floor of the box. The Pioneer unit came with the white PVC insert to protect the copper line set and the white cable is the 240VAC power and the black is the communication cable between the two halves of the Mini-Split. Up above I drilled two overlapping holes in the solid Acrylic countertop, which is fabulous stuff to work with BTW, and ran the electric cables and copper line sets through this. The copper lines in the interior evaporator unit come permanently fitted and they ended up just above the countertop height so I cut the new copper lines and installed new flare nuts that allowed me to connect them here and then run down into the compressor/condenser unit under the floor. The upper parts of the line sets gets covered with this black EPDM insulation and the corrugated clear hose is where the condensation produced by the evaporator drains out and down through the floor onto the road below. To protect and hide all these lines and cords I built a small vertical connector between the countertop and the overhead cabinet you can just see at the very top of this photo. The sides will soon be fitted with Cherry panels same as all the fronts of the doors and drawers that will be the topic of several other future posts. I will maybe guild some small shelves into this space to make it otherwise useful but for now it plays its primary role of protecting all these electrical cords and copper lines. Most importantly, Razz and Zoe use this new little upper step for their water bowl and so they give this new addition two paws up!
It’s been a bit cold the past few days with highs in the day around 10C/50F and brrrrrrrr as low as 4C/40F at night so we Three Pupsketeers have been really appreciating how well the heating function of the Mini-Split has kept us keeping us nice and comfy.
Well, that’s going to do it for this week but at least I’ve started to catch up with all those months of no updates on the progress with Lance and hope you enjoyed it.
Thanks for joining the journey here and don’t hesitate to leave your comments and questions in the Join the Discussion box below.
See you next week which will be Thanksgiving weekend for all my American friends and family.
In the very first post here in a year “We’re back! Transition to Möbius v2.0 begins” about Project Goldilocks Version 2.0 aka Möbius on Wheels aka Lance, I introduced you to Lance, our 2016 Kenworth T270 medium duty Horton ambulance that we are now transforming into our newest adventures eXploring this awemazing world by land.
If you missed it, that post will provide you with a good overall sense of the vehicle itself, our January trip to bring him from his birthplace in Sterling Illinois to our new place on Saturna Island in BC and then our relocation to our rental place that is appropriately across the street from the Klamath Falls Fire Department in Oregon.
Where I’ve continued the long process of removing most of the original ambulance interior equipment, walls, ceiling and floor. I will get back to that in a later post but I thought it might be more helpful to go back to what is both the beginning and the end so to speak; the design we have evolved so far of what we hope the end result will look like. So that’s what I’ll be covering here in this week’s posting.
As I did with Möbius V1.0 (the boat), I continue to use Autodesk Fusion 360 to create 3D models of almost everything I build, and so I will use screen shots and some animations from Fusion 360 to walk you through the evolution of the design we have so far.
I started by creating a 3D model of the Horton ambulance box/module itself which is an extremely robust all aluminium framed box. I spent time measuring all these frames to an accuracy of about +/- 1mm (0.04”) as I want to be able to use this model to plan out the whole interior and know exactly where every part of the frame is located. This will become especially valuable to me after I have put in all the interior insulation and walls and this AL framing is completely covered up.
The aluminium frames are all 2 inch (50mm) square AL tubing that is 1/8” (3.2mm) thick and then this is “skinned” with continuous sheets (no seams or joints) of 10 Gauge (3mm/0.10”) thick aluminium.
This shot of the upper rear DS (Driver Side) corner will give you a bit of an idea of just how well reinforced and strong this box is. One interesting detail I discovered along the way is that the outer AL skin does not come in any direct contact with the AL frame members as the skin is all fastened using 3M VHB (Very High Bond) tape that is about 2mm thick and keeps the outer AL skin isolated from the 2” square AL tubing and reduces the heat bridging transfer.
One of the big benefits of using an ambulance as the base for our XRV is all the compartments that are built into the AL framing with external doors accessing each one, so I added these to the 3D model next.
On the DS (Drivers Side) there are three of these compartments; two tall ones on the front and rear corners and then a very wide one midway along the DS with double doors.
All of these externally accessible cabinets are made from 3mm / 1/8” thick diamond plate Aluminium which makes them very strong and fully sealed off from the interior.
As you can see in the photo above they are all in like new condition. The Black rectangular shapes are the AL plate covers over the wheel wells On the Passenger Side (PS) there are two compartments, one on the front and rear corners as well as the side entrance door into the interior.
The compartment on the Front PS corner is in orange here because it was built as an independent AL framed cabinet framed which will be removed and replaced by AL cabinetry I will be building to house the full size fridge/freezer as well as additional storage via the external door (not yet in this model)
Looking from the PS front corner here I’ve added in the original flooring to help show how all of these diamond plate compartments extend about 50cm/20” below which adds significantly to their total volume. I have now also started to create the new framing (in Black) that I will be adding in for two windows on the PS and one large one on the DS as well as framing in the walk through into the cab you can see on the Right here.
Looking from the DS front corner here, if you compare these last two views of the model to the previous ones you will see that the diamond plate external compartments have now been cut down to accommodate the internal floor plan we’ve come up with and provide more internal volume.
Here for example is the DS Front compartment with about 3/4 of its depth cut off leaving about a 24cm / 9.5” deep full height cabinet which will be the new home of the entire electrical system for the habitat which I will cover in detail in future posts.
We will be insulating all surfaces very heavily with 2 inches of PolyIsocyanurate rigid foam board with double AL foil both sides for maximum R value. This works out perfectly to completely fill the 2 inch deep voids between each of the 2” AL square tubing as you can see here in the ceiling.
On top of this we will add another 1 inch thick layer of double foil faced PolyIso which will give us an total R-value of about R-20 which we think is pretty amazing and is in addition to the black coating of sound suppression on all the interior AL surfaces. We’ve learned from living in our VERY well insulated boats over the past decades how much overall efficiency we get from having lots of insulation. Keeps the heat out in summer and the heat in during winter so our HVAC (Heating Ventilation Air Conditioning) systems have to work much less and it also dramatically reduces the ingress of any external noises and creates an eXtremely cozy habitat.
Even with all this added insulation our overall finished interior space works out to be 421cm / 13’ 10” Long x 228cm / 7’ 5” Wide x 184cm / 6’ 1/2” Headroom. Might not sound like very much to most of you but by our tiny living standards, and certainly compared to any camper van, is HUGE!
But I digress with all these background details ……………
OK, let’s get back to the interior design!
Once we had the original faming of the ambo box all modeled in Fusion it was time to start figuring out how to organize everything for optimal and maximum living.
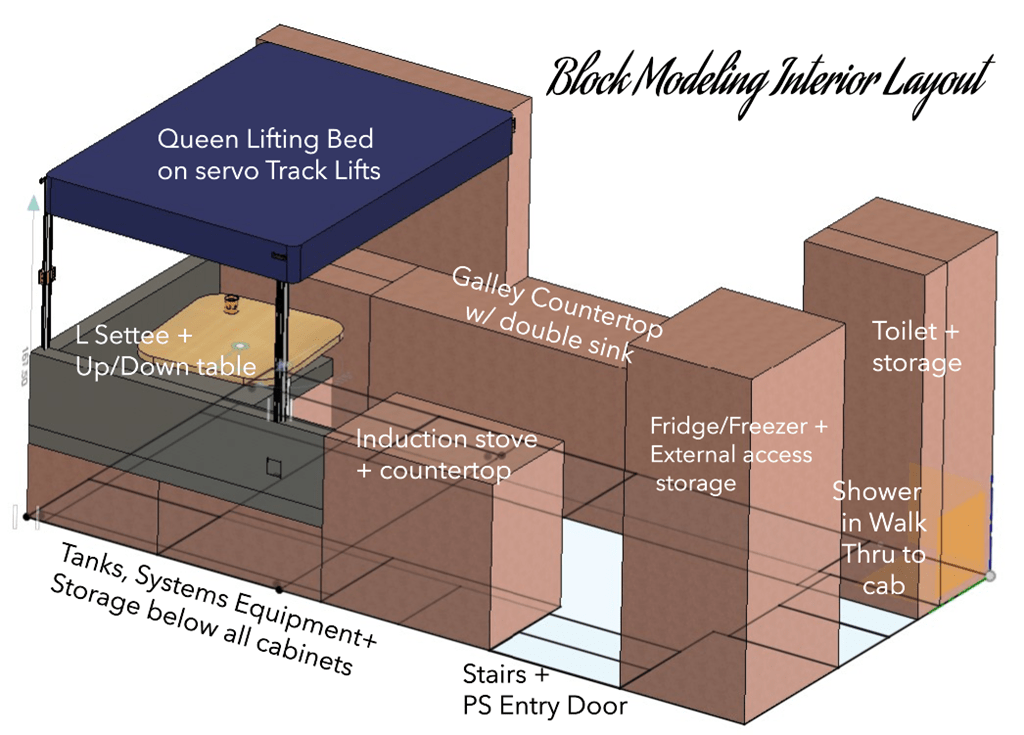
This is what I call the “box modeling” stage as using basic box shapes for the major interior components makes it very fast and easy for us to try out every idea we had, and between the two of us and all our times living in boats, we had a LOT of ideas!
Doing all this within our 3D model ensured that we were working within the actual interior dimensions we had and allowed us to work out realistic dimensions for things like countertop and drawer depths, headroom, walking and seating spaces.
* Note; you can click on any image to enlarge if you’d like to see more details.
I have annotated this example of one of our box modeling sessions which is about where we ended up.
We started with the placement of the bed as it is the largest single item and because knew we wanted to make this a lifting bed rather than fold out/up/down style so it could be a full Queen sized mattress that was always ready to use at a push of a button and not one that needed to be put together and taken apart every night/morning.
As we used to say about our boats, this is our full time home, we are NOT camping! Hence all our focus on designing the interior for maximum efficiency of the available space.
Putting the bed on a platform that raises and lowers electronically using Track Actuators allows us to put the bed all the way up into the ceiling every morning and have the entire space below available for our equally large L-shaped settee. At night we lower the large table in the settee and lower the bed in seconds and climb right in. This layout naturally divides the length of the habitat into three areas; the lifting Queen bed and work/eating settee in the rear, Galley/Kitchen in the middle and then Fridge/Freezer + Head + Shower in the front.
Fast forwarding through MANY iterations and discussions the final design gradually emerged as I added in the specific equipment we have decided on (for now) with models of actual components and equipment such as the double sink, induction cooktop, smart oven, fridge/freezer, toilet, windows, house batteries and so on. I’ll do my best to use screen grabs from our Fusion 360 model to show you the layout we will be building.
It is still very crude but I’ve added in some textures, colours and materials to help show the basic interior design that we’ve settled on.
Seen from the PS Rear corner in bed time mode. Bed removed this top view might provide a bit more perspective.
And that’s a wrap for this week folks! Hope this has been helpful in visualizing the layout in your own mind.
Any and all comments, ideas, and critiques most welcome and appreciated and I look forward to reading them all as they come in. Having you along for this adventure is MUCH appreciated and thanks to you all for putting up with my long winded reporting.
One note is that we are going to be up in Saturna till about the end of July with our two awemazing Granddaughters for a LONG awaited visit. And yes their pesky parents are coming too! Christine is actually up there already looking after Cotton their lovable white Golden Lab and I’ll be traveling up there on Tuesday. So my time will be a bit short for responding the rest of this month but I’ll do my best to answer and create weekly posts and appreciate your patience.
It was a busy week for both Christine and me but nothing too blogworthy so this week’s Möbius update will be short for a change.
I just returned to Möbius last night after spending most of the week in England. This was my first trip for 2022 and a nice change of pace for me. It has proven to take a LOT of time, energy and $$ to get parts shipped from England to us here in Turkey so I decided it was best to go pick up the new parts I needed for Mr. Gee in person from Gardner Marine Diesel and bring them back with me. To be honest, I will take just about any reason to make a trip to GMD and see Michael, James and David there so it was an easy decision. To make it even more compelling, Pegasus Airlines has very cheap flights twice a week between Antalya and London so my entire trip would cost less than the customs duties to ship the parts to me and would take at least a month, sometimes two to get here. The icing on the cake for me was the chance to get in a visit with a very good friend Robin and his wonderful wife Jayne. Robin and I first met when we were both fairly new to Autodesk back in about 1990 and have continue to grow our friendship over all those years. My thanks to Robin and Jayne for opening their home and hearts in welcoming me to stay with them and we had a delightful three days hanging out and catching up.
My outbound flight was very early in the morning so we decided to rent a car and spend the night in a fun little hotel not far from the airport and enjoyed a nice “date night” out at a great little family restaurant right across from the hotel. Christine was then able to do some shopping for groceries and other items that are much more available at the larger stores and malls in Antalya and then drive back to our small town of Finike so it all worked out very well..
XPM78-02 Vanguard
We also took advantage of being back in Antalya to stop by the Free Zone and Naval Yachts to see the progress on the several new builds they have underway. XPM78-02 mv Vanguard is now looking very much like a boat now that the superstructure for the Pilot House is in place. The other build is for the larger XPM85-01 which is in the early stages of the ‘hotworks’ and after a long wait due to supply chain and other issues, all the aluminium plates and parts have been delivered. These boats are built upside down in this first stage until all the hull plating is welded in place and then the hull is flipped right way up. The upside down deck plates are first put together in the steel framework bolted to the floor and then frames and bulkheads are tacked in place. Meanwhile, over on Vanguard, Uğur and Nihat, who did most of the AL work on Möbius are now busy welding the hundreds of Al pieces in place. You can see some of the cut and rolled plates for the keels setting on the floor to the Left. XPM78-02 is based on the same design as Möbius but will have twin JD engines as you can see from the dual prop tunnels in these two photos. The aft deck will be slightly larger and the Owners have decided to build some of the furniture into the boat such as this L-shaped dining area. Large window behind it, WT door into the SuperSalon in the middle and stairs up to the SkyBridge on the Right.
Here is the view from inside the SuperSalon looking back out onto the Aft Deck.
Going up those stairs the SkyBridge is starting to take shape and more built in furniture with an other L-shaped settee at the Aft end. Peering down from the very Aft end of the FlyBridge and roof overtop of the Aft Deck you can see the same arrangement as on Möbius with the doghouse for walking into the Engine Room on the Left and matching winding stairs on both sides. Looking up and aft lets you see another view of the upside down XPM85. Back down to Deck level on Vanguard, you can see another owner driven change with the addition of these bulwarks running most of the length of the side decks.
Bulwarks run all the way up to and around the Anchor Deck and bow. Up at the Bow the “sidewinder” anchor setup is the same as we designed for Möbius along with the Samson Post in the center and nose cone in the very front. This setup has proven to work out eXtremely well on Möbius so has been replicated here on hull #2. You can see how Dennis has nicely designed the Bow and anchoring arrangements to now include the wrap around bulwarks.
XPM78-01 Möbius
Lest we should forget the Mighty Möbius, I will leave you with THIS LINK to a series of photos that Captain Christine put together while I was off in Gardner Land in the UK this past week. Christine went through some of our archives of thousands of photos over the past 6 months or so and put the ones she liked into this album. So if you’ve been Jonesing to see less of the Engine Room and all the detailed technical shots that I post and more of the interior and exterior of Möbius, click the link above and enjoy your tour through this collection. Thanks for taking time to join us here again this week and hope you’ll be back again next Sunday for the latest weekly update on what’s been going on in Möbius.World.
Special thanks to all of you who have been contributing your questions and comments in the “Join the Discussion” box below and please keep them coming!
A rather scattered feeling week as Christine and I scurry about trying to get everything done before we fly back to the US and Canada for two months of long overdue and much needed Gramma & Grampa time with our kids, grandkids and many others. It will be almost two years since I’ve been back there so I am REALLY looking forward to this chance to spend time with the loved ones we so gratefully get to count as our family and friends. Our challenge is that this long list of friends and family are spread out all across North America so there is no one or even several common areas we can fly into where groups of them live.
However this is nothing new for us and so our favorite method is to rent an SUV, do a quick DIY mini camper conversion by building a platform bed in the back, picking up a cooler and some basic culinary tools and hit the road. We’ve been referring to these as the “Nauti Grandparents World Tour” and I think this will be our fourth or so NA Road trip
Here is one example of how I setup this Ford Edge SUV for our two month trek back in 2018. This is one of our favorite spots on the Florida everglades just a few miles away from where Christine’s son Tim lives where we have crocs to entertain us for our morning breakfast. And NO that did not include them having Barney or Ruby FOR breakfast! This was how I converted the 1998 Galloper that we were gifted by our dear friend John for our trek from Portugal to Turkey back in 2017. Simple but effective and we have a treasure trove of great memories from these trips so it is a pattern we hare very happy to repeat.
I like living on The No Plan Plan so we don’t have a route or schedule worked out but our current thinking is that after we land in Miami this coming Thursday Oct. 7th I will get busy with the camper conversion of the SUV and spend the weekend with friends and family in the southern Florida area before we start making our way North. We will likely do a somewhat diagonal trek to see friends in northern Florida, Alabama, Chicago and South Dakota and probably cross into Canada around the Alberta/Saskatchewan border. From there I’m looking forward to introducing Christine to some of Canada’s finest jewels by going through the Rockies to see spots such as Banff, Jasper and Lake Louise. Lots more family and friends to see in BC as we eventually make our way over to Vancouver and then Vancouver Island before we need to head south along the Pacific coast down to the SF Bay area and LA where we’ll turn left and start making our way East back to Florida where we fly back to Turkey on the first of December. It will be interesting to see what the odometer reads when we turn it in but likely more than 10K miles in total I’m guessing.
I will keep you posted from time to time here on the blog and those who wish can also follow along on FB and Instagram but this will likely be a bit of a hiatus for my blog articles till we return to Möbius at the beginning of December.
But enough of the future and let’s get back to the past week and what’s been going on. As per the title, I’m just going to catch you up on the bits and bobs of jobs that we got done this past week.
Watermaker Update
In last week’s post which you can read HERE I covered the installation of the big Blue Media or “sand” filter that I installed to more thoroughly filter the sea water as it gets pumped through the watermaker and converted into clear clean and almost pure H2O. This extends the life of the other two sea water filters from weeks to about one year so well worth the time and trouble. I received quite a few questions and Emails about this and you can read some of that in my answers to the comments on that posting but I thought some of this was worth posting here on its own with a few more details added.
One part of the discussion was about how Watermakers work and I noted that I’ve never been sure that Watermakers use “Reverse Osmosis” as this is a purely mechanical process of forcing salt water under very high pressures to pass through a semi-permeable membrane that won’t allow the larger sized salt and other molecules pass through so you get close to pure H2O as a result. I think the confusion in terminology comes in due to the fact that these membranes are very universal in use for lots of different applications and one of those is for actual reverse osmosis treatment of water such as ones in homes that use the chemical process of reverse osmosis to “pull” the raw water through the membrane and filter out unwanted minerals and other molecules to create clean water on the other side of the membrane.
My understanding is that high quality membranes such as those from DOW and Parker, only allow particles smaller than 0.0001 microns to pass through so very little other than the H2O molecules themselves can make it through.
This graphic from SeaTask does a nice job of putting this into perspective and as it notes, not much more than the H2O molecules can make it through that membrane.
Several people asked if we were doing any additional treatments to the watermaker water before drinking it. The short answer is no, we don’t do any additional treatment and drink the product water as it is called as it comes out of the watermaker. The slightly longer answer is that while some others do add additional treatments ranging from the use of second actual RO filter to UV (Ultra Violet) radiation, we feel that these are superfluous. Both Christine and I have been drinking watermaker water for decades with no known side or ill effects so we are very comfortable with this.
However, we do also have a 210L/55USG polyethylene tank that we also keep filled with watermaker water at all times. We did this as a redundant backup type of system and a bit of a “belt & suspenders” approach for that critical to life commodity of potable water. This tank is completely independent with its own pump with a dedicated faucet in the galley sink and as with all our aluminium built in tanks, it too is ONLY ever filled with water from our watermaker. No shore water allowed onboard. Therefore even if we were to somehow loose the entire 7300L/1900USG supply of potable water in the six aluminium tanks welded into the hull or their pumps or plumbing failed, we would always have about 200L to tide us over until we could fix the watermaker or whatever the problem was with our potable water system. We use this plastic water tank every day as literal drinking water supply from the faucet in the galley sink, but we do this just to keep this tank, pump, lines, etc. in good working condition, not because of any concern for the quality of the water itself and we regularly drink the water from all the other faucets as well.
I have read mixed reports of concerns that watermaker water is “too pure” in that the “good” parts such as some minerals and vitamins but we have always had a daily regime of multi vitamins, vitamin D & E, Omega 3, etc. as a “just in case” we might be short on any of those with our regular eating so these would more than make up for any lack of minerals and vitamins in our onboard potable water.
If anything, the only slight downside of drinking watermaker water is that it is pretty much tasteless and we do notice that when we are travelling or eating at other people’s homes that there is more “taste” the water, which of course can sometimes be very good and other times not so much so!
More XPM Family News
A few weeks ago in my post “The Artnautica Family Continues to Grow” I shared a few details of the next two XPM boats being built at Naval Yachts, the XPM78-02 Vanguard and the first of the larger XPM85 mode. This week I received two new introduction videos that Naval has posted on YouTube and I thought you might enjoy seeing these so here are the links below.
XPM78-02 Vanguard Intro video
XPM85 intro video from Naval
I will do my best to keep you updated as these two new builds progress so do stay tuned for more XPM goodness in the coming months.
Some TLC for our Tender “Mobli”
I was finally able to carve out some time to work on getting our Tender which we have called “Mobli” as a slight play on Kipling’s character Mowgli.
Basic specs are:
LOA 5.0m / 16.4ft
Beam 2.0m / 6.5ft
Draft 288mm / 13.8 inch
Weight: 1088 Kg / 2390 Lbs
Engine: 110HP Yanmar 4JH4-HTE
Propulsion: Castoldi 224 Direct Drive Jet
Our design intent was not for a typical RIB dinghy to just ferry us ashore in an anchorage and much more so a full on Tender that we designed using the same four SCEM principles we used for Möbius; Safety, Comfort, Efficiency and Maintainability. This will be our mini eXplorer boat to take us to places we can’t or don’t want to take Möbius to such as up small inlets and rivers, into super shallow bays and enable us to take multi day eXcursions in safety and comfortably dry in most any weather. Should also make for a fun boat when we have grandkids and others that might want to go water skiing or wakeboarding.
Mobli will also be our backup plan if we should ever run into catastrophic problems with Möbius being either unable to move or worst yet, sinking or on fire. As such Mobli will be both our lifeboat should we ever need to abandon ship and also be our emergency “get home” solution by being a little mini tugboat capable of pushing or pulling Möbius at a reasonable speed in reasonable sea conditions. Hence the 110HP inboard, which also met our single fuel boat design criteria by eliminating gasoline for an outboard engine. After seeing so many jet drives being used the pilot boats being built for Coast Guards, military and police use, we went with a jet drive for added safety, shallow water ability and high mobility in any direction. Having industrial quality rubber fenders or rub rails wrapped around all sides gave us all the better abilities to be a mini tugboat and be that much safer and cleaner when we make contact with docks or other boats.
For ease of boarding we designed the bow on Mobli such that we can butt the squared off bow fender up against a dock or the end of the Swim Platform on Möbius and then use these two very solid handrails for maximum safety for those getting on/off.
Prior to leaving the Antalya Free Zone back in May, Christine and had installed the Castoldi 224DD Jet Drive into the hull so she is watertight but I ran out of time during the launch and so I just set the 110HP Yanmar 4JH4-HTE engine in place on the engine beds and covered her up until this week.
So for the past months since launch, Mobli has been patiently waiting in her chocks on the Aft Deck for some time and attention to get her sea worthy too. You can see how Mobil has been designed for a Goldilocks close fit on the Aft Deck and by putting her at an angle the weight is kept very close to the centerline of Möbius and does not cause much heel when onboard. What little listing there is we can easily compensate for by moving a bit of our potable water to tanks in the other side using the built in water transfer pump system. We designed the engine bay lid to hinge up and out of the way to provide maximum access all around when open and then fully sound proofed when closed. Once I get the engine fully installed I have the sound insulation foam to install on all sides and the underside of the lid to keep Tender nice and quiet when underway, just like her sibling Möbius. Our decision on the whole jet drive propulsion system became very easy when we discovered that the Castoldi 224DD and Yanmar 4JH4-HTE were available as a total propulsion package that came with everything needed including all the wiring harnesses, hydraulic steering, dashboard instrumentation and switches, CentaFlex coupling and Transmec Cardon shaft, wet muffler, etc. I’ve been most impressed with the completeness of this single package and will help to make the installation much more trouble free. If you look at the drawings above you can see how the CentaFlex flexible coupling on the left, bolts to the Yanmar’s flywheel and then the Transmec Cardon shaft on the right, bolts to that at the front and then the Castoldi input flange aft. Here are all those parts in real life and one of my tasks this week was to work out the correct length and alignment of this drive train so I could then do the second job of bolting the 4 motor mounts on the Yanmar to the 20mm thick AL engine beds you can see them resting on here. A slightly different and closer view for you. The CentaFlex coupling helps to eliminate any vibrations and provide a smoother coupling of the Yanmar’s power to the jet drive. You may recall seeing a much larger version of this same kind of CentaFlex coupling that connects Mr. Gee to the Nogva CPP gearbox. so nice to keep it all in the same family. Once I had the fore/aft position of the Yanmar worked out, the next very important task was to align the output flange of the Yanmar flywheel to be precisely the same as the input flange on the Castoldi. It is a bit tricky and time consuming as you need to align the centerline of the Yanmar’s crankshaft to the input shaft of the Castoldi. As such, you need to measure and adjust the Yanmar in all six degrees.
I clamped the aluminium flat bar to the face of the Castoldi flange and uses this as my horizontal and then rotated 90 degrees to be the vertical reference points from which I could measure to the machined surfaces of the flywheel and bellhousing. Additionally, I needed to get the two centerlines to meet up and so I came up with this magnetic pointer that I could attach to the center shaft on the Castoldi and extend that to the centered hole in the end of the Yanmar’s crankshaft. A ways out as you can see here so then I adjusted the rear two motor mounts down a bit and the front two up a bit to tilt the engine downwards until the pointer was dead centered. Of course this now puts the vertical alignment out of whack a bit so you have to go back and reset those and around you go till you get them all just right. Once I had everything aligned I could centerpunch the locations for the two bolts that fasten each motor mount to the engine beds and drill them out for the 10mm hardened steel bolts.
Of course Mr. Murphey was on the job with me as always and to be able to get the drill into three of these bolt locations I had to lift and shift the engine out of the way which meant that I then had to go back and redo all the alignments! Finally all done with mounting the engine and time to prep the CentaFlex Coupling and the Cardon shaft to be installed next. As the weekend slipped away, all I had time for was cleaning up and painting the drive components and getting them all safely stowed away for the next two months while we are away. When we get back in December I will finish installing them and the drive system will be all good to go. Then it will take me some time to install all the steering, control panels, hydraulic lines, starter batteries, throttle cable, wet exhaust system, etc.
Looking forward to getting to all those jobs when I return and then being able to launch and test Mogli to see how she performs. Launching will also require me to rig up the Davit Arch in order to launch Mobli so be sure to stay tuned for those updates as they start to roll out when we get back to Turkey in December. That is about it for actual work on Möbius this week as I will be busy for the next few days before we fly out on Wednesday, getting Möbius tidied up and ready for the arrival of the wetter rainy months of winter here in Antalya. I will do my best to post a brief update just before or after we fly out.
Thanks so much for joining us on this grand adventure and don’t forget to add your comments and questions in the “Join the Discussion” box below.
After the novella that I turned last week’s post into I will change the pace for this week and write about something else I get asked about a lot and that more people can likely relate to than last week’s Tech Talk deep dive into fuel maps and CPP props. And a lot shorter!
Hope you enjoy and let me know in your comments either way.
Green Grass Prototyping
In one of my former lives I was a drafting and CAD teacher and in the architecture classes I taught I showed my students the value of what I referred to as the “Green Grass” approach to prototyping.
I took this title from a practice that I had first run into when I was attending the University of British Columbia in Vancouver and they were doing some major construction projects on this hugely awesome 400 hectares/1000 acres campus. When it came time to put in the many sidewalks and pathways around the campus rather than do the typical set of engineering studies to determine minimum walking distances, foot traffic density and the like, they instead just planted all these areas in grass for the first year. After being used that first year they went back and simply put in sidewalks and walkways on top of all the well trodden pathways had been made by all the people walking on them for the past year. I thought this was a brilliant method that I admired for its humbleness of seeing that the users were the true experts and that “we is smarter than me” type of approach. I have gone on to use this approach for the rest of my life and applied it conceptually to most of my many “build” projects over the past 50 years, the latest of which is the design and building of our new boat Möbius. Hence this week’s title. Seemed all quite apropos that I should come across this perfect example on my walk to the bank yesterday in the small town of Finike Turkey where we are currently docked and working on Möbius at the Setur Finike Marina.
Pretty clear proof that the civil engineers who did this recent renovation miscalculated and forgot to put in this section of walkway that more people than me thought should be there! I find this Green Grass Prototyping to be one of those concepts that is so simple and easy to understand, yet ever so smart and powerful. I thought it was worth writing about both because I get a lot of related questions about some of the ways we have used this on Möbius and I also hope that it is a concept than many of you will find useful and powerful in some of your own projects. Here are a few examples we have right now on Möbius.
Shading & Cooling of Super Salon
After living aboard for over seven months now, we are eXtremely pleased with the 360 degree views we have through the 26mm/1” thick glass that surrounds the SuperSalon or Pilot House. It is a thrilling place to be both day and night. We knew that all this glass would require some additional attention to control the heat coming in from the sun as well as the heat going out at night and we have quite a few options as to how to control both of these. As with most parts of boat design it is all about juggling the various pros and cons of each option and deciding which one will be the just right, just for us, Goldilocks choice. In many cases this is exacerbated by the fact that in order to evaluate many options you need to live with it for awhile and experiment with different arrangements before you will know how each possible solution works and how well it does or does not fit you. For controlling the PH windows we have options that include applying some of the amazing new films that are being made, using blinds on the inside or using shade cloth on the outside. This is where the Green Grass prototyping really shines and so we have been applying it to the shading of the SuperSalon glass. For the past few months we have had this nylon mesh garden shade material draped around the sides and front of the SuperSalon. We bought a 20m length of 2m wide shade cloth that is readily available from home improvement and hardware stores as it is used extensively for everything from shaded overhangs on cafes to semi-privacy screening on link fencing.
And I used some of these plastic spring clamps in my Workshop to clamp the unused width of the cloth to the AL pipe handrails running all around the roof overhang.
This has been working really well as it allows us to lift it up out of the way entirely in a few seconds and so we can experiment with how much of a difference it makes in the morning vs afternoon sun, etc.. One of the unexpected things we’ve learned is that in addition to reducing the amount of UV and sunlight getting through the glass, this draped material keeps the glass itself much cooler and also forms a bit of an air insulation pocket in the large space between the cloth and the window glass. Being loose and not attached at the bottom seems to also help in that there is a natural breeze blowing through this space keeping it from trapping hot air inside. It looks completely blacked out from the outside but when you are inside there is still reasonably good visibility so you know what is going on around you. Still early in our prototyping phase with this but our current thinking is that we will still likely go ahead and put in some film on the outer surfaces that will reduce the UV and heat transfer without adding much tint or colorization. But we think we will also do a more finished installation of this shade cloth by putting in some tracks or fasteners around the top and bottom and sewing up a strip of the shade cloth to attach to these. Right now we are enjoying the HUGE difference this has made to the inside temperatures in the hot up to 40C/105F we’ve had this summer.
SkyBridge Furniture
Another place where we have been applying the Green Grass approach is with the furniture in the large area up in the SkyBridge. We purposely left his large area open and then Christine found some inexpensive patio furniture that fit just right into the dimensions of this area. It is all loose and easily moved about so we are trying out different configurations of these furniture pieces for a month or so at a time while we enjoy it each breakfast and evening sundowner’s. We pay attention and talk about what we like, what’s working, what’s not with each configuration and I will use these when it comes time to build in a more permanent solution. A good example of where this prototyping really pays off is that I’ve realized that the AL frame running around the circumference of the windows where they transition from fixed tinted glass to removable panes of clear acrylic, ends up being at the same height as our eyes when we are sitting down. This gets in the way as you are looking out and showed us that we will want to install a raised platform for this area where the furniture will sit. This will also make it easy for me to convert the table to a pedestal style that can be raised and lowered and will give us some easy to access storage under the platform. I will build a prototype of this platform as well using PVC pipe and fittings for a framework and some plywood for the raised floor so we can Green Grass the platform as well and figure out the best shape and height.
Media Filter v2.0
I’ve also been doing some Green Grass prototyping with the media or sand filter that does the bulk of the work filtering the sea water being pumped into our Delfin 250L/hr watermaker.
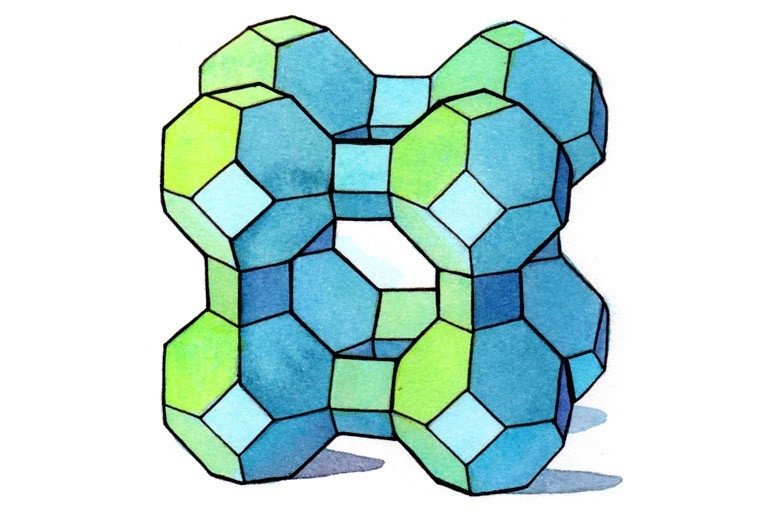
Apparently my first attempt with this plastic tank pool filter wasn’t quite up to the job as the 45PSI feed pump pressure proved too much for the seam and it split. So I found a more robust model that I could get shipped in here which is no easy task let me assure you, and spent 2 days getting this bad boy installed. As you can see it is wrapped in glass fibre to withstand much higher pressures. Unfortunately the only size that would fit moved the six position valve (black plastic bit on top of the white watermaker) from the top to the side so it took me a bit longer to figure out how best to re-route all the hoses and get everything to fit. It was close but I ended up being able to get it to fit just nicely behind the Blue filter body and still allow me to see the various pressure gauges I have on the plumbing and to fit all the hoses coming in and out. The low pressure (45 PSI) Feed Pump first pushes the sea water from the sea chest through the Blue media filter which removes almost all of the algae, dirt, etc. and then it goes through the 25 micron filter on the Right here before going through the final 5 micron filter. All in all it worked out very well. These media filters are not commonly found in marine Watermakers but they really do dramatically reduce the amount of filter cleaning and maintenance. Without one of these I would typically need to clean each of the 5 & 25 micron filters before each use and replace them about once a month. In my previous boat, adding a media filter reduced this to changing these two filters about once a year and even then they were still very clean. Inside the big Blue filter body, I first fill the bottom 10cm/4” (similar to the “Grade 2” in this illustration) with crushed rock about 20mm / 3/4” in size These rocks cover the spokes or laterals in the bottom of the filter and prevent the mesh surfaces from clogging with the sand above. Super simple in operation, no moving parts, the water enters at the top and the water pressure pushes the seawater through the full height of the sand and then exits out the bottom outlet. Rather than typical pool sand, I use what is called Zeolite which is far superior to regular pool filter sand in that it traps MUCH more and much finer particles and it cleans out much easier when back flushed. From what I read Zeolite is a natural mineral formed millions of years ago in volcanic ash flows that settled in seas and lakes. Zeolite a filtration area of about 1,000 times greater than sand media beds and the key to the truly amazing performance of this all natural Zeolite is in its molecular structure which looks like this. Much more surface area to trap finer particles in much higher volume than grains of sand. After each run of the watermaker it takes me about 3 minutes to backflush the media filter with fresh seawater by simply moving the handle on the filter valve to “Backwash” and then about 30 seconds at “Rinse” and it is all clean and ready for the next run.
The mechanical pressure gauges and Maretron pressure sensors make it easy for me to monitor any clogging of any of the filters and know which one is clogged.
I could argue that fresh water is ultimately even more critical than diesel fuel for us in order to live the completely self sufficient and eXtremely remote life style we do, so having these extra layers of filtration and dramatically lowered maintenance tick of all four of our SCEM priorities of Safety Comfort Efficiency and Maintainability.
Self Sufficient Freedom
This is especially relevant when we are at the very tiny remote islands we so enjoy which often have very limited fresh water for themselves. This is one of many favorite such spots we’ve been to, here in the Lau Group of islands in Fiji with a total of about 120 residents ashore when we were there in 2015. In several instances in our past experiences our watermaker proved to be quite the relationship builder wherein we were able to add value to the lives of those ashore by providing them with more fresh water rather than showing up wanting to take it from them to fill up depleted fresh water tanks onboard. This is the Aur atoll in the Marshall Islands when I was there in 2012.
Having a watermaker is also a key factor in our #1 benefit of this lifestyle which is Freedom. Without a watermaker, passage making boats often have their schedules dictated by the range of the supplies they carry. This applies to electricity needing to recharge batteries with shore power, diesel fuel when your tanks are too small to allow greater range and to fresh water as I’ve outlined above.
Being able to make all the electricity and water we need and having enough fuel that we only need to fill up about every 18 months allows us to travel the world with an eXtremely clean and minimal wake of disruption of the world around us.
It means that when we reach our next destination we have no demands often constrained shoreside resources and no stress from desperately seeking more water, fuel or electrical power.
Freedom indeed!
Thanks for joining me again this week, hope it was enjoyable and you learned something. Please add your comments, what you learned, what you are still curious about, in the “Join the Discussion” box below.


 Easily one of the most used and most important areas for our day to day live in Lance and our 10,000 + mile “maiden voyage” this past summer proved that our design worked well as we used it during that two month test drive. We prioritized large areas of open countertop, dual deep sink, induction cooktop and large fridge and freezer and you can see the basic layout from the 3D model screengrab here.


 Underneath both countertops it is all drawers as we find these much more efficient to use than cupboards and overall we have more than 20 drawers inside of Lance.
  I have always preferred dovetail joints for all drawers given their superior strength that stands up for decades of use and I think they look great too and so that’s what we went with for Lance. I was going to do this all myself but with almost a hundred dovetailed corners to do and SO many other jobs demanding my time and attention I decided to job this out. I found a fabulous company to work with called Barker Doors who offer a service using CNC (Computer Numeric Control) machines to custom cut all your drawers. I had all the drawers fully modeled in Fusion 360 so it was easy for me to send them these files with all the exact measurements I needed and they cut all the 5/8” Baltic Birch plywood to size for all the sides and the bottoms and then CNC cut all the dovetails.
  They shipped all the pre-cut drawers to me as flatpacks like this so the whole shipment of all the drawers was not too large and they were all very well shrink wrapped and carefully boxed up so they arrived with no damage at all.
  They also offered a great prices on the the top quality Blum undermount ball bearing drawer slides I wanted so it all came as a single order which made my life easier.
 Mounting more than 40 drawer slides to the XAL framework was very straightforward but time consuming to get them all exactly parallel and lined up.
  and some required a bit of Houdini moves to hold in place and tighten up.
  Next, I set up a little workbench on top of the PS Galley counter to assemble each drawer.
  Each set of dovetails only required a few drops of wood glue and they went together very well with two bar clamps and some taps with my little hammer to get the joints to fit together all the way. The dovetails were so precise that every drawer went together perfectly square and were solid as a rock.
  The Blum drawer slides required two slots in the bottom of each rear drawer side so I cut those out next and then I mounted to the Orange locking hardware to the bottom of the front corners. These are where the drawer slides clip into the drawer and make it very easy to lift out a drawer at any time. It’s a great system!
  Installing each drawer was now a simple process of pulling out each drawer slide……….
  ………… setting the pins in the rear of each drawer slide into the corresponding holes I had previously drilled and pushing them closed till they clicked in place.
  Et Voila! We’ve got drawers! Sad to say that I wasn’t able to get this done before we left on our big summer adventure so we REALLY appreciate having these now!
  I wanted all surfaces of these drawers to have a tough durable finish and decided to go with this two part Rubi Monocoat finish that you put on by hand with cloths rather than brush or spray. Hand rubbed finishes have always been my favorite and while this was a new one for me I was eXtremely pleased with the end result and the whole process of applying it.
  It was a bit laborious and a good workout but a very satisfying process for me.
  Difficult to see in photos but the Baltic Birch plywood came out with a glowing warm colour and a very tough finish that is also very easy to reapply in the future.
  To reduce the loss of usable space under the sinks I used these low profile P-traps which have turned out to work very well.
  and only required a small cut out on the rear of the two under sink drawers to clear nicely.
 For lighting, I decided to use COB (Circuit on Board) LED strip lights which I set inside lengths of 20mm wide black aluminium U channel which I ran in between each of the White PVC ceiling planks. I like these newer COB strips for two reasons; they provide an uninterrupted line of light rather than individual points of light in the regular LED strips and they can be adjusted from about 2200K (very warm amber) up to 6500K (daylight white).
  Once I had the layout done and the strips of PVC and AL channel cut to length, the process went quite quickly. I could apply the construction adhesive to each plank and AL channel and press them up into place and then use my super handy cargo jacks and some scrap lengths of XAL to press these all up against the ceiling so they ended up flat and aligned.
  You can buy the COB LED lights in 20 meter rolls which you then cut to the lengths you want and solder three wires to the copper strips underlying the Yellow COB light strips. Takes a bit of practice to get these tight solder joints without any cross connections but all went pretty well after a few practice solders.
  Then I twist the wires to help reduce any electrical interference and slide a clear tube of heat shrink tubing over the joints and shrink them in place for a nice clean and protected connection.
 I purchased the Black AL channel with frosted clip in covers so once I had the COB LED light strips glued in place and wired up …………
  ……………. I could now press these clear covers in place.
  Here’s the result at about 6000k. These LED light strips are also fully dimmable so you can adjust both the colour temp from warm to cold white and from off to full almost daylight brightness.
 We are very pleased with the end result.


 For those interested in the details, this is the make and model Mini-Split we decided on. It is a 9k BTU capacity “Pioneer Diamante Ultra” that is one of the most efficient models they make rated at 23.5 SEER for those who know that system. These type of two part aircon/heating systems are referred to as Mini-Splits because they consist of two parts; the outside condenser/compressor and the inside air handler evaporator.

 Back to the Mini-Split install, this is the wall mounted interior evaporator half of the system and I mounted this Air Handler above the entry door on the front passenger side of the Hab. Works out well as you can see being almost the same width as the door. There are moving louvers with one large one running across the bottom that you can see partially open here that distributes the cold/hot air up/down vertically and then inside are a set of other smaller louvers that move back and forth sideways and help move the air left and right. So this location works out very well for the heating/cooling of the interior air and yet keeps it from blowing directly on us when we are at the Settee or in bed.
  As you might have noticed in the earlier photos, I had to cut away part of the upper stair in the entry to fit this top right corner of the exterior half or condenser/compressor. Once I had this all solidly bolted in place to the frame of the Hab underneath (see that May post for details if you’re curious) I finished it off by building a little “cage” using extruded aluminium and some aluminium diamond plate that I had left over from cutting out some of the original ambulance cabinetry. Also added some insulation to keep the other heat/cold from getting into the Hab.
  The 6mm diamond plate slid nicely into the T-slot grooves of the extruded Aluminium or XAL as you can see here.
  All these interlocked plates and XAL turned this into somewhat of an Origami project as I needed to be able to slide some of those plates out to get inside to connect the wiring and refrigerant lines but I was quite pleased with the way it turned out in the end and still functioned well as our entry stairs.
  I chose the 240V model as it is a wee bit more efficient than the 120V versions and I designed our AC system that I’ll cover in more detail in a future post, to be a Split Phase system so it provides both 120 and 240 Volt power.
 Looking inside the entry door, the drawers on both sides of the Galley are 24” deep but the countertops are 32” so there is a nice space behind the drawers when they are closed.
  This is the space behind the bottom drawer on the Left side of the stairs as you enter and I drilled a 2” hole through the vinyl flooring, insulation and aluminium floor of the box. The Pioneer unit came with the white PVC insert to protect the copper line set and the white cable is the 240VAC power and the black is the communication cable between the two halves of the Mini-Split.
  Up above I drilled two overlapping holes in the solid Acrylic countertop, which is fabulous stuff to work with BTW, and ran the electric cables and copper line sets through this. The copper lines in the interior evaporator unit come permanently fitted and they ended up just above the countertop height so I cut the new copper lines and installed new flare nuts that allowed me to connect them here and then run down into the compressor/condenser unit under the floor.
  The upper parts of the line sets gets covered with this black EPDM insulation and the corrugated clear hose is where the condensation produced by the evaporator drains out and down through the floor onto the road below.
  To protect and hide all these lines and cords I built a small vertical connector between the countertop and the overhead cabinet you can just see at the very top of this photo. The sides will soon be fitted with Cherry panels same as all the fronts of the doors and drawers that will be the topic of several other future posts.
  I
I Most importantly, Razz and Zoe use this new little upper step for their water bowl and so they give this new addition two paws up!


 The aluminium frames are all 2 inch (50mm) square AL tubing that is 1/8” (3.2mm) thick and then this is “skinned” with continuous sheets (no seams or joints) of 10 Gauge (3mm/0.10”) thick aluminium.
  This shot of the upper rear DS (Driver Side) corner will give you a bit of an idea of just how well reinforced and strong this box is.
  On the DS (Drivers Side) there are three of these compartments; two tall ones on the front and rear corners and then a very wide one midway along the DS with double doors.
 All of these externally accessible cabinets are made from 3mm / 1/8” thick diamond plate Aluminium which makes them very strong and fully sealed off from the interior.
 The compartment on the Front PS corner is in orange here because it was built as an independent AL framed cabinet framed which will be removed and replaced by AL cabinetry I will be building to house the full size fridge/freezer as well as additional storage via the external door (not yet in this model)




 Seen from the PS Rear corner in bed time mode.
  Bed removed this top view might provide a bit more perspective.




Recent Comments