Hope all my American friends and family are wrapping up a great US Thanksgiving weekend. Christine has been back in Ft. Lauderdale for the past ten days enjoying some much needed Gramma time with our TEN year old Grandson Liam, seen here with his Dad Tim working on a new puzzle. As well as visiting dear friends of many years like Kathleen. Lucky me, while I can’t be there this time I often get to spend time with BOTH of these Gorgeous Galls. The pups and I have been holding down the fort here on Road Runner Ranch in Southern Nevada where the temps have started to drop and so Razz has taken to sunning himself on the solar panels for some extra warmth and seems like a good segue into today’s Lance progress update post on ……………………….. you guessed it; Solar Panels.
Living the nomadic and remote life that we always have, we are big fans having solar power be the primary source for all our daily electrical needs, which are quite extensive. On our boat Mobius we had factored solar panels into the design from the beginning and were able to have 16 large panels on three different roof surfaces on that boat such as these eight panels on the upper Pilot House roof. And here on Road Runner Ranch we have 18 solar panels in two banks, this one just set against one of our 40 foot shipping containers and the others you can see Razz laying on above. These keep our big EG4 Wall Mount 15kW battery charged up every day and running this through our EG4 6000XP Inverter/Charger provides all our electrical power for day to day life here. This is where the time I spent meticulously building Lance in a 3D model using Fusion 360 pays off. I could create a model for each of the different solar panels that I was considering and see how they would fit onto Lance’s roof and on the framing.
With much less surface area available for mounting solar panels on Lance’s rooftop I wanted to fit the maximum amount of solar output as possible and played around with lots of different solar panel models to get the Goldilocks combination that would fit. Over the years I have found it works best to design the overall electrical installation as a complete system because there are a lot of different pieces to this puzzle and they are all very interconnected not just electrically but also features and dependencies. I created 3D models for all of these components as well and you can see most of the components here in the Electrical Cabinet on the front Driver Side corner of Lance’s Hab/Box. There is a LOT to unpack here so I’ll cover the electrical system in a future post and get into all the details then for those interested.
After much deliberation and testing in the model, I decided to go with four SilFab 420 Watt QD panels which I purchased from Current Connected almost a year ago now. I was able to get these all installed this past May in time to help power us on our marathon maiden voyage with Lance driving out to Portland Maine and back this summer. For those interested you can see all the specs of these panels here and of course with the march of time since there would now be even higher output panels but we’ve still ended up with 1680 Watts of solar power and it has been more then enough to keep us fully powered all the time.
We do have additional sources of electrical power such as this 320 Amp 12V 3.8kW alternator on Lances Paccar/Cummins engine that can provide up to 4k of power anytime that engine is running. However on our summer test run I had not completed the installation of the Arco Zeus smart regulator so the alternator wasn’t working that whole trip and the solar kept our batteries filled the entire time so that was a pretty good testament as to how well the solar was working. I decided to use 10 foot lengths of galvanized Super Strut to mount the solar panels on Lance’s roof. I would have preferred to use aluminium Super Strut but the delivery times would not have been in time for me to get the solar panels mounted before our trip so I went with galvanized steel and they have worked out vey well. I laid them out as you see here, two lengths on each side and two down the middle. I added additional 4 foot lengths of Super Strut so that I would have a mounting system for the whole 14 foot length of Lance’s roof for mounting any additional items in the future. I kept the mounting very simple as well by cutting pieces off a length of 2” aluminium L bar, drilling two holes in each one for the mounting bolts, and using the very handy Super Strut M8 threaded inserts to bolt them solidly to the lengths of Super Strut. Quick, strong, simple; what’s not to like?!! I then made up the cables using extra UV rated cables, Red for the positive and Black for negative and crimping the MC4 twist lock connectors that are the most commonly used for solar panel wiring and which I’ve used a lot in previous projects so I have all the specialty tools, crimpers, etc. some of which you see here in the photo. To fasten the brackets to the solar panel frames themselves I inserted aluminium M6 threaded Riv-Nuts into holes I drilled into the vertical AL frame on the solar panel and then used this tool which compresses the threaded inserts and locks them to the frame. End result looks like this. One bolt vertically to fasten to the Super Strut and one horizontal to bolt into the solar panel frame.
For those wondering, I fastened the lengths of Super Strut to the roof using Loctite 8X PL Premium Fast Grab which is supposed to be 8 times stronger than traditional construction adhesives which I’ve used before. Probably overkill but you certainly don’t want solar panels flying off the roof when running down the highway at 70 miles an hour! To prevent any pooling of rainwater between the surfaces of the roof and the Super Strut I caulked all the edges with 3M marine sealant which I have LOTS of experience with on our previous boats. So everything fully sealed and eXtremely well fastened to the roof. Solar panel output drops off significantly with the rise in temperature of the panels, the irony of which isn’t lost on me, so I left this 4” gap where the two panels down each side meet up. This along with the 2+ inch space between the panels and the roof keeps them as well ventilated as possible and the efficiency of their output was very good even in the 40C/105F days we had several times on the trip AND while I was installing these panels! Talk about a cat on a hot tin roof! Ouch! To make it a bit easier to run the cables AND give me a wee bit of shade, I was able to remove the inner brackets and use the outer ones like a hinge and prop up one lengthwise pair of panels while I ran the cables. I ran the eight cables for all four solar panels to converge at this point on the front DS corner as this puts it directly overtop of the Electrical Cabinet below where they need to go and thus provides the shortest cable run for least voltage drop. I drilled the only hole in the roof for this but it was a BIG one as you can see and then I used more 3M 5200 to seal a short length of 2” PVC pipe as a safe conduit through the roof for these and all other cables in the future. The red square you see on the bottom is 3M VHB Very High Bond two sided tape which is a fabulous product for gluing almost anything to anything and it never comes off. PVC box now glued down to the roof over that PVC pipe and the cables run non stop down into the Electrical Compartment below.
Each solar panel needs to have a shut off so I used these DIN rail mini circuit breakers to do that and provide over current protection.
I use threaded glands, the black things you see here and above, to give each cable a watertight entry into all junction boxes. This is what it looked like inside the Electrical Compartment where the cables pass through. The output of solar panels is a much higher voltage than the batteries and needs to be regulated to different charging stages to properly charge the big LiFePO4 Lithium EG4 batteries in Lance so the output of the solar panels goes through a MPPT controller which looks after all of this. Although it isn’t common, the most efficient setup is to have a dedicated MPPT controller for each panel and so that’s how I’ve always built our solar systems. Those are the four Victron Blue boxes you see on the upper Right here. It’s a bit of electrical spaghetti and took a bit of time to route and connect all these cables but keeps all the wiring very well contained in the wire ducts like the one running vertically up the far Right side and will have a cap that snaps onto those fingers you see here. Final cabling is to take the output from each MPPT controller and connect them to the main 12VDC electrical bus bars which are the silver coloured bars you see running up on the far Right here. If you look closely you can see two Red and two Black cables connected together at the top and then the other four below so now all the power from the solar panels is connected into the 12VDC electrical circuit.
And here’s what Lance’s 1680 Watts of solar roof looks like.
The extra length of Super Strut has already come in handy for my temporary for now mounting of our Starlink dish and the 4” PVC tube running down the middle for storing long lengths of material I like to have for ongoing projects while we’re on the road. Go ahead and tell me you’re surprised?!?!
Did I mention that we LIKE solar panels???
And that wraps it up for this weeks progress update, hope it was informative and enjoyable and let me know what you think in the “Join the Discussion” box below.
As this recent holiday has reminded me I am indeed one eXtremely fortunate fellow with SO much to be thankful for, not the least of which is YOU, for the time you choose to take out of your busy schedule to read and comment here and join us on this latest adventure of the Ambo Nomads.
I’ll be back again next week with the next installment and hope you’ll join me again for that.
Ciao for now,
Wayne and “Sunny Boy” as he tells me he now likes to be called.
As predicted when I left off in the last update here, it has been a VERY BUSY time the past month for us but we’ve made the move and are now settling into our new Southern Home Base down near Searchlight Nevada.
There are some photos and details about our new 10 acre property in that PREVIOUS POST back on Dec. 8th so you can check that out if you’d like and I’ll just pick up from where we left off.
BONUS: Be sure to read to the end to see the bonus video that Drone Captain Christine put together.
Our son Skyler flew down from Vancouver BC on the 23rd of December to join us for the holidays in Klamath Falls and he was a HUGE help getting all my tools, equipment, materials and such packed up from the workshop I’d set up in Klamath Falls. Along with our personal belongings and food we managed to get everything loaded into Lance and the beds of the two pickup trucks we now find ourselves with.
We were a bit sad to leave as we had really enjoyed our time getting to know Klamath Falls and the surrounding area of southern Oregon. This is the parting shot just after noon on Boxing Day (Dec 26th) as we bid a very fond adieu to what had worked out to be a great home and workshop and hit the road for the almost 700 mile drive down to our new Southern Home Base just north of Searchlight NV. We broke the trip up into two legs with an overnight stop in Fallon Nevada and it turned out to be a great drive with clear dry roads after we got about a hundred miles south of Klamath Falls and enjoyed the ever increasing temperatures as the miles rolled by. We arrived at the property late in the afternoon of the 27th with big smiles for all three drivers and both pups. And just in time to catch this beautiful sunset which we’ve now discovered is most every night here.
Christine has been getting her drone flying skills dusted off and this shot she grabbed a few days ago from up above the spot we’re setting up to live on for the next few months will give you an idea of the layout. Those two big white rectangles are 40 foot “High Cube” (9’6” high) shipping containers that came with the property along with a lot of great items inside that you’ll soon see. The other white rectangle is the 2012 25 foot travel trailer that will be home for us for now.
** See the Bonus drone video at the end. As Skyler and I unloaded the crates of our belongings and coolers of food, Christine got to work storing it all away and organizing our new home. As sharp eyes might notice, she even baked a loaf of banana bread! Looking aft in the trailer you can see that we’ve got everything we need with a nice U shaped settee and an adjacent full bathroom & shower. Then a separate bedroom in the rear with a Queen bed and even an office for Christine to work at just out of sight in the rear left corner here at the foot of the bed. And check out our views out the windows! This floorplan helps to show how the bedroom & settee are in a slide out section along the right side of the trailer that really helps open up the space.
Keeping in mind that we are both used to living full time in boats, for us this is HUGE!
Skyler started unloading all the crates and materials from Lance and I started to figure out where to put them for now in the two containers. The one you see here on the Left will be my workshop area and the other one out of site in this photo over on the far Right closer to the trailer provides storage for everything else AND houses all our fresh water and electrical power equipment that allows us to live 100% off grid. Could not have been a better present than all the time we got with Skyler and all the hard work he so cheerfully gifted us with to make this latest transition of the Nauti Nomadic Grandparents so memorable. Thanks Sky!
It will take me awhile to build workbenches and storage racks but for now all my tools and equipment are very safely stored away inside the two containers.
Part of what made this property such a Goldilocks just right find for us was that one of the things inside the containers was sixteen 305 Watt solar panels and so Skyler and I got to work setting those up in two different locations to try out for now. Eight of those solar panels we propped up against the wall of the container as you can see here which made it a short run for the power cables to go into the MPPT controller inside. Of course the HIGHEST priority was getting the new Puppy Play Pen set up for Zoe and Razz to enjoy. The other eight solar panels we propped up against the south facing side of the trailer to try out that orientation as I monitor the daily production to see what generates the most power to keep our big new battery bank fully charged every day.
All very rough and tentative till we live with all this for awhile and decide best location on the acreage to build on and then I will build proper ground mount racks for all these and perhaps more solar panels. In that previous post you may recall seeing this pallet full of boxes that had arrived at the Klamath Falls workshop which contained the other two key components of our off grid power system. this 15 kWh 54 Volt upright EG4 lithium battery and ………. …….. this EG4 6000XP all in one MPPT solar charge controller, inverter charger.
The battery weighs a svelte 128kg/282 lbs. but Skyler and were able to get it wrestled out of Lance and into the container and get the 6000XP mounted above it and all secured to the steel walls of the container. These two smaller vertical boxes I mounted on on the side at the mid point are the isolation switches and circuit breakers for the high voltage power coming in on the Red and Black wires you see here which come from each of the two strings of solar panels (8 panels in each). We soon had everything wired up and in this shot I’m busy configuring all the settings before turning it on for the first time. Just amazing how far these kinds of off grid systems have come and we were able to go from no power at all when we arrived to having a full 240VAC split phase power system in less than one day. We had about 190L/50 USG of fresh water that I had filled up the trailer’s water tank with on my way bringing it back from where we bought it in Tucson so we had plenty of potable water for drinking, cooking and showers the first few days but now time for a more full time setup and another part of what made this property such a great find for us. These four 1250L/330USG IBC Totes as they are called (Interim Bulk Containers) also came with the property along with a fifth empty one that we’ll use in the future to bring more fresh water from the town water system in Searchlight that is just a few miles away. The pumps you see at the bottom here are now all set up to provide pressurized fresh water to a tap on the outside of the container and a hose from there to the trailer provides all the fresh water we need for day to day living.
It will take us a bit longer to get everything setup and be able to get back to working on books and Lance but we’re off to a great start and new year.
Can’t be all work and no play so in the midst of all this we also took time to celebrate the new year in our new home base. Christine and I adopted giving “experiences” rather than “stuff” to each other for gifts and this year I got us three tickets to go see the “Immersed in Van Gogh” experience in Las Vegas on New Year’s Eve which is less than an hour’s drive north from our property.
Then Christine had rented a boat for the three of us to go out on Lake Mohave for New Year’s Day. This shot is looking about due East from our place and off in the distance about center (click to expand any photo) you can see the Colorado River flowing South. Hoover/Boulder Dam is to the North and Davis Dam to the South which creates Lake Mohave in between. It only takes about 15 minutes to drive from our place to the marina on Lake Mohave. I will leave you with this shot of what our humble new abode is looking like with yet another super sunset that Christine loves to photograph.
I know many of you are shaking your heads and wondering what drew us here but perhaps these two days with New Years eve in Las Vegas and then New Year’s Day out on the lake both being minutes away from our otherwise eXtremely remote spot might help you understand a wee bit better what makes this such a Goldilocks place for us.
Location, location, location right??!!
BONUS VIDEO:
As promised, here is a short video that Christine has put together as she dusts off her drone flying skills for this quick flyover what we are thinking of calling “RoadRunner Ranch”. Although we have not yet spotted one here yet I hope this quick flyover part of our 10 acres will help you visualize this location and maybe help you see what we see. In any case do enjoy and thanks Captain Christine!
Hope all of you have 2025 off to a great start as well and I’m looking forward to getting back to regular updates in the next few weeks as I get my new workshop up and running and get back to working Lance. Thanks for joining us on yet another adventure and please leave any questions or comments in the “Join the Discussion” box below.
When we left off in the last update, we had arrived in SXM aka Saint Martin (France) or Sint Marteen (Netherlands) on Valentine’s Day. We anchored for the night on the south side in Simpson Bay (Red on map) and then headed inside to the large “Great Pond” lagoon through the Bridge on the Dutch side, then over through the Causeway Bridge to where we have been anchored ever since.
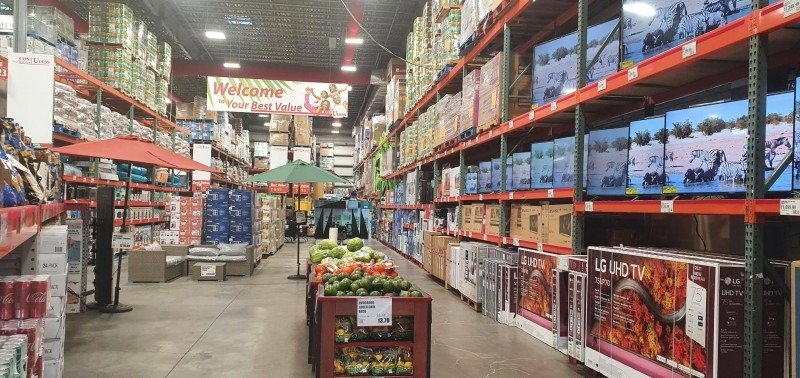
We are anchored about equidistant from the dinghy docks on the French side to the North and the Dutch side to the south so our location has worked out well and we’ve spent time eXploring SXM by foot and pretty much circumnavigating this fascinating island by rental car. SXM is home to many super yachts as well as being a popular tourist destination so we have been enjoying the largest supply of groceries, marine supplies, postal services we’ve had since arriving on this side of the Atlantic. There is even a Costco-like Cost U Less which was a bit overwhelming for us but we recovered long enough to stock up on wine, meat and groceries. And as if that wasn’t enough, next door was a very large French based Carrefour store as well so Möbius is now very well stocked up. On our drive around the island we eXplored some of the smaller town that dot most of the coastal roads. Up on the North side we found this spot right on the water and enjoyed a good BBQ lunch in the soft trade wind breezes while watching the boats anchored out in front.
Starlink Internet has arrived on Möbius!
As you can see from the smile, the BIG news aboard Möbius is that we have now joined the Starlink community! Christine spent a LOT of time figuring out the rather complex logistics of just how and where to get this satellite based internet solution registered and sent to us and SXM was her choice and it arrived without too much complication on Friday. For those who may not know, Starlink is a relatively new way of getting a pretty fast internet connection via a constellation of Low Earth Orbit LEO satellites launched by Elon Musk’s SpaceX company. This enables us to now have a solid internet connection from pretty much anywhere we wander and anchor in this awemazing world of ours. For nomadic people like us, this is an eXtremely BIG deal! You might think that such an advanced new solution would be very complex, but you’d be wrong. There are really just two parts, the dish itself, apparently officially called “Dishy”, that goes outside on the supplied mounting stand and then a wireless router which goes inside. Only two wires required to complete the setup, one being the power to the router which for now we are using 240V AC but will change to 24V DC in the future. And then a second cable to connect Dishy to the router. Dishy has a set of motors which automatically move the rectangular dish for the best direction to capture the most satellites streaming in the sky above which is mostly North in our current location. The aluminium stand nicely jammed itself between the handrail and the triangular walls of the front of the Salon roof so I have set Dishy up there for now. We will bring him inside when we are on passages until I decide how and where to mount him more permanently. Given that Möbius will sometimes be at all 360 degrees of the compass, I will be doing a “hack” that will remove or disconnect the alignment motors and allow me to mount the dish flat and solid most likely up on the front of the SkyBridge roof. This solid flat mount should be much more robust mount and long lasting. It turns out that with more and more satellites being launched and with so many nomads like us in RV’s and boats, some bright minds have figured out that because the phase array antennae inside Dishy can pick up satellites in about a 100 degree wide cone above, the dish will work very well when permanently mounted flat. Seems too good to be true but there are enough other nomadic Starlink users who have done this and kindly shared their setup on blogs and YouTube videos, I’m quite sure this will work fine for us. Starlink has also done an eXcellent job of creating an app that allows you to setup your system in a matter of minutes which was also very impressive. Once I had Dishy mounted and temporarily ran the cable back inside the boat to the router, it took less than 5 minutes to have it all working and record this quick speed test that is built into the app. We’ve now been using this new internet connection for the past three days and so far we are both very pleased. The app also has a full set of stats that it records and we can see that there have been some brief outages but so far nothing that we have notices performance wise when using the connection for streaming, Email, web searching, etc. I will track and update our performance, use and modifications to our new Starlink setup and share them in future posts so stay tuned for more.
Meanwhile, back in Wayne’s World….
Much less exciting update is that I continue to make progress on getting Möbius more and more seaworthy and working my way through the always growing job list. Our Bosch washing machine stopped working part way through its latest cycle and I spent several hours trying to figure out why without much success so far. Unfortunately and like most modern washing machines it seems, they are all now “smart appliances” with everything run by LED touch screens and automated sensors that shut things down as soon as they detect a problem.
All well and good except that once they turn off they won’t turn on again until the problem has been corrected so you can’t do anymore diagnosis. Real smart! Grrrrrrrrrrrr
I’ll take another run at it by removing it from the cabinet which takes time but I suspect this will need to wait till we get to a larger country where I can have better choices and options for assistance.
I spent time this past two weeks working on getting our Maretron N2K View monitoring system reporting more and more info on our main monitors at each helm as well as on our phones and tablets. This past week I was finally able to get some of the key engine data from Mr. Gee converted and sent to our N2K View Maretron system so that we can have things like engine RPM, loads, EGT, oil & water temperature, oil pressure, etc. now configured as new virtual gauges on any screen on the boat. This screen is from another boat but will give you an idea of the kinds of gauges I am creating with the N2K View program. It is slow and tedious work, in part because I’m needing to figure out how this process all works and getting all the senders and gauges in synch and talking nicely to each other so I spend a LOT of time staring at fun screens like this, but I am making progress however slowly and should have all of Mr. Gee’s data on these screens by next week.
Solar Panel Roof Update
As many of you know we mounted 8 of our 14 320Wh solar panels on top of the aluminium frame of the SkyBridge roof which has worked out very well. This shot a few minutes ago in the late afternoon so there is some shading on the rear panels from the overhead arch with the Radar and other antennae on it which reduces the output, but we have much more solar power production than we need so very happy with the overall performance. Here is the graph of solar performance for the past 7 days. The solar output is regulated by the MPPT charge controllers as the batteries charge and tapers off till they are fully charged and then stops charging so there is much more solar capacity than we use each 24 hour day and typically our batteries are back to 100% by noon. Looking up from inside the SkyBridge you can see how the solar panels have been attached directly to the AL frames using adhesive/sealant to form the roof itself. The white undersides with a bit of light coming through keeps things very bright but shaded. Unfortunately the sealant/adhesive that was used was not the correct UV resistant required along the ridge line which is fully exposed to the sun and was starting to break down and we had two small leaks inside the SkyBridge in heavy rains. The ridge is the only point of attachment that is exposed to UV as all the other surfaces are between the bottom of the AL frames of each solar panel and the 200mm wide AL roof frames underneath so the majority of the seal was fine. Using a putty knife and box cutter blade I was able to remove all the old sealant along the ridge line joints, clean them all with acetone and then mask them off. I purchased some 3M 5200 which has eXcellent UV resistance in my past experience with it and was able to inject it deep into the crevice running along the ridge where the two solar panel frames butted at a slight angle. Just for added insurance, I masked off the glass about 5mm past the AL frames to add an extra layer of sealant so I think this should now be fully sealed for many years to come.
St. Thomas here we come!
My Weather Wonderwoman aka Captain Christine tells me that there is an eXcellent weather window on Tuesday March 7th and so if the forecasts hold we will pull up the anchor and head out through the French side bridge to the north of us, Green on the map here. This should be a relatively short passage of about 110 nautical miles, 200km/125 miles, and we’ll make this a night passage so that we arrive in St. Thomas with good light the next morning for navigating and anchoring. As you can see from this larger scale map of the whole Caribbean, we will now be turning Westward for the next few passages as we make our way over to the US Virgin Islands, Puerto Rico and then likely continue NW to eXplore the Bahama islands.
Kling a ling a ling
Most excitingly though, we are heading for St. Thomas because our 7 year old Grandson Liam is flying there along with his Mom & Dad aka Tim & Ashley on March 22nd for their first time aboard Möbius! We will have a few weeks to get well setup probably around the East end of St. Thomas and figure out how everything works there so we can maximize the precious time we have with our family.
I will bring you the details of our passage over to St. Thomas in the next update and thanks so much for taking the time to join us once again here as our adventures continue.


 Christine has been back in Ft. Lauderdale for the past ten days enjoying some much needed Gramma time with our TEN year old Grandson Liam, seen here with his Dad Tim working on a new puzzle.
  As well as visiting dear friends of many years like Kathleen. Lucky me, while I can’t be there this time I often get to spend time with BOTH of these Gorgeous Galls.
  The pups and I have been holding down the fort here on Road Runner Ranch in Southern Nevada where the temps have started to drop and so Razz has taken to sunning himself on the solar panels for some extra warmth and seems like a good segue into today’s Lance progress update post on ……………………….. you guessed it; Solar Panels.
 Living the nomadic and remote life that we always have, we are big fans having solar power be the primary source for all our daily electrical needs, which are quite extensive. On our boat Mobius we had factored solar panels into the design from the beginning and were able to have 16 large panels on three different roof surfaces on that boat such as these eight panels on the upper Pilot House roof.
  And here on Road Runner Ranch we have 18 solar panels in two banks, this one just set against one of our 40 foot shipping containers and the others you can see Razz laying on above. These keep our big EG4 Wall Mount 15kW battery charged up every day and running this through our EG4 6000XP Inverter/Charger provides all our electrical power for day to day life here.
  This is where the time I spent meticulously building Lance in a 3D model using Fusion 360 pays off. I could create a model for each of the different solar panels that I was considering and see how they would fit onto Lance’s roof and on the framing.
  Over the years I have found it works best to design the overall electrical installation as a complete system because there are a lot of different pieces to this puzzle and they are all very interconnected not just electrically but also features and dependencies. I created 3D models for all of these components as well and you can see most of the components here in the Electrical Cabinet on the front Driver Side corner of Lance’s Hab/Box. There is a LOT to unpack here so I’ll cover the electrical system in a future post and get into all the details then for those interested.
 After much deliberation and testing in the model, I decided to go with four SilFab 420 Watt QD panels which I purchased from Current Connected almost a year ago now. I was able to get these all installed this past May in time to help power us on our marathon maiden voyage with Lance driving out to Portland Maine and back this summer. For those interested you can see all the specs of these panels here and of course with the march of time since there would now be even higher output panels but we’ve still ended up with 1680 Watts of solar power and it has been more then enough to keep us fully powered all the time.
  We do have additional sources of electrical power such as this 320 Amp 12V 3.8kW alternator on Lances Paccar/Cummins engine that can provide up to 4k of power anytime that engine is running. However on our summer test run I had not completed the installation of the Arco Zeus smart regulator so the alternator wasn’t working that whole trip and the solar kept our batteries filled the entire time so that was a pretty good testament as to how well the solar was working.
  I decided to use 10 foot lengths of galvanized Super Strut to mount the solar panels on Lance’s roof. I would have preferred to use aluminium Super Strut but the delivery times would not have been in time for me to get the solar panels mounted before our trip so I went with galvanized steel and they have worked out vey well. I laid them out as you see here, two lengths on each side and two down the middle.
  I added additional 4 foot lengths of Super Strut so that I would have a mounting system for the whole 14 foot length of Lance’s roof for mounting any additional items in the future.
  I kept the mounting very simple as well by cutting pieces off a length of 2” aluminium L bar,
  drilling two holes in each one for the mounting bolts,
  and using the very handy Super Strut M8 threaded inserts to bolt them solidly to the lengths of Super Strut.
  Quick, strong, simple; what’s not to like?!!
  I then made up the cables using extra UV rated cables, Red for the positive and Black for negative and crimping the MC4 twist lock connectors that are the most commonly used for solar panel wiring and which I’ve used a lot in previous projects so I have all the specialty tools, crimpers, etc. some of which you see here in the photo.
  To fasten the brackets to the solar panel frames themselves I inserted aluminium M6 threaded Riv-Nuts into holes I drilled into the vertical AL frame on the solar panel and then used this tool which compresses the threaded inserts and locks them to the frame.
  End result looks like this.
  One bolt vertically to fasten to the Super Strut and one horizontal to bolt into the solar panel frame.
  For those wondering, I fastened the lengths of Super Strut to the roof using Loctite 8X PL Premium Fast Grab which is supposed to be 8 times stronger than traditional construction adhesives which I’ve used before. Probably overkill but you certainly don’t want solar panels flying off the roof when running down the highway at 70 miles an hour! To prevent any pooling of rainwater between the surfaces of the roof and the Super Strut I caulked all the edges with 3M marine sealant which I have LOTS of experience with on our previous boats. So everything fully sealed and eXtremely well fastened to the roof.
  Solar panel output drops off significantly with the rise in temperature of the panels, the irony of which isn’t lost on me, so I left this 4” gap where the two panels down each side meet up. This along with the 2+ inch space between the panels and the roof keeps them as well ventilated as possible and the efficiency of their output was very good even in the 40C/105F days we had several times on the trip AND while I was installing these panels! Talk about a cat on a hot tin roof! Ouch!
  To make it a bit easier to run the cables AND give me a wee bit of shade, I was able to remove the inner brackets and use the outer ones like a hinge and prop up one lengthwise pair of panels while I ran the cables.
  I ran the eight cables for all four solar panels to converge at this point on the front DS corner as this puts it directly overtop of the Electrical Cabinet below where they need to go and thus provides the shortest cable run for least voltage drop. I drilled the only hole in the roof for this but it was a BIG one as you can see and then I used more 3M 5200 to seal a short length of 2” PVC pipe as a safe conduit through the roof for these and all other cables in the future. The red square you see on the bottom is 3M VHB Very High Bond two sided tape which is a fabulous product for gluing almost anything to anything and it never comes off.
  PVC box now glued down to the roof over that PVC pipe and the cables run non stop down into the Electrical Compartment below.
 Each solar panel needs to have a shut off so I used these DIN rail mini circuit breakers to do that and provide over current protection.
  This is what it looked like inside the Electrical Compartment where the cables pass through.
  The output of solar panels is a much higher voltage than the batteries and needs to be regulated to different charging stages to properly charge the big LiFePO4 Lithium EG4 batteries in Lance so the output of the solar panels goes through a MPPT controller which looks after all of this. Although it isn’t common, the most efficient setup is to have a dedicated MPPT controller for each panel and so that’s how I’ve always built our solar systems. Those are the four Victron Blue boxes you see on the upper Right here.
  It’s a bit of electrical spaghetti and took a bit of time to route and connect all these cables but keeps all the wiring very well contained in the wire ducts like the one running vertically up the far Right side and will have a cap that snaps onto those fingers you see here.
  Final cabling is to take the output from each MPPT controller and connect them to the main 12VDC electrical bus bars which are the silver coloured bars you see running up on the far Right here. If you look closely you can see two Red and two Black cables connected together at the top and then the other four below so now all the power from the solar panels is connected into the 12VDC electrical circuit.
 And here’s what Lance’s 1680 Watts of solar roof looks like.
 The extra length of Super Strut has already come in handy for my temporary for now mounting of our Starlink dish and the 4” PVC tube running down the middle for storing long lengths of material I like to have for ongoing projects while we’re on the road. Go ahead and tell me you’re surprised?!?!
 and “Sunny Boy” as he tells me he now likes to be called.


 Christine has been getting her drone flying skills dusted off and this shot she grabbed a few days ago from up above the spot we’re setting up to live on for the next few months will give you an idea of the layout. Those two big white rectangles are 40 foot “High Cube” (9’6” high) shipping containers that came with the property along with a lot of great items inside that you’ll soon see. The other white rectangle is the 2012 25 foot travel trailer that will be home for us for now.
 As Skyler and I unloaded the crates of our belongings and coolers of food, Christine got to work storing it all away and organizing our new home. As sharp eyes might notice, she even baked a loaf of banana bread!
  Looking aft in the trailer you can see that we’ve got everything we need with a nice U shaped settee and an adjacent full bathroom & shower. Then a separate bedroom in the rear with a Queen bed and even an office for Christine to work at just out of sight in the rear left corner here at the foot of the bed. And check out our views out the windows!
 Skyler started unloading all the crates and materials from Lance and I started to figure out where to put them for now in the two containers. The one you see here on the Left will be my workshop area and the other one out of site in this photo over on the far Right closer to the trailer provides storage for everything else AND houses all our fresh water and electrical power equipment that allows us to live 100% off grid.
  Could not have been a better present than all the time we got with Skyler and all the hard work he so cheerfully gifted us with to make this latest transition of the Nauti Nomadic Grandparents so memorable.
  Thanks Sky!
 It will take me awhile to build workbenches and storage racks but for now all my tools and equipment are very safely stored away inside the two containers.
 Part of what made this property such a Goldilocks just right find for us was that one of the things inside the containers was sixteen 305 Watt solar panels and so Skyler and I got to work setting those up in two different locations to try out for now. Eight of those solar panels we propped up against the wall of the container as you can see here which made it a short run for the power cables to go into the MPPT controller inside.
  The other eight solar panels we propped up against the south facing side of the trailer to try out that orientation as I monitor the daily production to see what generates the most power to keep our big new battery bank fully charged every day.
 In that previous post you may recall seeing this pallet full of boxes that had arrived at the Klamath Falls workshop which contained the other two key components of our off grid power system.
  this 15 kWh 54 Volt upright EG4 lithium battery and ……….
  …….. this EG4 6000XP all in one MPPT solar charge controller, inverter charger.
  The battery weighs a svelte 128kg/282 lbs. but Skyler and were able to get it wrestled out of Lance and into the container and get the 6000XP mounted above it and all secured to the steel walls of the container.
  These two smaller vertical boxes I mounted on on the side at the mid point are the isolation switches and circuit breakers for the high voltage power coming in on the Red and Black wires you see here which come from each of the two strings of solar panels (8 panels in each). We soon had everything wired up and in this shot I’m busy configuring all the settings before turning it on for the first time. Just amazing how far these kinds of off grid systems have come and we were able to go from no power at all when we arrived to having a full 240VAC split phase power system in less than one day.
  These four 1250L/330USG IBC Totes as they are called (Interim Bulk Containers) also came with the property along with a fifth empty one that we’ll use in the future to bring more fresh water from the town water system in Searchlight that is just a few miles away. The pumps you see at the bottom here are now all set up to provide pressurized fresh water to a tap on the outside of the container and a hose from there to the trailer provides all the fresh water we need for day to day living.


 I will leave you with this shot of what our humble new abode is looking like with yet another super sunset that Christine loves to photograph.




Recent Comments